发表于: 2017-11-22 21:49:24
1 717
今天完成的事情:
看spring4.x17章,
@RequestMapping使用value值请求指定的URL
定义在类上提供初步的请求映射信息,定义在方法上则提供进一步的细分映射信息,如:
@RequestMapping("/user")
public class UserController{
@RequestMapping("/createUser")
public String ...(){
...
}
}
http请求报文:

请求方法主要有
get(查询)、post(新增)、put(修改)、delete(删除)
url是请求对应的url地址
请求头部主要是客户端的信息
请求正文承载着请求参数的数据
controller的处理方法返回类型一般为ModelAndView或String,前者包含模型和逻辑视图名,后者仅代表一个逻辑视图名
了解下basedao:

http://blog.csdn.net/kdc18333608478/article/details/52895867
我对basedao和basedaoimpl的理解:在复杂庞大的项目里,肯定有有多个模块对相同的表有相同的基础增删改查操作,通过继承basedaoimpl则无需写同样的代码,basedaoimpl里面就有了,可以省去很多代码
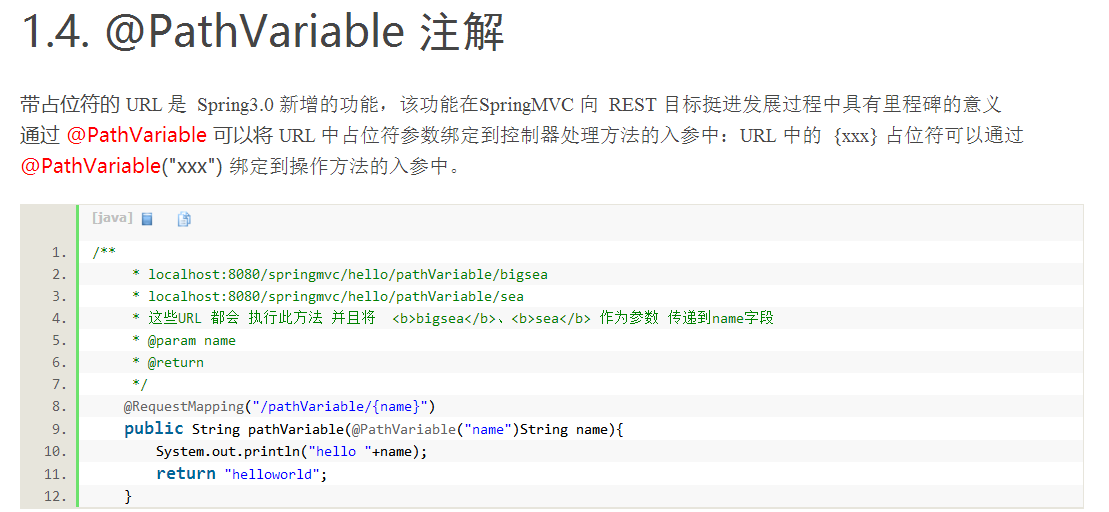
@Pathvariable可以将url中的占位符参数绑定到控制器处理方法的入参中
@RequestParam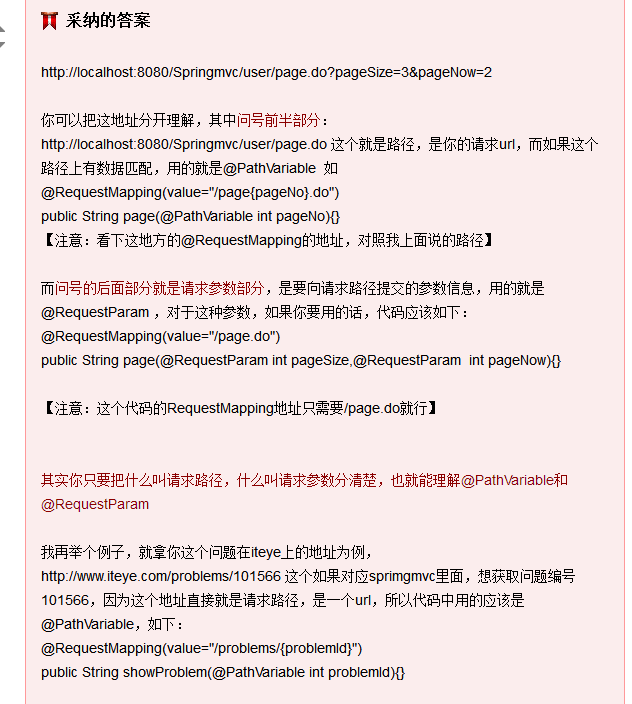
我对@RequestParm 和@Pathvariable的理解:前者是url路径占位符的参数,后者是url的?后面传递的参数
Servlet api入参:
HttpservletRequest:看后面的Request就知道是请求,使用它可以获取url请求的参数,如:
@RequestMapping("/user")
public class UserController{
@RequestMapping("/createUser")
public String ...(HttpservletRequest servlet){
String userName= WebUtils.findParamterValue(servlet,"userName");
...
}
如果处理方法使用HttpServletResponse返回相应,方法返回值设为void
public class UserController{
@RequestMapping("/createUser")
public void...(HttpservletRequest servlet HttpServletResponse response){
String userName= WebUtils.findParamterValue(servlet,"userName");
...
response.addCookie(...);
}
}
@Requestbody
和@RequestParam一样放在方法入参前面注解,我认为是用来处理application/json, application/xml的编码,后者处理application/x-www-form-urlencoded编码
@Responsebody
https://www.cnblogs.com/qiankun-site/p/5774325.html
相对应request,response是相应的意思,百度得知他将返回xml或json格式的数据
@RestTemplate
从书上和网上了解,以目前理解感觉他就是发送http请求的
HttpEntity<?>可以访问请求和相应报文头、报文体数据
httpEntity.getHeaders() //获得报文头
httpEntity.getBody() //获得报文体
xml和json对比
https://www.cnblogs.com/SanMaoSpace/p/3139186.html
我认为他们两个都是一种存放数据的格式,但是前者需要双标签把数据装起来,代码量多,文件庞大
在控制器上上注解@RestController,则无需在其方法内注解@ResponseBody
AsyncRestTemplate支持异步无阻塞方式进行访问
以前用过jquery的ajax,同步就是等待数据返回然后继续往下执行,异步则是不管数据是否返回直接往下执行
SpringMVC输出模型数据方式:
1.ModelAndView
添加模型数据:ModelAndView addObject(String attributeName, Object attributeValue)和ModelAndView addAllObjects(Map<String,?> modelMap)
设置视图:void setView(View view) 指定具体视图对象 void setViewName(String viewName)指定逻辑视图名
2.@ModelAttribute
http://blog.csdn.net/hejingyuan6/article/details/49995987
在这个代码中,访问控制器方法helloWorld时,会首先调用populateModel方法,将页面参数abc(/helloWorld.ht?abc=text)放到model的attributeName属性中,在视图中可以直接访问。
- @Controller
- public class HelloModelController {
- @ModelAttribute
- public void populateModel(@RequestParam String abc, Model model) {
- model.addAttribute("attributeName", abc);
- }
- @RequestMapping(value = "/helloWorld")
- public String helloWorld() {
- return "helloWorld.jsp";
- }
- }
也可以指定属性名称
- @Controller
- public class Hello2ModelController {
- @ModelAttribute(value="myUser")
- public User populateModel() {
- User user=new User();
- user.setAccount("ray");
- return user;
- }
- @RequestMapping(value = "/helloWorld2")
- public String helloWorld(Model map) {
- return "helloWorld.jsp";
- }
- }
对象合并指定对象名称:
- @Controller
- public class Hello2ModelController {
- @ModelAttribute("myUser")
- public User populateModel() {
- User user=new User();
- user.setAccount("ray");
- return user;
- }
- @RequestMapping(value = "/helloWorld2")
- public String helloWorld(@ModelAttribute("myUser") User user) {
- user.setName("老王");
- return "helloWorld.jsp";
- }
- }
3.方法入参类型是map或model时,其数据会自动添加到模型中
Java代码

1 @RequestMapping("/test")2 public String test(Map<String,Object> map,Model model,ModelMap modelMap){3 4 map.put("names", Arrays.asList("caoyc","zhh","cjx"));5 model.addAttribute("time", new Date());6 modelMap.addAttribute("city", "ChengDu");7 modelMap.put("gender", "male");8 return "hello";9 }
JSP页面
1 1、time:${requestScope.time}2 <br/>2、names:${requestScope.names }3 <br/>3、city:${requestScope.city }4 <br/>4、gender:${requestScope.gender }
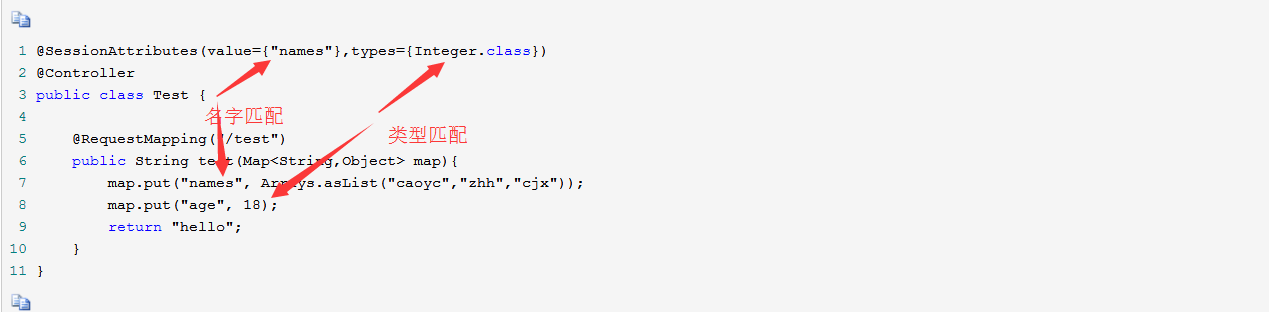
4. @SessionAttributes将模型暂存到httpSession中(以前用过Session,可以跨网页传递数据)
数据转换
Spring支持的转换器接口:
Converter<S,T>
GenericConverter
ConverterFactory
数据格式化
位于org.springframework.format类包中,Formatter<T>接口扩展了Printer<T>接口(负责对象格式化输出)和Parse<T>(负责对象格式化输入)
https://www.cnblogs.com/rocky-AGE-24/p/5225826.html
springMVC-数据的格式化
1.配置annotation-driven
<mvc:annotation-driven ></mvc:annotation-driven>
2.在实体类上加上@NumberForma这样的注解
@NumberFormat(pattern="#,###,###.#")
private Float price;
@DateTimeFormat(pattern="yyyy-MM-dd")
private Date productionDate;
其中@DateTimeFormat还支持对Long、Calendar类型注解
数据校验
Spring的校验框架所在的包是org.springframework.validation,多用其中的LocalValidatorFactoryBean,它实现了JSR-303接口,Spring没有提供JSR-303的实现,因此要用LocalValidatorFactoryBean也要把JSR-303的的实现者的jar包引入
http://jinnianshilongnian.iteye.com/blog/1990081
- <!-- 以下 validator ConversionService 在使用 mvc:annotation-driven 会 自动注册-->
- <bean id="validator" class="org.springframework.validation.beanvalidation.LocalValidatorFactoryBean">
- <property name="providerClass" value="org.hibernate.validator.HibernateValidator"/>
- <!-- 如果不加默认到 使用classpath下的 ValidationMessages.properties -->
- <property name="validationMessageSource" ref="messageSource"/>
- </bean>
校验属性:
- public class User implements Serializable {
- @NotNull(message = "{user.id.null}") //不能为空
- private Long id;
- @NotEmpty(message = "{user.name.null}") //被注释的元素必须非空
- @Length(min = 5, max = 20, message = "{user.name.length.illegal}") //被注释的元素长度要在它定义的范围内
- @Pattern(regexp = "[a-zA-Z]{5,20}", message = "{user.name.illegal}") //被注释的元素长度要匹配其定义的正则表达式
- private String name;
- @NotNull(message = "{user.password.null}") //不能为空
- private String password;
- }
校验方法入参:
- @Controller
- public class UserController {
- @RequestMapping("/save")
- public String save(@Valid User user, BindingResult result) {
- if(result.hasErrors()) {
- return "error";
- }
- return "success";
- }
- }
明天计划的事情:继续看spring4.x
遇到的问题:光看书上空泛的概念难以理解,百度搜索相关的代码就容易懂
收获:以上


评论