发表于: 2019-05-07 22:43:37
1 813
今天完成的事:讲了小课堂sass的使用
<!doctype html>
<html>
<head>
<meta charset="utf-8">
<meta name="viewport" content="width=device-width, initial-scale=1.0, maximum-scale=1.0, user-scalable=no">
<title>葡萄藤PPT</title>
<link rel="stylesheet" href="https://ptteng.github.io/PPT/css/reveal/reveal.css">
<!-- PPT主题,可以在/css/reveal/theme/中选择其他主题,目前暂时只能使用该模板 -->
<link rel="stylesheet" href="https://ptteng.github.io/PPT/css/reveal/theme/ptt.css">
<!-- syntax highlighting 代码高亮主题 -->
<link rel="stylesheet" href="https://ptteng.github.io/PPT/lib/reveal/css/zenburn.css">
<style>
.float {
float: left;
}
p.font {
text-align: left;
}
</style>
<!-- 打印和PDF输出样式 -->
<script>
var link = document.createElement('link');
link.rel = 'stylesheet';
link.type = 'text/css';
link.href = window.location.search.match(/print-pdf/gi) ?
'https://ptteng.github.io/PPT/css/reveal/print/pdf.css' : '../css/reveal/print/paper.css';
document.getElementsByTagName('head')[0].appendChild(link);
</script>
</head>
<body>
<img src="img/2018-11-16-A-css01/logo.png" alt="" usemap="#pttmap" class="base-logo" style="visibility: hidden">
<map name="pttmap">
<area shape="rect" coords="0,0,276,58" href="http://www.jnshu.com/" alt="" target="_blank">
</map>
<div class="reveal slide center" role="application" data-transition-speed="default" data-background-transition="fade">
<div class="slides" style="width: 960px; height: 700px; left: 50%; top: 50%; bottom: auto; right: auto; transform: translate(-50%, -50%) scale(0.794571);">
<section class="present" style="top: 234px; display: block;">
<h3>【css-TASK】简述sass的使用</h3>
<p style="text-align: center;">分享人:冯思伟</p>
</section>
<section class="future" style="top: 3px; display: block;" hidden="" aria-hidden="true">
<p>目录</p>
<p>1. 背景介绍</p>
<p>2. 知识剖析</p>
<p>3. 常见问题</p>
<p>4. 解决方案</p>
<p>5. 编码实战</p>
<p>6. 扩展思考</p>
<p>7. 参考文献</p>
<p>8. 更多讨论</p>
</section>
<section class="future" style="top: 267px; display: block;" hidden="" aria-hidden="true">
<h3>一、背景介绍</h3>
</section>
<section class="future" style="top: 190px; display: none;" hidden="" aria-hidden="true">
<p>sass的安装?</p>
<p style="text-align: left">
  sass基于Ruby语言开发而成,因此安装sass前需要安装Ruby。(注:mac下自带Ruby无需在安装Ruby!)<span style="color: black">安装过程中请注意勾选Add Ruby executables to your PATH添加到系统,环境变量。</span> https://www.sass.hk/install/教程详解安装过程就不一一细说了。<br>
  特别提醒一下在安装sass的时候因为淘宝源已经不维护了要换成china源<br>
  使用sass可以减少我们很多的代码量和命名这是一个非常好用的工具 <br>
  
</section>
<section class="future" style="top: 267px; display: none;" hidden="" aria-hidden="true">
<h3>二、知识剖析</h3>
</section>
<section class="future" style="top: 188px; display: none;" hidden="" aria-hidden="true">
<h3>sass使用中常用的几种</h3>
<p style="text-align: left;font-size: 30px;text-transform:none;">
变量声明<br>
// // <br>
sass变量的声明和css属性的声明很像:<br>
  $color:white;,<br>
  这就是说我们声明了一个变量,变量名字是color颜色是white<br>
  当我们想使用这个变量的时候只需要调用这个这个变量名字就好了<br>
  在声明变量时,变量值也可以引用其他变量。<br>
  这里,$border:1px solid $color;量的声明中使用了$color:red;这个变量。<br>
生的效 果就跟你直接为border属性设置了一个1px $color solid 一样<br>
最后我们来说一下sass的变量的命名
sass的变量名可以与css中的属性名和选择器名称相同,包括中划线和下划线。这完全取决于个人的喜好,有些人喜欢使用中划线来分隔变量中的多个词(如$highlight-color),而有些人喜欢使用下划线(如$highlight_color)。使用中划线的方式更为普遍,这也是compass和本文都用的方式。俩种方法是兼容的<br>
</p>
</section>
<section class="future" style="top: 188px; display: none;" hidden="" aria-hidden="true">
<h3> 嵌套CSS 规则</h3>
<p style="text-align: left;font-size: 30px;text-transform:none;">
css中重复写选择器是非常恼人的。如果要写一大串指向页面中同一块的样式时,往往需要 一遍又一遍地写同一个ID <br>
我们大家在做任务8 的时候使用了Bootstrap框架
要书写大量的container 和row但是当我们使用了sass你就不会为了命名而发愁了<br>
提醒一下嵌套最好不要超过三层不然的话会加大解码难度不利于浏览器快速渲染 <br>
我用实例为大家演示一下,更直观明了<br>
</p>
</section>
<section class="future" style="top: 188px; display: none;" hidden="" aria-hidden="true">
<h3> 静默注释</h3>
<p style="text-align: left;font-size: 30px;text-transform:none;">
SASS共有两种注释风格。
标准的CSS注释 /* comment */ ,会保留到编译后的文件。
单行注释 // comment,只保留在SASS源文件中,编译后被省略。 <br>
<br>
sass提供了一种不同于css标准注释格式/* ... */的注释语法,即静默注释,其内容不会出现在生成的css文件中。静默注释的语法跟JavaScriptJava等类C的语言中单行注释的语法相同,它们以//开头,注释内容直到行末。 <br>
<br>
   color: #333; // 这种注释内容不会出现在生成的css文件中
padding: 0; /* 这种注释内容会出现在生成的css文件中 */ <br>
} <br>
</p>
</section>
<section class="future" style="top: 188px; display: none;" hidden="" aria-hidden="true">
<h3>混合器</h3>
<p style="text-align: left;font-size: 30px;text-transform:none;">
如果你的整个网站中有几处小小的样式类似(例如一致的颜色和字体),那么使用变量来统一处理这种情况是非常不错的选择。但是当你的样式变得越来越复杂,你需要大段大段的重用样式的代码,独立的变量就没办法应付这种情况了。你可以通过sass的混合器实现大段样式的重用。<br>
混合器使用@mixin标识符定义<br>
通过@include来使用这个混合器,放在你希望的任何地方<br>
利用混合器,可以很容易地在样式表的不同地方共享样式<br>
混合器中不仅可以包含属性,也可以包含css规则,包含选择器和选择器中的属性<br>
  @mixin no-bullets {
list-style: none;
li {
list-style-image: none;
list-style-type: none;
margin-left: 0px;
}
<br>
当一个包含css规则的混合器通过@include包含在一个父规则中时,在混合器中的规则最终会生成父规则中的嵌套规则。<br>
例子
ul.plain {
color: #444;
@include no-bullets;
}<br>
sass的@include指令会将引入混合器的那行代码替换成混合器里边的内容<br>
<br>
</p>
</section>
<section class="future" style="top: 188px; display: none;" hidden="" aria-hidden="true">
<h3>使用选择器继承来精简CSS</h3>
<p style="text-align: left;font-size: 30px;text-transform:none;">
使用sass的时候,最后一个减少重复的主要特性就是选择器继承。
选择器继承是说一个选择器可以继承为另一个选择器定义的所有样式。这个通过@extend语法实现
<br>
</p>
</section>
<section class="future" style="top: 188px; display: none;" hidden="" aria-hidden="true">
<h3> 何时使用继承</h3>
<p style="text-align: left;font-size: 30px;text-transform:none;">
混合器主要用于展示性样式的重用,而类名用于语义化样式的重用。因为继承是基于类的(有时是基于其他类型的选择器),所以继承应该是建立在语义化的关系 <br>
<p>你可以为这两个类分别写相同的样式,但是如果有大量的重复怎么办?使用sass时,我们提倡的就是不要做重复的工作。
你可以使用一个选择器组(比如说.error.seriousError)给这两个选择器写相同的样式。如果.error的所有样式都在同一个地方,这种做法很好,但是如果是分散在样式表的不同地方呢?再这样做就困难多了。
<p>你可以使用一个混合器为这两个类提供相同的样式,但当.error的样式修饰遍布样式表中各处时,这种做法面临着跟使用选择器组一样的问题。这两个类也不是恰好有相同的 样式。你应该更清晰地表达这种关系。</p>
</p>
</section>
<section class="future" style="top: 267px; display: none;" hidden="" aria-hidden="true">
<h3>继承器的工作细节</h3>
<p style="text-align: left;font-size: 30px;text-transform:none;">
跟混合器相比,继承生成的css代码相对更少。因为继承仅仅是重复选择器,而不会重复属性,所以使用继承往往比混合器生成的css体积更小。如果你非常关心你站点的速度,请牢记这一点。<br>
继承遵从css层叠的规则。当两个不同的css规则应用到同一个html元素上时,并且这两个不同的css规则对同一属性的修饰存在不同的值,css层叠规则会决定应用哪个样式。相当直观:通常权重更高的选择器胜出,如果权重相同,定义在后边的规则胜出。<br>
<br>
  混合器本身不会引起css层叠的问题,因为混合器把样式直接放到了css规则中,而继承存在样式层叠的问题。被继承的样式会保持原有定义位置和选择器权重不变。通常来说这并不会引起什么问题,但是知道这点总没有坏处。<br>
    <br>
   <br>
<br>
<br>
   <br>
   <br>
<br>
<br>
<br>
</p>
</section>
<section class="future" style="top: 267px; display: none;" hidden="" aria-hidden="true">
<h3> 使用继承的最佳实践</h3>
<p style="text-align: left;font-size: 30px;text-transform:none;">
通常使用继承会让你的css美观、整洁。因为继承只会在生成css时复制选择器,而不会复制大段的css属性。但是如果你不小心,可能会让生成的css中包含大量的选择器复制。<br>
避免这种情况出现的最好方法就是不要在css规则中使用后代选择器(比如.foo .bar)去继承css规则。如果你这么做,同时被继承的css规则有通过后代选择器修饰的样式,生成css中的选择器的数量很快就会失控:<br>
<br>
<br>
<br>
<br>
</p>
</section>
<section class="future" style="top: 267px; display: none;" hidden="" aria-hidden="true">
<h3>混合器和继承 占位符区别?</h3>
<p style="text-align: left">
混合器@mixin
特点:可传参
缺点:如果在样式文件中调用同一个混合宏,会产生多个对应的样式代码,造成代码的冗余.
@mixin cont{
color: red;
font-size: 14px;
}
调用:
body{
@include cont;
}
这个看上去好像跟占位符的用法一样,是的,两者几乎没有很大区别,唯一不同的是当一个页面中多次调用的话,@mixin不会将样式相同的代码进行合并,而使用占位符多次调用的话则会处理这个问题.
</p>
</section>
<section class="future" style="top: 267px; display: none;" hidden="" aria-hidden="true">
<h3>四、解决办法</h3>
</section>
<section class="future" style="top: 267px; display: none;" hidden="" aria-hidden="true">
<img src="img/distinction.png" height="288" width="741"/></section>
<section class="future" style="top: 267px; display: none;" hidden="" aria-hidden="true">
<h3>五、编码实战</h3>
<p> 综上所述,已经和大家展示过,这里就不多说</p>
</section>
<section class="future" style="top: 267px; display: none;" hidden="" aria-hidden="true">
<h3>六、拓展思考</h3>
</section>
<section class="future" style="top: 97.5px; display: none;" hidden="" aria-hidden="true">
<h3>sass和less的区别</h3>
<p style="text-align: left;font-size: 30px">
1.编译环境不一样<br>
Sass的安装需要Ruby环境,是在服务端处理的,而Less是需要引入less.js来处理Less代码输出css到浏览器,也可以在开发环节使用Less,然后编译成css文件,直接放到项目中,也有 Less.app、SimpleLess、CodeKit.app这样的工具,也有在线编译地址。 <br>
2.变量符不一样,Less是@,而Scss是$,而且变量的作用域也不一样。<br>
3.输出设置,Less没有输出设置,Sass提供4中输出选项:nested, compact, compressed 和 expanded。<br>
4.Sass支持条件语句,可以使用if{}else{},for{}循环等等。而Less不支持。
</p>
</section>
<section class="future" style="top: 267px; display: none;" hidden="" aria-hidden="true">
<h3>六、拓展思考</h3>
</section>
<section class="future" style="top: 267px; display: none;" hidden="" aria-hidden="true">
<p> 5. 引用外部CSS文件<br>
scss引用的外部文件命名必须以_开头, 如下例所示:其中_test1.scss、_test2.scss、_test3.scss文件分别设置的h1 h2 h3。文件名如果以下划线_开头的话,Sass会认为该文件是一个引用文件,不会将其编译为css文件.<br>
不管是Sass,还是Less,都可以视为一种基于CSS之上的高级语言,其目的是使得CSS开发更灵活和更强大,Sass的功能比Less强大,基本可以说是一种真正的编程语言了,Less则相对清晰明了,易于上手,对编译环境要求比较宽松。
</p>
</section>
<section class="future" style="top: 267px; display: none;" hidden="" aria-hidden="true">
<h3>什么是作用域?</h3>
<p style="text-align: left;">简单地说,就是作用的范围,指它在函数在哪些范围内可以用,而在其他部分不可以,要用就得重新定义。 <br>
局部变量:在程序中,只在特定的过程或函数中可以访问的变量,是相对与全局变量而言的 <br>
全局变量也称为外部变量,是在函数的外部定义的,它的作用域为从变量定义处开始,到本程序文件的末尾。全局变量全部存放在静态存储区,在程序开始执行时给全局变量分配存储区,程序行完毕就释放。 <br>
全局变量是使用相同的内存块在整个类中存储一个值.在整个函数中都适用。;</p>
</section>
<section class="future" style="top: 267px; display: none;" hidden="" aria-hidden="true">
<h3>七、参考文献</h3>
</section>
<section class="future" style="top: 178px; display: none;" hidden="" aria-hidden="true">
<p style="text-align: left">
菜鸟教程<br>
https://www.sass.hk/guide/<br>
sass中文网<br>
sass用法指南 阮一峰<br>
</p>
</section>
<section class="future" style="top: 267px; display: none;" hidden="" aria-hidden="true">
<h3>八、更多讨论</h3>
</section>
<section class="future" style="top: 202.5px; display: none;" hidden="" aria-hidden="true">
<h3>感谢观看</h3>
</section>
</div>
<div class="backgrounds"><div class="slide-background present" data-loaded="true" style="display: block;"></div><div class="slide-background future" data-loaded="true" style="display: block;"></div><div class="slide-background future" data-loaded="true" style="display: block;"></div><div class="slide-background future" data-loaded="true" style="display: none;"></div><div class="slide-background future" data-loaded="true" style="display: none;"></div><div class="slide-background future" data-loaded="true" style="display: none;"></div><div class="slide-background future" data-loaded="true" style="display: none;"></div><div class="slide-background future" data-loaded="true" style="display: none;"></div><div class="slide-background future" data-loaded="true" style="display: none;"></div><div class="slide-background future" data-loaded="true" style="display: none;"></div><div class="slide-background future" data-loaded="true" style="display: none;"></div><div class="slide-background future" data-loaded="true" style="display: none;"></div><div class="slide-background future" data-loaded="true" style="display: none;"></div><div class="slide-background future" data-loaded="true" style="display: none;"></div><div class="slide-background future" data-loaded="true" style="display: none;"></div><div class="slide-background future" data-loaded="true" style="display: none;"></div><div class="slide-background future" data-loaded="true" style="display: none;"></div><div class="slide-background future" data-loaded="true" style="display: none;"></div><div class="slide-background future" data-loaded="true" style="display: none;"></div><div class="slide-background future" data-loaded="true" style="display: none;"></div><div class="slide-background future" data-loaded="true" style="display: none;"></div><div class="slide-background future" data-loaded="true" style="display: none;"></div><div class="slide-background future" data-loaded="true" style="display: none;"></div><div class="slide-background future" data-loaded="true" style="display: none;"></div><div class="slide-background future" data-loaded="true" style="display: none;"></div></div><div class="progress" style="display: block;"><span style="width: 0px;"></span></div><aside class="controls" style="display: block;"><button class="navigate-left" aria-label="previous slide"></button><button class="navigate-right enabled" aria-label="next slide"></button><button class="navigate-up" aria-label="above slide"></button><button class="navigate-down" aria-label="below slide"></button></aside><div class="slide-number" style="display: none;"></div><div class="speaker-notes" data-prevent-swipe=""></div><div class="pause-overlay"></div><div id="aria-status-div" aria-live="polite" aria-atomic="true" style="position: absolute; height: 1px; width: 1px; overflow: hidden; clip: rect(1px, 1px, 1px, 1px);">
【css-task9】sass的使用
分享人:冯思伟
</div></div>
<script src="https://ptteng.github.io/PPT/lib/reveal/js/head.min.js"></script>
<script src="https://ptteng.github.io/PPT/lib/reveal/reveal.js"></script>
<script>
Reveal.initialize({
history: true,
dependencies: [{
src: 'https://ptteng.github.io/PPT/plugin/markdown/marked.js'
},
{
src: 'https://ptteng.github.io/PPT/plugin/markdown/markdown.js'
},
{
src: 'https://ptteng.github.io/PPT/plugin/notes/notes.js',
async: true
},
{
src: 'https://ptteng.github.io/PPT/plugin/highlight/highlight.js',
async: true,
callback: function () {
hljs.initHighlightingOnLoad();
}
}
]
});
</script>
</body></html>
通过讲小课堂又重新学习了一遍SASS虽然中间出了点小故障 很多demo没用上,但是收获也很多
学习了一点js的内容
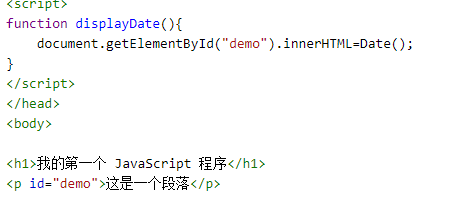
知道了JS的写法 可以写在head里 可以写在Body里 也可以用外联的方式写
学习了dom知道了js的最基本的运算

document.gerElementById("demo").innerHTML=Date();
选中这个id名字叫demo的 然后改变网页显示时间函数
明天把14 15写完专心做Js


评论