发表于: 2019-03-22 23:45:54
1 583
今天完成的事情:(一定要写非常细致的内容,比如说学会了盒子模型,了解了Margin)
复习了下6-10
明天计划的事情:(一定要写非常细致的内容)
继续开始任务
遇到的问题:(遇到什么困难,怎么解决的)
关于渲染的问题
收获:(通过今天的学习,学到了什么知识)

在这个登陆的页面里面的路由部分配置,还有ajax的部分

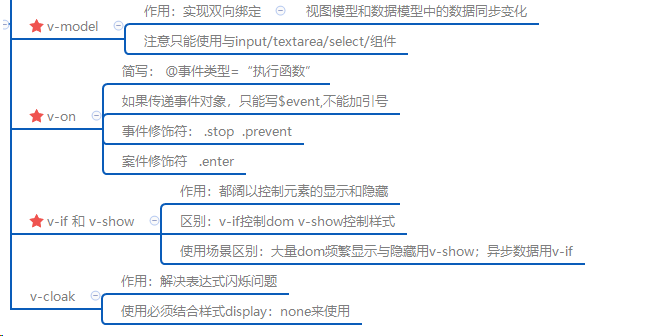
还有最后的闪烁问题是因为使用引入的时候

这个的部分还没有加载完成或者加载的速度过慢的关系,就会出现一瞬间的闪烁
使用这个v-cloak来进行隐藏就可以了
<div id="app">
<h1>Hello App!</h1>
<p>
<!-- 使用 router-link 组件来导航. -->
<!-- 通过传入 `to` 属性指定链接. -->
<!-- <router-link> 默认会被渲染成一个 `<a>` 标签 -->
<router-link to="/foo">Go to Foo</router-link>
<router-link to="/bar">Go to Bar</router-link>
</p>
<!-- 路由出口 -->
<!-- 路由匹配到的组件将渲染在这里 -->
<router-view></router-view>
</div>
// 0. 如果使用模块化机制编程,导入Vue和VueRouter,要调用 Vue.use(VueRouter)
// 1. 定义 (路由) 组件。
// 可以从其他文件 import 进来
const Foo = { template: '<div>foo</div>' }
const Bar = { template: '<div>bar</div>' }
// 2. 定义路由
// 每个路由应该映射一个组件。 其中"component" 可以是
// 通过 Vue.extend() 创建的组件构造器,
// 或者,只是一个组件配置对象。
// 我们晚点再讨论嵌套路由。
const routes = [
{ path: '/foo', component: Foo },
{ path: '/bar', component: Bar }
]
// 3. 创建 router 实例,然后传 `routes` 配置
// 你还可以传别的配置参数, 不过先这么简单着吧。
const router = new VueRouter({
routes // (缩写) 相当于 routes: routes
})
// 4. 创建和挂载根实例。
// 记得要通过 router 配置参数注入路由,
// 从而让整个应用都有路由功能
const app = new Vue({
router
}).$mount('#app')
// 现在,应用已经启动了!


评论