发表于: 2018-11-12 22:41:19
0 968
一、今天完成的事情
1.
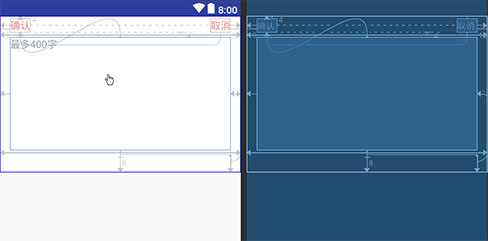
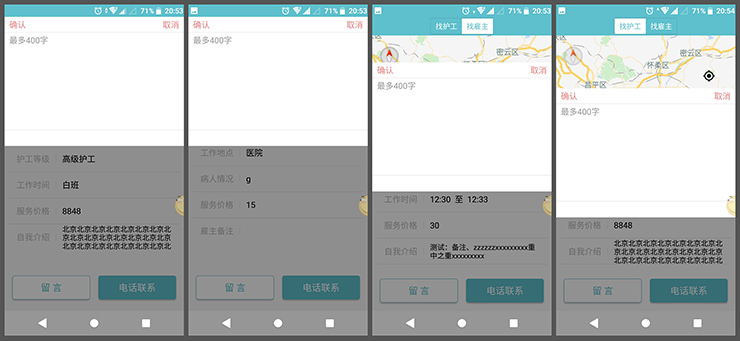
任务中需要实现一个留言功能,写完之后发现整个app中至少有四个地方要用到留言功能,于是就写了一个小模块。
布局
<android.support.constraint.ConstraintLayout xmlns:android="http://schemas.android.com/apk/res/android"
    xmlns:app="http://schemas.android.com/apk/res-auto"
    xmlns:tools="http://schemas.android.com/tools"
    android:layout_width="match_parent"
    android:layout_height="wrap_content"
    android:background="@color/white_ffffff">

    <TextView
        android:id="@+id/tv_confirm"
        android:layout_width="wrap_content"
        android:layout_height="wrap_content"
        android:layout_marginStart="16dp"
        android:layout_marginTop="4dp"
        android:background="@color/white_ffffff"
        android:text="@string/confirm"
        android:textColor="@color/red_ea8989"
        android:textSize="16sp"
        app:layout_constraintStart_toStartOf="parent"
        app:layout_constraintTop_toTopOf="parent" />

    <TextView
        android:id="@+id/tv_cancel"
        android:layout_width="wrap_content"
        android:layout_height="wrap_content"
        android:layout_marginEnd="16dp"
        android:background="@color/white_ffffff"
        android:text="@string/cancel"
        android:textColor="@color/red_ea8989"
        android:textSize="16sp"
        app:layout_constraintBottom_toBottomOf="@+id/tv_confirm"
        app:layout_constraintEnd_toEndOf="parent"
        app:layout_constraintTop_toTopOf="@+id/tv_confirm" />

    <View
        android:id="@+id/view_line_1"
        android:layout_width="match_parent"
        android:layout_height="1px"
        android:layout_marginTop="4dp"
        android:background="@color/grey_bababa"
        app:layout_constraintEnd_toEndOf="parent"
        app:layout_constraintStart_toStartOf="parent"
        app:layout_constraintTop_toBottomOf="@+id/tv_confirm" />

    <EditText
        android:id="@+id/et_message"
        android:layout_width="match_parent"
        android:layout_height="180dp"
        android:layout_marginStart="16dp"
        android:layout_marginTop="4dp"
        android:layout_marginEnd="16dp"
        android:layout_marginBottom="8dp"
        android:background="@color/white_ffffff"
        android:gravity="start|top"
        android:hint="@string/limit_400_fonts"
        android:inputType="textMultiLine"
        android:maxLength="400"
        android:textColor="@color/black_000000"
        android:textSize="16sp"
        app:layout_constraintBottom_toBottomOf="parent"
        app:layout_constraintEnd_toEndOf="parent"
        app:layout_constraintStart_toStartOf="parent"
        app:layout_constraintTop_toBottomOf="@+id/view_line_1"
        app:layout_constraintVertical_bias="0.0" />

    <View
        android:id="@+id/view_line_2"
        android:layout_width="match_parent"
        android:layout_height="1px"
        android:layout_marginTop="4dp"
        android:background="@color/grey_bababa"
        app:layout_constraintEnd_toEndOf="parent"
        app:layout_constraintStart_toStartOf="parent"
        app:layout_constraintTop_toBottomOf="@+id/et_message" />

    <TextView
        android:id="@+id/tv_count"
        android:layout_width="wrap_content"
        android:layout_height="wrap_content"
        android:layout_marginTop="4dp"
        android:layout_marginBottom="8dp"
        android:textColor="@color/grey_bababa"
        android:textSize="14sp"
        app:layout_constraintBottom_toBottomOf="parent"
        app:layout_constraintEnd_toEndOf="@+id/et_message"
        app:layout_constraintTop_toBottomOf="@+id/view_line_2"
        app:layout_constraintVertical_bias="0.0" />

</android.support.constraint.ConstraintLayout>
代码
public class LeaveMessage extends ConstraintLayout {
private static final String TAG = "LeaveMessage";
public static final int WORKER_MESSAGE = 1; //留言类型:护工留言
public static final int EMPLOYER_MESSAGE = 2; //留言类型:雇主留言
private EditText messageET; //留言输入
private TextView countTV; //显示字数
public LeaveMessage (Context context) {
super(context);
}
public LeaveMessage (Context context, AttributeSet attrs, int defStyle) {
super(context, attrs, defStyle);
}
public LeaveMessage (Context context, AttributeSet attrs) {
super(context, attrs);
LayoutInflater.from(context).inflate(R.layout.my_control_leave_message, this, true);
TextView confirmTV = (TextView) findViewById(R.id.tv_confirm);
confirmTV.setOnClickListener(new MyOnClickListener());
TextView cancelTV = (TextView) findViewById(R.id.tv_cancel);
cancelTV.setOnClickListener(new MyOnClickListener());
countTV = (TextView) findViewById(R.id.tv_count);
messageET = (EditText) findViewById(R.id.et_message);
//设置监听
messageET.addTextChangedListener(new TextWatcher() {
@Override
public void beforeTextChanged(CharSequence s, int start, int count, int after) {
//输入前
}
@Override
public void onTextChanged(CharSequence s, int start, int before, int count) {
//输入中
}
@Override
public void afterTextChanged(Editable s) {
/ /输入后
if (s.length() <= 400) {
//显示当前的字数
countTV.setText((s.length() + "/400"));
} else {
//提示字数超过400
Toast.makeText(getContext(), "字数超过400,无法继续输入", Toast.LENGTH_SHORT).show();
}
}
});
}
//点击事件监听
public class MyOnClickListener implements OnClickListener {
@Override
public void onClick(View view) {
switch (view.getId()) {
case R.id.tv_confirm:
leaveMessageListener.confirmMessage();
new Thread(new Runnable() {
@Override
public void run() {
saveMessage();
}
}).start();
break;
case R.id.tv_cancel:
leaveMessageListener.cancelMessage();
messageET.setText("");
break;
}
}
}
/**
*上传留言
*/
private void saveMessage() {
String message = messageET.getText().toString();
if (message.equals("")) {
Toast.makeText(getContext(), "不能为空", Toast.LENGTH_SHORT).show();
} else {
//根据留言类型判断用哪种类型上传
if (messageType == EMPLOYER_MESSAGE) {
//当前是护工页面,所以上传的是雇主的留言
MyUser currentUser = BmobUser.getCurrentUser(MyUser.class);
WorkerPost workerPost = new WorkerPost();
workerPost.setObjectId(objectId);
EmployerMessage employerMessage = new EmployerMessage();
employerMessage.setContent(message);
employerMessage.setEmployer(currentUser);
employerMessage.setWorkerPost(workerPost);employerMessage.save(new SaveListener<String>() {
@Override
public void done(String s, BmobException e) {if (e == null) {
//发送成功,设置回调
leaveMessageListener.successfulMessage();
Log.i(TAG, "done: 雇主留言上传成功,object:" + objectId);} else {
//发送失败,设置回调
leaveMessageListener.failedMessage();
Log.i(TAG, "done: 雇主留言上传失败," + e.getErrorCode() + ":" + e.getMessage());
}
}
});
} else if (messageType == WORKER_MESSAGE) {
//当前是雇主页面,所以上传的是护工的留言
MyUser currentUser = BmobUser.getCurrentUser(MyUser.class);
EmployerPost employerPost = new EmployerPost();
employerPost.setObjectId(objectId);
WorkerMessage workerMessage = new WorkerMessage();
workerMessage.setContent(message);
workerMessage.setWorker(currentUser);
workerMessage.setEmployerPost(employerPost);
workerMessage.save(new SaveListener<String>() {
@Override
public void done(String s, BmobException e) {if (e == null) {
//发送成功,设置回调
leaveMessageListener.successfulMessage();
Log.i(TAG, "done: 护工留言上传成功,object:" + objectId);} else {
//发送失败,设置回调
leaveMessageListener.failedMessage();
Log.i(TAG, "done: 护工留言上传失败," + e.getErrorCode() + ":" + e.getMessage());
}
}
});
}
}
}
//获取留言
public String getMessage() {
return messageET.getText().toString();
}
//设置留言
public void setMessage(String str) {
messageET.setText(str);
}
//接口
public interface LeaveMessageListener {
//发送
void confirmMessage ();
//取消发送
void cancelMessage ();
//发送成功
void successfulMessage();
//发送失败
void failedMessage();
}
private int messageType;
private String objectId;
private LeaveMessageListener leaveMessageListener;
/**
* 设置接口的方法
* @param messageType 留言类型:护工留言、雇主留言
* @param objectId 留言对应的帖子id
* @param leaveMessageListener 接口对象
*/
public void setLeaveMessageListener (int messageType, String objectId,
LeaveMessageListener leaveMessageListener)
this.messageType = messageType;
this.objectId = objectId;
this.leaveMessageListener = leaveMessageListener;
}
}
主要是写好回调接口,确认发送、取消发送、发送成功、发送失败都有对应的响应事件
使用
布局中添加
<com.example.forrestsu.logintest.my_controls.LeaveMessage
    android:id="@+id/my_control_leave_message"
    android:layout_width="match_parent"
    android:layout_height="wrap_content" />
代码中
在所属的Activity或者Fragment中实现接口
public class EmployerPageActivity extends BaseActivity implements LeaveMessage.LeaveMessageListener {private static LeaveMessage leaveMessage;leaveMessage = (LeaveMessage) findViewById(R.id.my_control_leave_message);
leaveMessage.setLeaveMessageListener(LeaveMessage.WORKER_MESSAGE, objectId, this);
leaveMessage.setVisibility(GONE);@Override
public void confirmMessage() {
progressDialog.show();
}
@Override
public void cancelMessage() {
leaveMessage.setVisibility(GONE);
glassView.setVisibility(GONE);
}
@Override
public void successfulMessage() {
Toast.makeText(EmployerPageActivity.this, "发送成功", Toast.LENGTH_SHORT).show();
leaveMessage.setMessage("");
glassView.setVisibility(GONE);
leaveMessage.setVisibility(GONE);
progressDialog.dismiss();
}
@Override
public void failedMessage() {
Toast.makeText(EmployerPageActivity.this, "发送失败", Toast.LENGTH_SHORT).show();
progressDialog.dismiss();
}
}可以很方便地在不同的Activity和Fragment中调用

2.
.EditText自动换行
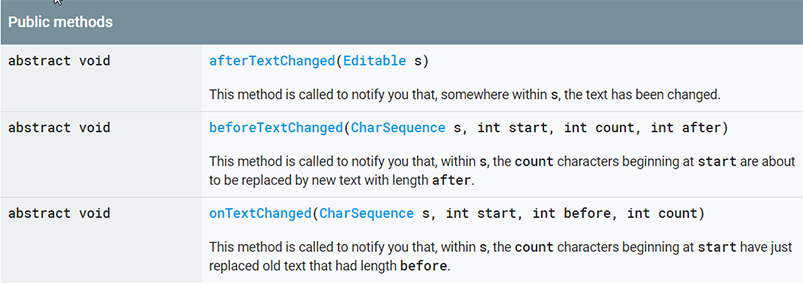
android:inputType="textMultiLine".TextWatcher接口
有三个抽象方法

上面的留言模块有用到这个接口,用来判断输入的字数,当然,它的用处还有很多,比如过滤输入内容等等,以后还需要继续深入学习。
.TextView获取焦点
布局文件中
android:singleLine="true"
android:ellipsize="marquee"
android:focusable="true"
代码中
showAddressTV.requestFocus();代码和布局中都要设置。还有一种方法是自定义控件继承自TextView,在自定义控件中设置TextView获取焦点。
二、明天计划的事情
整理最近一段时间学习的内容,很多东西只是为了去完成任务用了一下,并没有理解。
三、遇到的问题
随着任务的推进,发现自己之前学的关于布局和控件的 知识只是皮毛,并且任务过程中一直没怎么补充这方面的知识,导致最近在布局和控件上卡了不少时间,有必要专门花点时间补一补了。
四、收获
EditTextView和TextView等看似很简单的控件其实有很多知识点,只是以前的需求很简单,没有深入去了解。


评论