发表于: 2018-10-31 23:32:33
0 932
一、今天完成的事情
今天做护工发布的布局的时候,页面有这么一部分
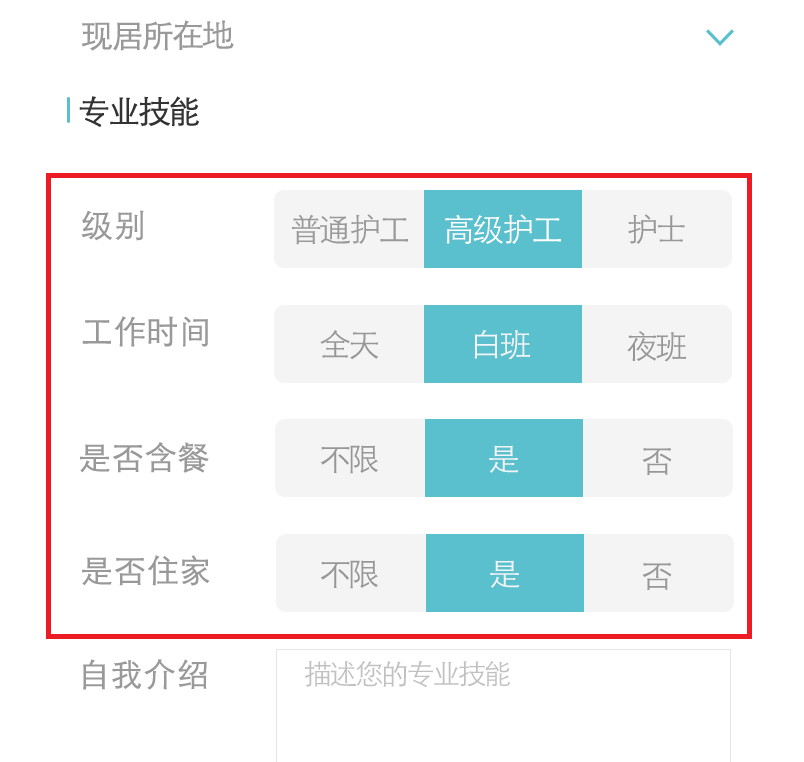
可以看到有四个相同的布局,如果写成死页面,虽然很简单,但是这种方式没有任何布局复用的概念,同时也让当前的布局变得臃肿难以维护,开发效率低下,因为控件太多了,一不小心写错一个参数可能就要检查半天。所以
这种情况就需要用到自定义组合控件,自定义组合控件有提高布局文件开发效率、降低布局文件维护成本、降低布局文件和Activity代码耦合性、容易扩展、简单易用等好处。
首先创建一个自定义控件的布局文件

<android.support.constraint.ConstraintLayout    xmlns:android="http://schemas.android.com/apk/res/android"
    android:layout_width="match_parent"
    android:layout_height="wrap_content"
    xmlns:app="http://schemas.android.com/apk/res-auto">

    <TextView
        android:id="@+id/tv_title"
        android:layout_width="wrap_content"
        android:layout_height="42dp"
        android:gravity="center_vertical|start"
        android:textColor="@color/grey_bababa"
        android:textSize="16sp"
        android:text="dbhfb"
        app:layout_constraintStart_toStartOf="parent"
        app:layout_constraintTop_toTopOf="parent"/>

    <TextView
        android:id="@+id/tv_1"
        android:layout_width="0dp"
        android:layout_height="42dp"
        android:layout_marginStart="100dp"
        android:gravity="center"
        android:textSize="16sp"
        app:layout_constraintStart_toStartOf="parent"
        app:layout_constraintEnd_toStartOf="@+id/tv_2"
        app:layout_constraintTop_toTopOf="@+id/tv_title"
        app:layout_constraintBottom_toBottomOf="@+id/tv_title"/>

    <TextView
        android:id="@+id/tv_2"
        android:layout_width="0dp"
        android:layout_height="42dp"
        android:gravity="center"
        android:textSize="16sp"
        app:layout_constraintStart_toEndOf="@+id/tv_1"
        app:layout_constraintEnd_toStartOf="@+id/tv_3"
        app:layout_constraintTop_toTopOf="@+id/tv_title"
        app:layout_constraintBottom_toBottomOf="@+id/tv_title"/>

    <TextView
        android:id="@+id/tv_3"
        android:layout_width="0dp"
        android:layout_height="42dp"
        android:layout_marginEnd="12dp"
        android:gravity="center"
        android:textSize="16sp"
        app:layout_constraintStart_toEndOf="@+id/tv_2"
        app:layout_constraintEnd_toEndOf="parent"
        app:layout_constraintTop_toTopOf="@+id/tv_title"
        app:layout_constraintBottom_toBottomOf="@+id/tv_title"/>
</android.support.constraint.ConstraintLayout>
然后设置自定义控件属性
在vaues下创建一个attrs.xml文件,在declare-style able标签中直接定义属性,其中name一般设成自定义控件名称。在attr标签中,首先name是自定义属性的名称,format是属性的类型,常用类型有
(1) string:字符串类型;
(2) integer:整数类型;
(3) float:浮点型;
(4) dimension:尺寸;
(5) Boolean:布尔值;
(6) reference:引用类型,传入的是某一资源的ID,必须以“@”符号开头;
(7) color:颜色;
(8) fraction:百分比;
(9) enum:枚举类型
<resources>
    <declare-styleable name="workerBar">
        <attr name="title_text" format="string" />
        <attr name="button_1_text" format="string" />
        <attr name="button_2_text" format="string" />
        <attr name="button_3_text" format="string" />

        <attr name="text_unSelected_color" format="color" />
        <attr name="text_selected_color" format="color" />

        <attr name="text_unSelected_bg_color" format="color" />
        <attr name="text_selected_bg_color" format="color" />
    </declare-styleable>
</resources>
让自定义控件继承自ConstraintLayout,也可以使用LinearLayout、RealitiveLayout等其他ViewGroup
另外,所有的控件都设置了OnCLickLIstener(),这样Activity里的代码量会进一步减少,逻辑会更清晰。
public class WorkerBar extends ConstraintLayout {

    private int color_text_bg_unSelected;
    private int color_text_bg_selected;
    private int color_text_unSelected;
    private int color_text_selected;

    private TextView titleTV;
    private TextView firstTV;
    private TextView secondTV;
    private TextView thirdTV;

public WorkerBar(Context context) {
               super(context);
    }

    public WorkerBar(Context context, AttributeSet attrs, int defStyle) {
               super(context, attrs, defStyle);
    }

public WorkerBar(Context context, AttributeSet attrs) {
               super(context, attrs);

        TypedArray typedArray = context.obtainStyledAttributes(attrs, R.styleable.workerBar);

        color_text_bg_unSelected = typedArray.getColor(
           R.styleable.workerBar_text_unSelected_bg_color, 0xffebebeb);
        color_text_bg_selected = typedArray.getColor(
           R.styleable.workerBar_text_unSelected_bg_color, 0xff5fc0cd);
        color_text_unSelected = typedArray.getColor(
           R.styleable.workerBar_text_unSelected_color, 0xffbababa);
       color_text_selected = typedArray.getColor(
           R.styleable.workerBar_text_unSelected_color, 0xffffffff);

        LayoutInflater.from(context).inflate(R.layout.bar_worker, this, true);
        titleTV = (TextView) findViewById(R.id.tv_title);
        firstTV = (TextView) findViewById(R.id.tv_1);
        secondTV = (TextView) findViewById(R.id.tv_2);
        thirdTV = (TextView) findViewById(R.id.tv_3);

        titleTV.setText(typedArray.getString(R.styleable.workerBar_title_text));
        firstTV.setText(typedArray.getString(R.styleable.workerBar_button_1_text));
        secondTV.setText(typedArray.getString(R.styleable.workerBar_button_2_text));
        thirdTV.setText(typedArray.getString(R.styleable.workerBar_button_3_text));

        firstTV.setTextColor(color_text_unSelected);
        firstTV.setBackgroundColor(color_text_bg_unSelected);
        secondTV.setTextColor(color_text_selected);
        secondTV.setBackgroundColor(color_text_bg_selected);
        thirdTV.setTextColor(color_text_unSelected);
        thirdTV.setBackgroundColor(color_text_bg_unSelected);

        firstTV.setOnClickListener(new MyOnClickListener());
        secondTV.setOnClickListener(new MyOnClickListener());
        thirdTV.setOnClickListener(new MyOnClickListener());
    }
最后就是使用自定义控件了,直接在需要的布局中添加就行了,需要注意的是,一定要引入自定义属性,否则编译器无法识别这些属性。
xmlns:workerbar="http://schemas.android.com/apk/res-auto"
<TextView
android:id="@+id/tv_skills"
android:layout_width="wrap_content"
android:layout_height="wrap_content"
android:layout_marginTop="12dp"
android:layout_marginStart="12dp"
android:text="@string/skills"
android:textSize="16sp"
android:textColor="@color/black_000000"
app:layout_constraintTop_toBottomOf="@+id/view_line_4"
app:layout_constraintStart_toStartOf="parent"/>
<com.example.forrestsu.logintest.my_controls.WorkerBar
android:id="@+id/bar_level"
android:layout_width="0dp"
android:layout_height="wrap_content"
android:layout_marginStart="12dp"
android:layout_marginTop="32dp"
android:layout_marginEnd="12dp"
app:layout_constraintEnd_toEndOf="parent"
app:layout_constraintStart_toStartOf="parent"
app:layout_constraintTop_toBottomOf="@id/tv_skills"
workerbar:button_1_text="普通护工"
workerbar:button_2_text="高级护工"
workerbar:button_3_text="护士"
workerbar:title_text="级别" />
<com.example.forrestsu.logintest.my_controls.WorkerBar
android:id="@+id/bar_time"
android:layout_width="0dp"
android:layout_height="wrap_content"
android:layout_marginStart="12dp"
android:layout_marginTop="20dp"
android:layout_marginEnd="12dp"
app:layout_constraintEnd_toEndOf="parent"
app:layout_constraintStart_toStartOf="parent"
app:layout_constraintTop_toBottomOf="@+id/bar_level"
workerbar:button_1_text="全天"
workerbar:button_2_text="白班"
workerbar:button_3_text="夜班"workerbar:title_text="工作时间" />
........
二、明天计划的事情
1.完成护工发布
2.雇主发布页面
三、遇到的问题
四、收获
之前做任务三的时候想做一个自定义的筛选菜单,但是有些复杂(对于我来说),各种bug,然后就放弃了,主要是因为对控件、布局的许多基础知识掌握不到位。所以学习知识还是要循序渐进,先把基础的学好了再去进阶,不可能一口吃成个胖子。


评论