发表于: 2018-06-10 23:22:11
1 967
今天完成的事情:
REST风格的SSM-CRUD
业务逻辑层调用数据访问层的方法,返回逻辑值给到显示层
@Override
//添加一个用户
public boolean addUser(User user) {
    operation= userMapper.insertUser(user);
    if(operation!=0){
        return true;
    }else{
        return false;
    }
}
用户访问主页面:/User GET请求
//查询全表:User GET
@RequestMapping(value = "/User", method = RequestMethod.GET)
public ModelAndView queryAll() {
    ModelAndView modelAndView = new ModelAndView();
    list = userService.queryUser();
    modelAndView.addObject("list", list);
    modelAndView.setViewName("User");
    return modelAndView;
}
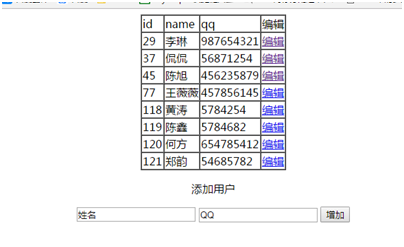
主页面设置编辑链接和用于增加操作的提交表单
<%@ page contentType="text/html;charset=UTF-8" language="java"%>
<%@ taglib uri="http://java.sun.com/jsp/jstl/core" prefix="c"%>
<html>
<head>
    <title>测试页面</title>
</head>
<body>
    <script type="text/javascript" src="js/jquery.min.js"></script>

    <table align='center' border='1' cellspacing='0'>
        <tr>
            <td>id</td>
            <td>name</td>
            <td>qq</td>
            <td>编辑</td>
        </tr>
        <c:forEach items="${list}" var="c" varStatus="st">
            <tr>
                <td>${c.id}</td>
                <td>${c.name}</td>
                <td>${c.qq}</td>
                <td><a href="User/${c.id}">编辑</a></td>
            </tr>
        </c:forEach>
    </table>

    <div style="text-align:center">
        <p>添加用户</p>
        <form action="User" method="post">
            <input type="text" name="name" value="姓名">
            <input type="text" name="qq" value="QQ">
            <input type="submit" value="增加">
        </form>
    </div>
</body>
</html>
点击增加,提交表单:POST请求 (/User) [name/qq]
//添加 User POST
@RequestMapping(value = "/User",method = RequestMethod.POST)
public ModelAndView add(User user){
    ModelAndView modelAndView=new ModelAndView();
    operation=userService.addUser(user);
    if(operation==true){
        modelAndView.setViewName("redirect:/User");
    }else {
        modelAndView.setViewName("error");
    }
    return modelAndView;
}
添加操作的控制器,使用User参数封装JSP传来的[name/qq],调用业务层添加方法,判断操作是否成功,成功通过重定向回到添加后的主页面
点击编辑,GET请求 (/User/id值),[id]
//编辑,查询一个用户:User{id}GET
@RequestMapping(value = "/User/{id}",method = RequestMethod.GET)
public ModelAndView edit(@PathVariable("id")long id){
    user=userService.queryUserById(id);
    ModelAndView modelAndView=new ModelAndView();
    if(user!=null){
        modelAndView.addObject("object",user);
        modelAndView.setViewName("edit");
    }else {
        modelAndView.setViewName("error");
    }
    return modelAndView;
}
设置编辑控制器接收/User/值,GET的请求。通过@PathVariable获得接收到的[id]。调用业务层方法,根据id值得到对象。将对象封装到modeAndView中。并设置进入编辑页面。
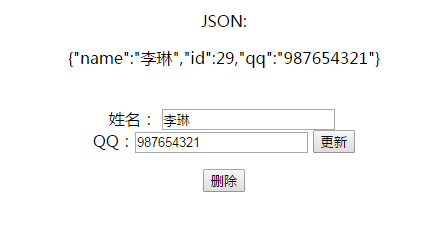
编辑页面使用EL表达式获得编辑控制器传来的对象,设置JSON显示对象、from表单更新用户(采用隐藏域将POST请求转化为PUT表单,通过EL表达式将跳转地址设置为/User/对象id值)、from表单删除用户(隐藏域:DELETE)
<%@ page language="java" contentType="text/html; charset=UTF-8"
         pageEncoding="UTF-8" import="java.util.*"%>
<%@ taglib uri="http://java.sun.com/jsp/jstl/core" prefix="c"%>
<%@ taglib prefix="json" uri="http://www.atg.com/taglibs/json" %>

<div style="text-align:center">
    <p>JSON:</p>
    <json:object>
        <json:property name="name" value="${object.name}"/>
        <json:property name="id" value="${object.id}"/>
        <json:property name="qq" value="${object.qq}"/>
    </json:object>
</div>
<div style="width:500px;margin:0px auto;text-align:center">


    <div style="text-align:center;margin-top:40px">

        <form method="post" action="/User/${object.id}">
            姓名: <input name="name" value="${object.name}" type="text"> <br>
            QQ:<input name="qq" value="${object.qq}" type="text">
            <input type="hidden" value="${object.id}" name="id">
            <input type="hidden" name="_method" value="PUT">
            <input type="submit" value="更新">
        </form>
        <form method="post" action="/User/${object.id}">
            <input type="hidden" name="_method" value="DELETE">
            <input type="hidden" name="id" value="${object.id}">
            <input type="submit" value="删除">
        </form>

    </div>
</div>
按下更新按键:PUT请求 User/对应id值 [name/qq/id]
更新控制器,通过User参数获得[name/qq/id],调用业务层方法,操作成功重点向到主页
//更新一个用户 User {id} PUT
@RequestMapping(value = "/User/{id}",method =RequestMethod.PUT)
public ModelAndView update(User user){
    ModelAndView modelAndView=new ModelAndView();
    operation=userService.reviseUserById(user);
    if(operation=true){
        modelAndView.setViewName("redirect:/User");
    }else {
        modelAndView.setViewName("error");
    }
    return modelAndView;
}
按下删除 DELETE请求,User/对象id值
删除控制器 接收DELETE User/对象id值请求,获得id值,调用业务层方法.操作成功重定向到主页
//删除: User {id}  DELETE
@RequestMapping(value = "/User/{id}",method = RequestMethod.DELETE)
public ModelAndView delate(@RequestParam("id")long id){
    ModelAndView modelAndView=new ModelAndView();
    operation=userService.cutUserById(id);
    if(operation==true){
        modelAndView.setViewName("redirect:/User");//重定向
    }else {
        modelAndView.setViewName("error");
    }
    return modelAndView;
}
添加分页逻辑
参考代码中的方法
添加依赖
<!-- pageHelper -->
<dependency>
  <groupId>com.github.pagehelper</groupId>
  <artifactId>pagehelper</artifactId>
  <version>${pagehelper.version}</version>
</dependency>
在会话工厂类的插件属性中注入PageInterceptor的类
<bean id="sqlSessionFactory" class="org.mybatis.spring.SqlSessionFactoryBean">
   <property name="typeAliasesPackage" value="com.how2java.pojo" />
   <property name="dataSource" ref="dataSource"/>
   <property name="mapperLocations" value="classpath:com/how2java/mapper/*.xml"/>
   <property name="plugins">
       <array>
         <bean class="com.github.pagehelper.PageInterceptor">
           <property name="properties">
             <value>
             </value>
           </property>
         </bean>
       </array>
     </property>
</bean>
添加页面类
public class Page {

   int start=0;//开始位置
   int count = 6;//每页的个数
   int last = 0;//最后一页的位置
   public int getStart() {
      return start;
   }
   public void setStart(int start) {
      this.start = start;
   }
   public int getCount() {
      return count;
   }
   public void setCount(int count) {
      this.count = count;
   }
   public int getLast() {
      return last;
   }
   public void setLast(int last) {
      this.last = last;
   }

   //通过总数total和每页的个数计算出最后一页的位置
   public void caculateLast(int total) {
       // 假设总数是50,是能够被5整除的,那么最后一页的开始就是45
       if (total % count==0)
           last = total - count;
       // 假设总数是51,不能够被5整除的,那么最后一页的开始就是50
       else
           last = total - total % count;
   }
}
修改主页面控制器的代码
//查询全表:User GET
@RequestMapping(value = "/User", method = RequestMethod.GET)
public ModelAndView queryAll(Page page) {
    ModelAndView modelAndView = new ModelAndView();
    //(页面开始值,页面值数)
    PageHelper.offsetPage(page.getStart(),6);
    list = userService.queryUser();
    //获得数据的总数
    int total = (int) new PageInfo<>(list).getTotal();
    //计算最后一页的开始值
    page.caculateLast(total);
    modelAndView.addObject("list", list);
    modelAndView.setViewName("User");
    return modelAndView;
}
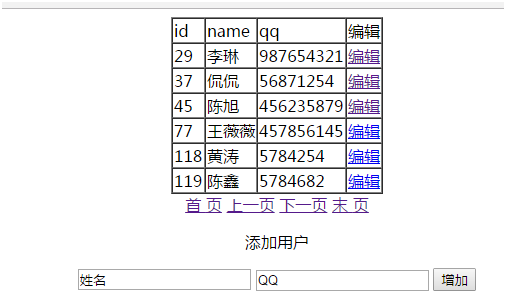
主页JSP添加代码
<div style="text-align:center">
    <a href="?start=0">首 页</a>
    <c:if test="${page.start-page.count>=0}">
        <a href="?start=${page.start-page.count}">上一页</a>
    </c:if>
    <c:if test="${page.start+page.count<=page.last}">
        <a href="?start=${page.start+page.count}">下一页</a>
    </c:if>
    <a href="?start=${page.last}">末页</a>
</div>
运行
参考资料:https://www.oschina.net/news/91089/mybatis-plus-page-1-0-2
发现一些跟代码相关的信息
mybatis 分页插件 MicroPageInterceptor
使用RowBounds子类PageInfo作为分页信息和记录总数的载体,不必像其他分页插件那样要求输入输出参数必须继承特殊父类。
建议在sqlSessionFactory中配置,可以根据sqlSessionFactory是oracle还是mysql配置插件的dialect属性
接口中添加PageInfo参数,表示需要分页处理
PageInfo创建实例时需填写pageNo(页数从1开始)和pageRows(每页条数)
大概就是使用一个分页插件来完成分页操作
在控制器类中将查询到的数据设置为分页模式
public ModelAndView queryAll(Page page) {
PageHelper.offsetPage(page.getStart(),6);//设置开始值,分页值
int total = (int) new PageInfo<>(list).getTotal();//计算总数
page.caculateLast(total);//计算最后一页的值开始数,设置page.last的值
设置后首页的地址:http://localhost:8080/User?start=0
下一页:http://localhost:8080/User?start=6
下一页:http://localhost:8080/User?start=12
即页面被设置成:http://localhost:8080/User?start=值 的形式
访问http://localhost:8080/User?start=某值 即可得到以该顺序值开始的表单(固定值数)
跳页JSP代码:
<div style="text-align:center">
    <a href="?start=0">首 页</a>
    <c:if test="${page.start-page.count>=0}">
        <a href="?start=${page.start-page.count}">上一页</a>
    </c:if>
    <c:if test="${page.start+page.count<=page.last}">
        <a href="?start=${page.start+page.count}">下一页</a>
    </c:if>
    <a href="?start=${page.last}">末页</a>
</div>
设置为分页模式的控制器:会传递控制器形参的page(假设数据总数为15,start=0,count=6,last=最后一页的开始值:12,)
点击首页:href="?start=0":首页(此时start=0)
上一页:0-6>=0(不成立,不显示)
下一页:0+6<=12(成立,显示)
末页:href="?start=12":跳转到尾页
点击下一页:href="?start=6":第二页(此时start=6,conut=6,last=12)
上一页:6-6>=0(成立,显示)
下一页:6+6<=12(成立,显示)
末页:ref="?start=12":跳转到尾页
了解其他分页插件:
参考资料:https://blog.csdn.net/u012728960/article/details/50791343
Mybatis分页插件-PageHelper的使用
1.添加依赖
分页插件pagehelper.jar
<!-- https://mvnrepository.com/artifact/com.github.pagehelper/pagehelper -->
<dependency>
  <groupId>com.github.pagehelper</groupId>
  <artifactId>pagehelper</artifactId>
  <version>5.1.4</version>
</dependency>
由于使用了sql解析工具:jsqlparser.jar
(4.1.0及以后版本需要0.9.4版本、4.1.0以前版本需要0.9.1版本)
<!-- https://mvnrepository.com/artifact/com.github.jsqlparser/jsqlparser -->
<dependency>
  <groupId>com.github.jsqlparser</groupId>
  <artifactId>jsqlparser</artifactId>
  <version>1.2</version>
</dependency>
2.在会话工厂中配置类
<bean id="sqlSessionFactory" class="org.mybatis.spring.SqlSessionFactoryBean">
   <property name="typeAliasesPackage" value="com.how2java.pojo" />
   <property name="dataSource" ref="dataSource"/>
   <property name="mapperLocations" value="classpath:com/how2java/mapper/*.xml"/>
   <property name="plugins">
       <array>
         <bean class="com.github.pagehelper.PageInterceptor">
           <property name="properties">
             <value>
             </value>
           </property>
         </bean>
       </array>
     </property>
</bean>
3.添加查询语句
  <select id="list" resultType="Category">
      select
<include refid="Base_Column_List" />
       from category_
  </select>
疑惑?
<include refid="Base_Column_List" />
参考资料:https://blog.csdn.net/duweiqian/article/details/51188729
使用include标签重用mybatis的代码段
1.定义一个sql标签,定义一个唯一的标签:
<sql id="Base_Column_List" >name,id</sql>
2.在代码中使用定义好的sql标签
  <select id="list" resultType="Category">
      select
<include refid="Base_Column_List" />
       from   category_
  </select>
4.改写控制器代码
//创建一个页面对象作为方法的参数
@RequestMapping("listCategory")
public ModelAndView listCategory(ModelAndView modelAndView,
       @RequestParam(required = true,defaultValue = "1")Integer page,
       @RequestParam(required = false,defaultValue = "6")Integer pageSize)
{
   //模型和视图对象
   ModelAndView mav = new ModelAndView();
   //页面帮手(页面开始值,页面值数)
   PageHelper.startPage(page,pageSize);
   //查询全表将数据保存在List类型的cs中
   List<Category> list= categoryService.list();

   PageInfo<Category> p=new PageInfo<Category>(list);

   mav.addObject("cs",list);
   mav.addObject("page",p);
   mav.setViewName("listCategory");
   return mav;
}
参考资料:https://jingyan.baidu.com/article/b907e62784c48446e7891c90.html (找了好久)
5.得知在JSP页面使用:?page=${page.参数}的形式实现跳转
相关知识点:
当前地址:http://localhost:8080/listCategory
<a href="?page=${page.firstPage}">:在当前地址上另外添加参数
跳转后为:http://localhost:8080/listCategory?page=值
<a href="/?page=${page.firstPage}">
跳转后为:http://localhost:8080/?page=值
<a href=" listCategory /?page=${page.firstPage}">
跳转后为:http://localhost:8080/listCategory/listCategory?page=值
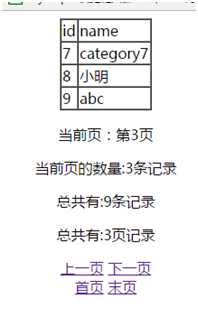
<p>当前页:${page.pageNum}</p>
<a href="?page=${page.firstPage}">首页</a><br>
<a href="?page=${page.prePage}">上一页</a><br>
<a href="?page=${page.nextPage}">下一页</a><br>
<a href="?page=${page.lastPage}">末页</a><br>
6.实现效果:
了解mybatis的动态sql语句
(有一些资料里面都是一些看不懂的动态SQL,有必要了解一下)
参考资料:https://www.cnblogs.com/EasonJim/p/7057575.html
MyBatis的动态SQL语句是基于OGNL表达式的。可以方便的在SQL语句中实现某些逻辑,总体说来MyBatis动态SQL语句主要有以下几类:
1、if语句(简单的条件判断)。
2、choose(选择)(when(当),otherwise(否则)),相当于Java语言中的switch,与JSTL中的choose很类似。
3、trim(对包含的内容加上prefix,或者suffix等,前缀,后缀)。
4、where(主要是用来简化SQL语句中where条件判断的,能智能的处理and or,不必担心多余导致语法错误)。
5、set(主要用于更新时)。
6、foreach(循环)(在实现MyBatis in语句查询时特别有用)。
1.if语句
<select id="dynamicIfTest" parameterType="Article" resultType="Article">
   select * from article where 1 = 1
   <if test="title != null">
      and title = #{title}
   </if>
   <if test="content != null">
      and content = #{content}
   </if>
   limit 1
</select>
如果if标签中参数不为null,则SQL语句添加if标签中的语句
limit 1:找到一条记录就不继续找了
2. choose(when,otherwize),相当于Java语言中的switch,与JSTL中的choose很类似
<select id="dynamicChooseTest" resultType="Article">
   select * from article where 1 = 1
   <choose>
      <when test="title != null">
         and title = #{title}
      </when>
      <when test="content != null">
         and content = #{content}
      </when>
      <otherwise>
         and tile = "test_title"
      </otherwise>
   </choose>
</select>
when元素表示当when中的条件满足的时候就输出其中的内容,跟JAVA中的switch效果差不多的是按照条件的顺序,当when中有条件满足的时候,就会跳出choose,即所有的when和otherwise条件中,只有一个会输出,当所有的我很条件都不满足的时候就输出otherwise中的内容。
3.trim(对包含的内容加上prefix,或者suffix等,前缀,后缀)
<select id="dynamicTrimTest" parameterType="Article" resultType="Article">
   select * from article
   <trim prefix="where" prefixOverrides="and | or">
      <if test="title != null">
         title = #{title}
      </if>
      <if test="content != null">
         and content = #{content}
      </if>
      <if test="id != null">
         or id = #{id}
      </if>
   </trim>
</select>
trim元素的主要功能是可以在自己包含的内容前加上某些前缀,也可以在其后加上某些后缀,与之对应的属性是prefix和suffix;可以把包含内容的首部某些内容覆盖,即忽略,也可以把尾部的某些内容覆盖,对应的属性是prefixOverrides和suffixOverrides;
4.where(主要是用来简化SQL语句中where条件判断的,能智能的处理and or,不必担心多余导致语法错误)
<select id="dynamicWhereTest" parameterType="Article" resultType="Article">
   select * from article
   <where>
      <if test="title != null">
         title = #{title}
      </if>
      <if test="content != null">
         and content = #{content}
      </if>
   </where>
</select>
where元素的作用是会在写入where元素的地方输出一个where,另外一个好处是不需要考虑where元素里面的条件输出是什么样子的,MyBatis会智能的帮你处理,
如果所有的条件都不满足那么MyBatis就会查出所有的记录(相当于where不存在)
如果输出后是and开头的,MyBatis会把第一个and忽略
当然如果是or开头的,MyBatis也会把它忽略
此外,在where元素中不需要考虑空格的问题,MyBatis会智能的帮你加上。
5. set(主要用于更新时)
<update id="dynamicSetTest" parameterType="Article">
   update article
   <set>
      <if test="title != null">
         title = #{title},
      </if>
      <if test="content != null">
         content = #{content}
      </if>
   </set>
   where id = #{id}
</update>
set元素主要是用在更新操作的时候,它的主要功能和where元素其实是差不多的,主要是在包含的语句前输出一个set
然后如果包含的语句是以逗号结束的话将会把该逗号忽略,如果set包含的内容为空的话则会出错。
有了set元素就可以动态的更新那些修改了的字段。
6. foreach(在实现MyBatis in语句查询时特别有用):IN 操作符允许我们在 WHERE 子句中规定多个值。
foreach的主要用在构建in条件中,它可以在SQL语句中进行迭代一个集合。
foreach元素的属性主要有item,index,collection,open,separator,close。
item表示集合中每一个元素进行迭代时的别名
index指定一个名字,用于表示在迭代过程中,每次迭代到的位置
open表示该语句以什么开始
separator表示在每次进行迭代之间以什么符号作为分隔符
close表示以什么结束
在使用foreach的时候最关键的也是最容易出错的就是collection属性,该属性是必须指定的,但是在不同情况下,该属性的值是不一样的,主要有一下3种情况:
如果传入的是单参数且参数类型是一个List的时候,collection属性值为list
如果传入的是单参数且参数类型是一个Array数组的时候,collection的属性值为array
如果传入的参数是多个的时候,就需要把它们封装成一个Map,当然单参数也可以封装成Map,实际上如果在传入参数的时候,在MyBatis里面也是会把它封装成一个Map的,Map的key就是参数名,所以这个时候collection属性值就是传入的List或Array对象在自己封装的Map里面的key
1、单参数List的类型:
<select id="dynamicForeachTest" resultType="Article">
   select * from article where id in
   <foreach collection="list" index="index" item="item" open="(" separator="," close=")">
      #{item}
   </foreach>
</select>
collection:设置传入类型为单参数List类型
item:设置集合中每一个元素进行迭代时的别名为“item”
index:每次迭代到“item”
open:语句从“(”开始
separator: 每次进行迭代之间以“,”作为分隔符
close:语句以“)”结束
最后的SQL:select * from article where id in (集合中的第一个元素, 集合中的第二个元素,….,集合中的最后一个元素)
2、数组类型的参数:
<select id="dynamicForeach2Test" resultType="Article">
   select * from article where id in
   <foreach collection="array" index="index" item="item" open="(" separator="," close=")">
      #{item}
   </foreach>
</select>
collection:设置传入的类型为数组
item: 设置集合中每一个元素进行迭代时的别名为“item”
index: 每次迭代到“item”
open:开始的字符“(”
separator: 每次进行迭代之间以“,”作为分隔符
close:语句以“)”结束
最后的SQL:select * from article where id in (集合中的第一个元素, 集合中的第二个元素,….,集合中的最后一个元素)
3、Map类型的参数:
<select id="dynamicForeach3Test" resultType="Article">
   select * from article where title like "%"#{title}"%" and id in
   <foreach collection="ids" index="index" item="item" open="(" separator="," close=")">
      #{item}
   </foreach>
</select>
只是collection不同,其他没区别
7.<sql>用来封装SQL语句, <include>来调用
明天计划的事情:
了解一下怎么使用静态资源
遇到的问题:
有一些文章涉及到动态SQL语句(已了解)以及静态资源的加载(还没学)
收获:
常规思路的CRUD(REST风格),mybatis的分页插件,了解mybatis的动态SQL语句


评论