发表于: 2018-02-02 20:56:00
1 532
今日完成
1.学习hibernate
(1)导包,这里用的是spring4.3.12+hibernate5.2.12.F。要使用hibernate导两个包就行了。
<dependency>
  <groupId>org.hibernate</groupId>
  <artifactId>hibernate-core</artifactId>
  <version>5.2.12.Final</version>
</dependency>
<dependency>
  <groupId>org.hibernate</groupId>
  <artifactId>hibernate-entitymanager</artifactId>
  <version>5.2.12.Final</version>
</dependency>
(2)看看hibernate是什么?
Hibernate是一个开放源代码的对象关系映射框架,它对JDBC进行了非常轻量级的对象封装,使得Java程序员可以随心所欲的使用对象编程思维来操纵数据库。 Hibernate可以应用在任何使用JDBC的场合,既可以在Java的客户端程序使用,也可以在Servlet/JSP的Web应用中使用,最具革命意义的是,Hibernate可以在应用EJB的J2EE架构中取代CMP,完成数据持久化的重任。
Hibernate是轻量级JavaEE应用的持久层解决方案,是一个关系数据库ORM框架.
* ORM:Object Relational Mapping.
(3)还是使用贯穿任务的学生表格吧。
1)创建hibernate的核心配置文件,必须放在rec文件夹下面。命名的规范:hibernate.cfg.xml
<!DOCTYPE hibernate-configuration PUBLIC
"-//Hibernate/Hibernate Configuration DTD 3.0//EN"
"http://www.hibernate.org/dtd/hibernate-configuration-3.0.dtd">
<hibernate-configuration>
<session-factory>
<property name="hibernate.connection.driver_class">com.mysql.jdbc.Driver</property>
<!--//数据库是zz2017,问号后面的是设置一下字符编码,我防止数据库中文字符乱码问题-->
<property name="hibernate.connection.url">jdbc:mysql://rm-wz9oexky20j20h2w01o.mysql.rds.aliyuncs.com:3306/task4?useUnicode=true&characterEncoding=UTF8</property>
<property name="hibernate.connection.username">root</property>
<!--//数据库密码-->
<property name="hibernate.connection.password">*******</property>
<!-- hbm:映射 to DDL: create drop alter -->
<!--<property name="hibernate.hbm2ddl.auto">update</property>-->
<!-- 显示SQL -->
<property name="hibernate.show_sql">true</property>
<!-- 格式化SQL -->
<property name="hibernate.format_sql">true</property>
<!-- Hibernate的方言 -->
<!-- 生成底层SQL不同的 -->
<property name="hibernate.dialect">org.hibernate.dialect.MySQL5Dialect</property>
<mapping resource="lujing/pojo/Student.hbm.xml"/>
</session-factory>
</hibernate-configuration>
2)建立实体类,与mybatis很相似。每个实体类有一个对应的hb.xml配置文件。和mybatis的resultMap很类似。
<?xml version='1.0' encoding='utf-8'?>
<!DOCTYPE hibernate-mapping PUBLIC
    "-//Hibernate/Hibernate Mapping DTD 3.0//EN"
    "http://www.hibernate.org/dtd/hibernate-mapping-3.0.dtd">
<hibernate-mapping>

    <class name="lujing.pojo.Student" table="student" schema="task4">
        <id name="id" column="ID">
            <generator class="native"/>
        </id>
        <property name="name" column="name"/>
        <property name="qqNum" column="qq_num"/>
        <property name="type" column="type"/>
        <property name="perTime" column="per_time"/>
        <property name="gradSchool" column="grad_school"/>
        <property name="pic" column="pic"/>
        <property name="dailyLink" column="daily_link"/>
        <property name="statement" column="statement"/>
        <property name="presenter" column="presenter"/>
        <property name="learnFrom" column="learn_from"/>
        <property name="createAt" column="create_at"/>
        <property name="updateAt" column="update_at"/>
    </class>
</hibernate-mapping>
3)这就可以开始写第一个demo了。这里需要注意一点,hibernate真的有点奇怪,好多版本生成会话工厂的方式都不太一样,刚开始学习的时候需要注意一下,但是后面使用spring管理sessionfactory了就不用管这个了。
//1.创建服务注册对象
ServiceRegistry serviceRegistry = new StandardServiceRegistryBuilder().configure().build();
//2.创建会话工厂对象
sessionFactory = new MetadataSources(serviceRegistry).buildMetadata().buildSessionFactory();


//3.创建session
session = sessionFactory.openSession();
//4.开启事务
transaction = session.beginTransaction();
   //5. crud操作
        Student xx = new Student();
        xx.setName("盖伦2");
        xx.setGradSchool("德玛西亚");
        xx.setQqNum("1122@qq.com");

        session.save(xx);
//        Student s1 = session.get(Student.class, 218547);
//        session.delete(s1);
//        System.out.println(s1);
    }
//6.事务提交
transaction.commit();
//7.释放资源
session.close();
sessionFactory.close();
4)后面还有一些其他的操作,放在整合里面一起写。
(4)使用spring整合
1)datasource和其他的一样。
2)管理sessionfactory。其实就是就前面的核心配置文件里面的内容放在这个里面了。
<bean id="sessionFactory" class="org.springframework.orm.hibernate5.LocalSessionFactoryBean">
    <property name="dataSource" ref="dataSource"/>

    <property name="hibernateProperties">
        <props>
            <prop key="hibernate.show_sql">true</prop>
            <prop key="hibernate.format_sql">true</prop>
            <prop key="hibernate.dialect">org.hibernate.dialect.MySQL5Dialect</prop>
            <!--<prop key="hibernate.current_session_context_class">thread</prop>-->
            <!--<prop key="hibernate.connection.autocommit">true</prop>-->
            <prop key="hibernate.hbm2ddl.auto">update</prop>
            <prop key="hibernate.conn">true</prop>
        </props>
    </property>
3)加载配置文件
<property name="mappingResources"
          value="lujing/entity/Students.hbm.xml,lujing/entity/Classes.hbm.xml,lujing/pojo/Student.hbm.xml"/>
4)事务管理
<bean id="transactionManager" class="org.springframework.orm.hibernate5.HibernateTransactionManager">
    <property name="sessionFactory" ref="sessionFactory"/>
</bean>
5)注解驱动的事务管理
<tx:annotation-driven transaction-manager="transactionManager"/>
(5)hibernate的自定义查询。hibernate弱化了sql语句,自定义查询有几个常用的接口和对象。
1:query
/**
* 使用query接口的自定义查询,使用HQL的方式
*/
@Test
public void customQuery() {
Session session = sessionFactory.getCurrentSession();
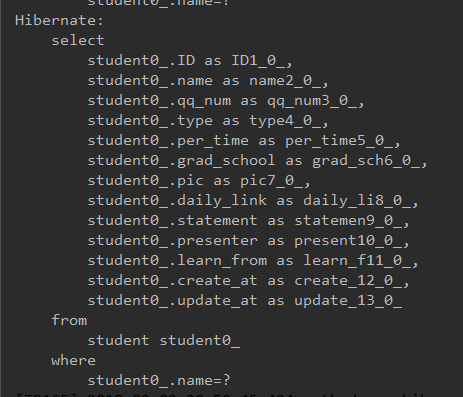
Query query = session.createQuery("from Student where name = ?");
//使用索引占位符
query.setParameter(0, "lujing");
List<Student> list = query.getResultList();
for (Student student : list) {
System.out.println(student);
}
}
输出的SQL语句(这个需要配置日志文件,才能在控制台打印出sql)
2:nativeQuery——这个是原生的SQL;
/**
* 使用NativeQuery接口的自定义查询,使用原生SQL的方式
*/
@Test
public void customNativeQuery() {
Session session = sessionFactory.getCurrentSession();
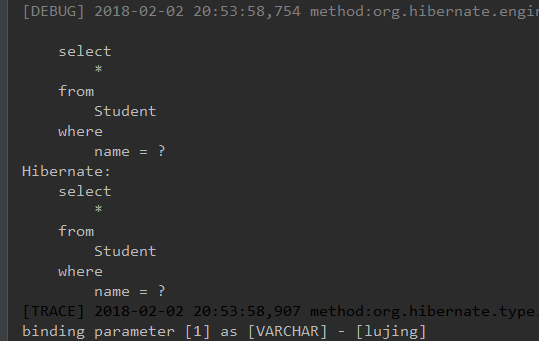
Query query = session.createNativeQuery("select * from Student where name = ?", Student.class);
//使用索引占位符
query.setParameter(1, "lujing");
List<Student> list = query.getResultList();
for (Student student : list) {
System.out.println(student);
}
}
输出的SQL语句就是原生的了;
遇到问题
1.暂无
明日计划
1,hibernate多表查询
收获
学会了hibernate的基本配置。


评论