发表于: 2018-01-23 21:33:21
1 766
今日完成
1.分选登录的完成,识别用户输入的是手机号用户名或者邮箱。
(1)前端正则匹配如果是手机号,将该字段给phonenum赋值。其他的同理。代码实现如下
$('#login_button').click(function () {
if ($('#name').val() == '') {
$('#name').focus().css({
border: "1px solid ",
boxShadow: "0 0 2px "
});
$('#loginCue').html("<font color='#B03469'><b>请输入用户名</b></font>");
return false;
}
if ($('#password').val() == '') {
$('#password').focus().css({
border: "1px solid ",
boxShadow: "0 0 2px "
});
$('#loginCue').html("<font color='#B03469'><b>请输入密码</b></font>");
return false;
}
var myRegEmail = /^([a-zA-Z0-9_-])+@([a-zA-Z0-9_-])+((\.[a-zA-Z0-9_-]{2,3}){1,2})$/
var myRegPhone = /^(((13[0-9]{1})|(14[0-9]{1})|(17[0]{1})|(15[0-3]{1})|(15[5-9]{1})|(18[0-9]{1}))+\d{8})$/;
//如果是手机号
if (myRegPhone.test($('#name').val())) {
console.log($('#name').val());
$.ajax({
type: 'POST',
url: './loginRequest',
dataType: 'json',
data: {phoneNum: $('#name').val(), password: $('#password').val()},
async: true,
success: function (data) {
console.log(data)
if (data == 1) {
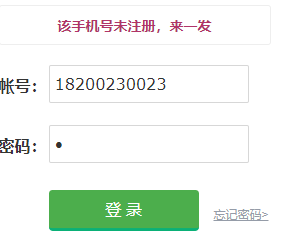
$('#loginCue').html("<font color='#B03469'><b>该手机号未注册,来一发</b></font>");
return false;
}
if (data == -1) {
$('#loginCue').html("<font color='#B00A08'><b>密码错误</b></font>");
return false;
}
if (data == 0) {
$('#euserCue').html("<font color='#1e941e'><b>√ 登录成功 </b></font>");
location.href = "${pageContext.request.contextPath}/login"
}
}
})
}
// 如果是邮箱号码
if (myRegEmail.test($('#name').val())) {
console.log($('#name').val());
$.ajax({
type: 'POST',
url: './loginRequest',
dataType: 'json',
data: {email: $('#name').val(), password: $('#password').val()},
async: true,
success: function (data) {
console.log(data)
if (data == 1) {
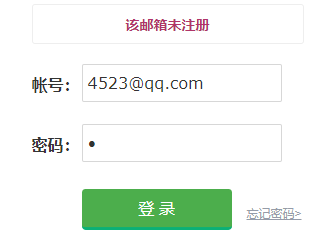
$('#loginCue').html("<font color='#B03469'><b>该邮箱未注册</b></font>");
return false;
}
if (data == -1) {
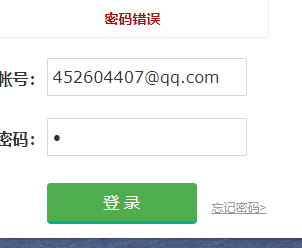
$('#loginCue').html("<font color='#B00A08'><b>密码错误</b></font>");
return false;
}
if(data == 2){
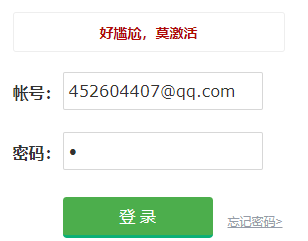
$('#loginCue').html("<font color='#B00A08'><b>好尴尬,莫激活</b></font>");
return false;
}
if (data == 0) {
$('#euserCue').html("<font color='#1e941e'><b>√ 登录成功 </b></font>");
location.href = "${pageContext.request.contextPath}/login"
}
}
})
}
//如果是用户名
if (!myRegPhone.test($('#name').val()) && !myRegEmail.test($('#name').val())) {
console.log($('#name').val());
$.ajax({
type: 'POST',
url: './loginRequest',
dataType: 'json',
data: {name: $('#name').val(), password: $('#password').val()},
async: true,
success: function (data) {
console.log(data)
if (data == 1) {
$('#loginCue').html("<font color='#B03469'><b>该用户名未注册,搞一个吧</b></font>");
return false;
}
if (data == -1) {
$('#loginCue').html("<font color='#B00A08'><b>密码错误</b></font>");
return false;
}
if (data == 0) {
$('#euserCue').html("<font color='#1e941e'><b>√ 登录成功 </b></font>");
location.href = "${pageContext.request.contextPath}/login"
}
}
})
}
})
$('#name').focus(function () {
$('#loginCue').html("<font color='#B03469'><b>帐号:用户名/手机号/邮箱</b></font>");
})
})
(2)后端使用同一接口,都是用user去接收数据
/**
 * 用户登录认证接口
 * @param session
 * @param response
 * @param user
 * @param password
 * @return 0:认证成功。1:用户不存在。-1:认证失败。2:未激活
 */
@RequestMapping(value = "/loginRequest", method = RequestMethod.POST)
public @ResponseBody
int loginRequest(HttpSession session, HttpServletResponse response, User user, String password) {

    int result = userServiceImpl.verifyUser(session, response, user, password);
    return result;
}
(3)相应的服务层。昨天写的findUserCustom得到了复用。
/**
 * 用户登录认证
 *
 * @param session
 * @param response
 * @param user     前端分离后的用户
 * @param password 前端回传的密码
 * @return 0:认证成功。1:用户不存在。-1:认证失败。2:未激活
 */
@Override
public int verifyUser(HttpSession session, HttpServletResponse response,
                      User user, String password) {
    User record = userMapper.findUserCustom(user);

    if (null != record) {
        if(record.getEmailStatus() !=null&&record.getEmailStatus() == 0){
            return 2;
        }

        //获得用户的盐值
        String salt = record.getSalt();
        //再次生成加密后的密码
        String verifyDesPwd = MessageDigestUtils.SHA256(password + salt);
        if (verifyDesPwd.equals(record.getDesPassword())) {
            //登录成功,使用工具类生成TOKEN;
            String token = JwtUtils.
                    generateToken(Constant.siginKey, record.getName(), 30 * 60 * 1000l);
            //将生成的token,放入制定域对象的cookie中,并设置有效时长。
            CookieUtils.createCookie(response, Constant.jwtCookieName, token, 30 * 60);
            //生成session
            session.setAttribute("username", record.getName());
            session.setMaxInactiveInterval(30 * 60);
            return 0;
        }
        return -1;
    }
    return 1;

}
(4)看看效果---先提示用户注册状态,再提示,密码状态。

 、
、
2.邮箱注册激活链接的实现。
(1)注册后发送链接
/**
 * 邮箱注册,并发送激活链接
 * @param request
 * @param record
 * @param password
 * @param model
 * @return
 */
@RequestMapping("/sigwithemail")
public String sigwithemail(HttpServletRequest request, User record, String password, Model model) {
    //设置未激活状态
    record.setEmailStatus(0);
    //发送激活连接
    int sendStautus = userServiceImpl.sendActiveEmail(record.getEmail(), record.getName(), request, 1000 * 60*15l);
    if (sendStautus == 0) {
        String result = userServiceImpl.siginUser(record, password);

        if (result == Constant.signSuccess) {
            model.addAttribute("message", "注册成功,快进入你的邮箱然后点击激活吧");
            return "/login/sigSuccess";
        }
    }
    model.addAttribute("message", "注册失败……");
    return "/login/sigSuccess";
}
(2)发送链接的服务层
 /**
     * @param to  邮箱接收地址
     * @param ttl 激活链接
     * @return 0:发送成功。else 发送失败httpstatus
     */
    @Override
    public int sendActiveEmail(String to, String subject, HttpServletRequest request, Long ttl) {

        String token = JwtUtils.generateToken(Constant.siginKey, subject, ttl);
        String path = request.getContextPath();
        String basePath = request.getScheme() + "://" + request.getServerName() + ":" + request.getServerPort() + path;

        StringBuffer sbb = new StringBuffer();
        sbb.append(basePath).append("/activeEmail").append("?").append("name=").append(subject);
        sbb.append("&token=").append(token);
        String url = sbb.toString();
        logger.info("激活链接" + url);
        int result = SendCloudAPIV2_44.send_template(to, subject, url);
        if (result == 200) {
            return 0;
        }
        logger.info("发送状态" + result);
        return result;
    }
}
(3)激活链接点击的接口,接受回传的token,以及name
/**
 * 邮箱激活链接
 *
 * @param name
 * @param token
 * @param model
 * @return
 */
@RequestMapping("/activeEmail")
public String activeEmail(HttpServletRequest request, String name, String token, Model model) {

    try {
        String sub = Jwts.parser().setSigningKey(Constant.siginKey).parseClaimsJws(token).getBody().getSubject();
        if (name.equals(sub)) {
            User update = new User();
            update.setEmailStatus(1);
            update.setName(name);
            userMapper.UpdateByNameSelective(update);

            model.addAttribute("message", "恭喜您,激活成功啦,");
            return "login/sigSuccess";
        }
    } catch (Exception e) {
        User act = new User();
        act.setName(name);
        User active = userMapper.findUserCustom(act);
        if (null != active) {
            model.addAttribute("message", "过期不候哦哦哦,看看有木有新的激活邮件");
            int sendStautus = userServiceImpl.sendActiveEmail(active.getEmail(), name, request, 1000 * 60 * 60l);
            return "login/sigSuccess";
        }

    }
明日计划
1.整理代码,部署项目,提交任务
遇到问题
1.ajax的相对路径与绝对路径
收获
1.对前后端的交换有了更深的理解。


评论