发表于: 2018-01-20 23:10:27
1 630
今天完成的事情:
1.spring-Interceptor(拦截器)
3.afterCompletion :在DispatchServlet执行完ModelAndView之后执行
public class AuthorizationInterceptor implements HandlerInterceptor {
//不拦截的页面
private static final String[] IGNORE_URI = {"/login"};
/**
* preHandle拦截使用,在controller执行之前
* 返回值为true才会向下执行,false的话请求就结束
*/
public boolean preHandle(HttpServletRequest httpServletRequest, HttpServletResponse httpServletResponse, Object o) throws Exception {
System.out.println("方法AuthorizationInterceptor preHandle()");
boolean flag = false; //用于存储判断登陆的结果
//对请求路径判断
String servletPath = httpServletRequest.getServletPath();
System.out.println("获取地址"+servletPath);
//判断请求路径是否需要拦截
for(String s:IGNORE_URI){
if(servletPath.contains(s)){
System.out.println("包含在不拦截列表中");
flag = true; //如果是不拦截的网站,flag为true,跳出循环,专项下一个方法
break;
}
}
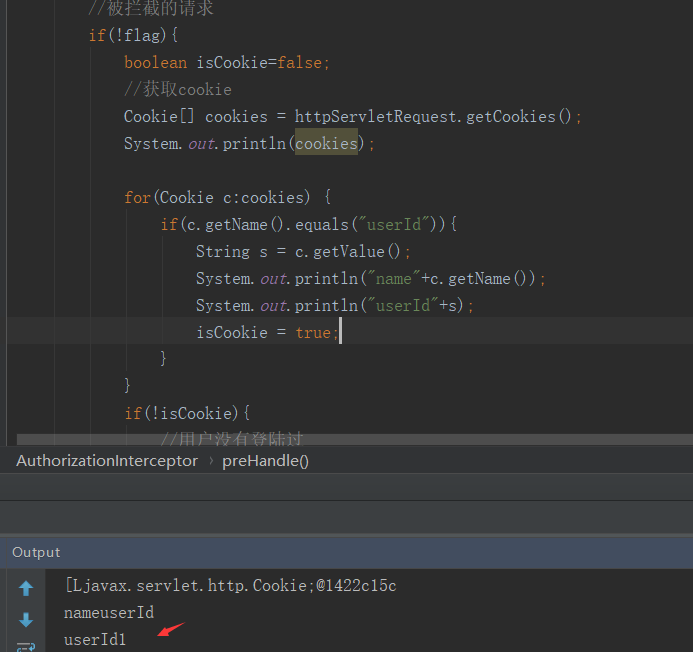
//被拦截的请求
if(!flag){
boolean isCookie=false;
//获取cookie
Cookie[] cookies = httpServletRequest.getCookies();
System.out.println(cookies);
for(Cookie c:cookies) {
if(c.getName().equals("userId")){
String s = c.getValue();
System.out.println("name"+c.getName());
System.out.println("userId"+s);
isCookie = true;
}
}
if(!isCookie){
//用户没有登陆过
System.out.println("\"AuthorizationInterceptor拦截请求\"");
httpServletRequest.setAttribute("message","请先登陆管理员后再访问网站");
httpServletRequest.getRequestDispatcher("/").forward(httpServletRequest,httpServletResponse);
}else{
//用户登陆过,验证通过
httpServletRequest.setAttribute("message","已登陆");
System.out.println("\"AuthorizationInterceptor放行请求\"");
flag=true;
}
}
return flag;
}
spring-mvc配置文件根据任务要求拦截一个页面,/u/t10
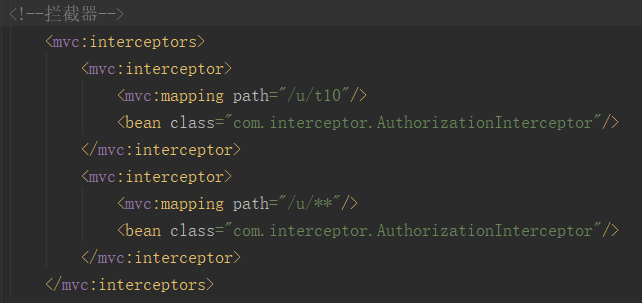
访问/u/t10,则访问被拦截器拦截,
进入preHandle: 在执行controller处理之前执行,返回值为true时接着执行postHandle和afterCompletion,如果我们返回false则中断执行。
如果为true,则正常访问。
如果为false,则跳转到登陆页面。
2.token学习。
http://blog.csdn.net/a8250852/article/details/72615452
基本的技术实现路线:
1.用户在登录页面输入账号密码,提交后,java后台进行一次验证,如果正确,则为用户制作token令牌
具体制作过程:
将传过来的值进行一个加密就可以了制作成token令牌了,一般来说,选用md5加密方式,参数方面,可以使用用户名+秘钥
2.将加密后的字符串传给前端
3.前端使用cookie保存token和用户名
4.使用拦截器,获取用户名和token,使用用户名再制作token,然后比对,如果一致就可以放行了
3.DES(Data Encryption Standard)数据加密标准,对称加密。网上找了一个实现。
public class DES {

    //加密
    public static byte[] encrypt(byte[] datasource, String password){
        try{
            //安全随机数
            SecureRandom random = new SecureRandom();
            DESKeySpec desKey = new DESKeySpec(password.getBytes());
            //创建一个密钥工厂,然后用它把DESKeySpec转换
            SecretKeyFactory keyFactory = SecretKeyFactory.getInstance("DES");
            SecretKey securekey = keyFactory.generateSecret(desKey);
            //Cipher对象实际完成加密操作
            Cipher cipher= Cipher.getInstance("DES");
            //用密钥初始化Cipher对象
            cipher.init(Cipher.ENCRYPT_MODE, securekey, random);
            //获取数据并加密
            //正式执行加密操作
            return cipher.doFinal(datasource);

        } catch (InvalidKeyException e) {
            e.printStackTrace();
        } catch (NoSuchAlgorithmException e) {
            e.printStackTrace();
        } catch (BadPaddingException e) {
            e.printStackTrace();
        } catch (IllegalBlockSizeException e) {
            e.printStackTrace();
        } catch (NoSuchPaddingException e) {
            e.printStackTrace();
        } catch (InvalidKeySpecException e) {
            e.printStackTrace();
        }
        return null;
    }

    /**
     * 解密
     * @param src byte[]
     * @param password String
     * @return byte[]
     * @throws Exception
     */
    public static byte[] decrypt(byte[] src, String password) throws Exception {
// DES算法要求有一个可信任的随机数源
        SecureRandom random = new SecureRandom();
// 创建一个DESKeySpec对象
        DESKeySpec desKey = new DESKeySpec(password.getBytes());
// 创建一个密匙工厂
        SecretKeyFactory keyFactory = SecretKeyFactory.getInstance("DES");
// 将DESKeySpec对象转换成SecretKey对象
        SecretKey securekey = keyFactory.generateSecret(desKey);
// Cipher对象实际完成解密操作
        Cipher cipher = Cipher.getInstance("DES");
// 用密匙初始化Cipher对象
        cipher.init(Cipher.DECRYPT_MODE, securekey, random);
// 真正开始解密操作
        return cipher.doFinal(src);
    }
}
使用方式:
@Test
public void gogo() throws UnsupportedEncodingException {
    //待加密内容
    String str = "1"+"20:42:11";
    //密码,长度要是8的倍数
    String password = "abcdefga";      //密钥,关键
byte[] result = DES.encrypt(str.getBytes(), password);
   System.out.println("加密后:" + new String(Base64.encodeBase64(result)));
    //直接将如上内容解密
    try {
        byte[] decryResult = DES.decrypt(result, password);
        System.out.println("解密后:" + new String(decryResult));
    } catch (Exception e1) {
        e1.printStackTrace();
    }
}
5.使用DES生成token:
DES(用户id+登陆时间+密钥 )==token -------》》 cookies: token=token , userId = id, logtime -=logtime
@RequestMapping(value = "/login",method = RequestMethod.POST)
public String loge(HttpServletRequest request,
                    HttpServletResponse response,
                    @RequestParam("userName") String u,
                   @RequestParam("userPassword") String pw,
                   Model model){
    student = studentMapper.selectByuserName(u);

    if(u.equals(student.getUserName()) && pw.equals(student.getPassWord())){
        //得到系统当前时间,传给cookie
        Date day = new Date();
        SimpleDateFormat sdf = new SimpleDateFormat("HH:mm:ss");
        String logtime = sdf.format(day);
        String id = String.valueOf(student.getId());
        //生成token
        //待加密内容
        String str = id + logtime;
        //密钥,长度要是8的倍数
        String key = "aaaaaaaa";
        byte[] result = DES.encrypt(str.getBytes(), key);
        String token = new String(Base64.encodeBase64(result));  //!!!!!!!!要使用base64编码,否则cookie接受失败。
        //创建cookie
        Cookie idCookie = new Cookie("id",id);
        Cookie logTimeCookie = new Cookie("logtime",logtime);
        Cookie tokenCookie = new Cookie("token",token);
        response.addCookie(idCookie);
        response.addCookie(logTimeCookie);
        response.addCookie(tokenCookie);
    }else {
        return "login";
    }
    model.addAttribute("message","已登陆");
    return "hello";
}
改拦截器:
1.获取cookies;
2.获取 id 和 logtime 和token的值。
3.如果 DES(id+logtime+key) == token ,验证通过。
还没完成
遇到的问题:
1.
byte[] result = DES.encrypt(str.getBytes(), password);
   System.out.println("加密后:" + new String(Base64.encodeBase64(result)));
加密后转字符串会出现乱码,客户端无法接受cookie,要使用base64转码。
2.cookie.getName() cookie.getValue() 取不到值,暂时未解决。
.
收获:
1.学习了拦截器的简单用法。
2.了解了DES加密,一种对称加密方式,关键点是 key。
3.了解了cookie,token。
明天的计划:
1.提交任务4
2.完成登陆验证系统。
任务4开始时间:2018.1.17.
预计完成时间:2018.1.22.
禅道:http://task.ptteng.com/zentao/project-task.html


评论