发表于: 2017-12-29 23:50:13
1 474
1.尝试翻译mybatis-config.xml
<?xml version(版本)="1.0" encoding(编码)="UTF-8" ?>
<!DOCTYPE(文档类型) configuration(配置)
PUBLIC "-//mybatis.org//DTD Config 3.0//EN"
"http://mybatis.org/dtd/mybatis-3-config.dtd">
<configuration>
<properties resource(资源)="jdbc.properties"/>
<environments default(默认的)="mysql">
<environment(环境) id="mysql">
<transactionManager(事务管理器) type="JDBC"/>
<dataSource(数据源) type="POOLED">
<property name="driver" value="${driver}"/>
<property name="url" value="${url}"/>
<property name="username" value="root"/>
<property name="password" value="1234"/>
</dataSource>
</environment>
</environments>
<mappers>
<mapper class="cn.summerwaves.dao.UserDao"/>(一连串的包,类的位置)
<mapper resource="cn/summerwaves/mapper/UserDao.xml"/>
</mappers>
</configuration>(配置)
二:首先建立一个表,如图所示:

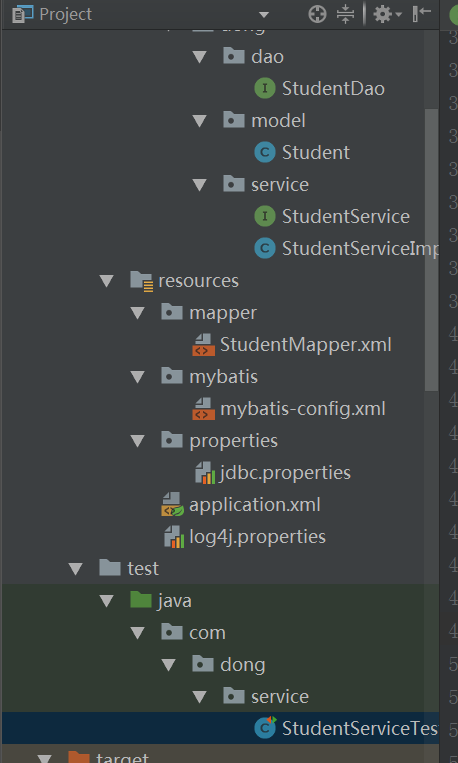
2.建立一个maven项目:表结构如此:
3.配置pom.xml文件(以前的日报有),jdbc.properties,如下图
jdbc_driverClassName=com.mysql.jdbc.Driver
jdbc_url=jdbc:mysql://localhost:3306/test
jdbc_username=root
jdbc_password=1234
4.配置mybatis-config.xml文件:
<?xml version="1.0" encoding="UTF-8"?>
<!DOCTYPE configuration PUBLIC "-//mybatis.org//DTD Config 3.0//EN"
        "http://mybatis.org/dtd/mybatis-3-config.dtd">
<configuration>
</configuration>
5.配置StudentMapper文件
<?xml version="1.0" encoding="UTF-8"?>
<!DOCTYPE mapper PUBLIC "-//mybatis.org//DTD Mapper 3.0//EN"
        "http://mybatis.org/dtd/mybatis-3-mapper.dtd">
<mapper namespace="com.dong.dao.StudentDao">
    <!--设置model类和数据库中表的字段一一对应,注意数据库字段和model类中的字段名称不致,此处一定要!-->
    <resultMap id="BaseResultMap" type="com.dong.model.Student">
        <id column="id" property="id" jdbcType="INTEGER" />
        <result column="student_id" property="studentId" jdbcType="INTEGER" />
        <result column="student_name" property="studentName" jdbcType="VARCHAR" />
        <result column="student_password" property="studentPassword" jdbcType="VARCHAR" />
        <result column="student_email" property="studentEmail" jdbcType="VARCHAR" />
    </resultMap>
    <!-- 按照id查找 -->
    <select id="selectStudentById" parameterType="int" resultMap="BaseResultMap">
        SELECT * FROM student WHERE id = #{id}
    </select>
    <!--按照学号查找 -->
    <select id="selectStudentByStudentId" parameterType="int" resultMap="BaseResultMap">
        SELECT * FROM student WHERE student_id = #{studentId}
    </select>
    <!--按照姓名查找 -->
    <select id="selectStudentByStudentName" parameterType="String" resultMap="BaseResultMap">
        SELECT * FROM student WHERE student_name = #{studentName}
    </select>
    <!--向表中增加數據-->
    <select id="insertStudent" parameterType="com.dong.model.Student">
    INSERT into student(student_id,student_name,student_password,student_email) VALUES(#{studentId},#{studentName},#{studentPassword},#{studentEmail})
    </select>
    <!--删除表中数据-->
    <delete id="deleteStudentById" parameterType="int">
        DELETE FROM student WHERE id = #{id}
    </delete>
    <!--更新表中数据(改)-->
    <update id="updateStudent" parameterType="com.dong.model.Student">
        UPDATE student SET student_id=#{studentId},student_name=#{studentName},student_password=#{studentPassword},student_email=#{studentEmail} WHERE id=#{id}
    </update>
</mapper>
6.配置log4j.properties
#
#log4j.rootLogger=DEBUG,Console,Stdout
#
##Console
#log4j.appender.Console=org.apache.log4j.ConsoleAppender
#log4j.appender.Console.layout=org.apache.log4j.PatternLayout
#log4j.appender.Console.layout.ConversionPattern=%d [%t] %-5p [%c] - %m%n
#
#log4j.logger.java.sql.ResultSet=INFO
#log4j.logger.org.apache=INFO
#log4j.logger.java.sql.Connection=DEBUG
#log4j.logger.java.sql.Statement=DEBUG
#log4j.logger.java.sql.PreparedStatement=DEBUG
#
#log4j.appender.Stdout = org.apache.log4j.DailyRollingFileAppender
#log4j.appender.Stdout.File = E://logs/log.log
#log4j.appender.Stdout.Append = true
#log4j.appender.Stdout.Threshold = DEBUG
#log4j.appender.Stdout.layout = org.apache.log4j.PatternLayout
#log4j.appender.Stdout.layout.ConversionPattern = %-d{yyyy-MM-dd HH:mm:ss}  [ %t:%r ] - [ %p ]  %m%n
#
#
7.配置application.xml
<?xml version="1.0" encoding="UTF-8"?>
<beans xmlns="http://www.springframework.org/schema/beans"
       xmlns:xsi="http://www.w3.org/2001/XMLSchema-instance"
       xmlns:context="http://www.springframework.org/schema/context"
       xsi:schemaLocation="
           http://www.springframework.org/schema/beans
           http://www.springframework.org/schema/beans/spring-beans-3.0.xsd
           http://www.springframework.org/schema/context
           http://www.springframework.org/schema/context/spring-context-3.0.xsd">
    <!-- 引入jdbc配置文件 -->
    <bean id="propertyConfigurer" class="org.springframework.beans.factory.config.PropertyPlaceholderConfigurer">
        <property name="locations">
            <list>
                <value>classpath:properties/*.properties</value>
                <!--要是有多个配置文件,只需在这里继续添加即可 -->
            </list>
        </property>
    </bean>
    <!-- 配置数据源 -->
    <bean id="dataSource"
          class="org.springframework.jdbc.datasource.DriverManagerDataSource">
        <!-- 使用properties来配置 -->
        <property name="driverClassName">
            <value>${jdbc_driverClassName}</value>
        </property>
        <property name="url">
            <value>${jdbc_url}</value>
        </property>
        <property name="username">
            <value>${jdbc_username}</value>
        </property>
        <property name="password">
            <value>1234</value>
        </property>
    </bean>
    <!-- 自动扫描了所有的XxxxMapper.xml对应的mapper接口文件,这样就不用一个一个手动配置Mpper的映射了,只要Mapper接口类和Mapper映射文件对应起来就可以了。 -->
    <bean class="org.mybatis.spring.mapper.MapperScannerConfigurer">
        <property name="basePackage"
                  value="com.dong.dao" />
    </bean>
    <!-- 配置Mybatis的文件 ,mapperLocations配置**Mapper.xml文件位置,configLocation配置mybatis-config文件位置-->
    <bean id="sqlSessionFactory" class="org.mybatis.spring.SqlSessionFactoryBean">
        <property name="dataSource" ref="dataSource" />
        <property name="mapperLocations" value="classpath*:mapper/**/*.xml"/>
        <property name="configLocation" value="classpath:mybatis/mybatis-config.xml" />
    </bean>
    <!-- 自动扫描注解的bean -->
    <context:component-scan base-package="com.dong.service" />
</beans>
8.配置StudentServiceTest
package com.dong.service;
import com.dong.model.Student;
import org.apache.log4j.Logger;
import org.junit.Test;
import org.junit.runner.RunWith;
import org.springframework.beans.factory.annotation.Autowired;
import org.springframework.test.context.ContextConfiguration;
import org.springframework.test.context.junit4.SpringJUnit4ClassRunner;
@ContextConfiguration(locations={"classpath:application.xml"})
@RunWith(SpringJUnit4ClassRunner.class)
public class StudentServiceTest {
    @Autowired
    private StudentService studentService;
    Logger logger =Logger.getLogger(StudentServiceTest.class);
    //    根据姓名查询
    @Test
    public void setStudentByStudentNameTest(){
        Student student =studentService.selectStudentByStudentName("钟楚炯");
        logger.debug("查找结果"+ student);
        System.out.println(student);
    }
//    根据id查询
    @Test
    public void selectStudentByIdTest(){
        Student student = studentService.selectStudentById(11);
        logger.debug("查找结果"+ student);
        System.out.println(student);
    }
//    根据学号查询
    @Test
    public void selectStudentByStudentIdTest(){
        Student student = studentService.selectStudentByStudentId(113);
        logger.debug("查找结果"+student);
        System.out.println(student);
        }
//    向表中添加数据
    @Test
    public void insertStudentTest(){
        Student student = new Student();
        student.setStudentEmail("liudehua@126.com");
        student.setStudentId(2651);
        student.setStudentName("刘德华");
        student.setStudentPassword("32135456");
        studentService.insertStudent(student);
        System.out.println(student+"\n"+"添加成功");
    }
    //    通过id删除表中数据
    @Test
    public void deleteStudentById(){
        studentService.deleteStudentById(9);
        }
        //        修改表中数据
    @Test
    public void updateStudentTest(){
        Student student = new Student();
        student.setStudentEmail("hanyaohe@163.com");
        student.setStudentId(2652);
        student.setStudentName("韩寒");
        student.setStudentPassword("89462359");
        student.setId(25);
        studentService.updateStudent(student);
        }
        //    查询整个表格
}
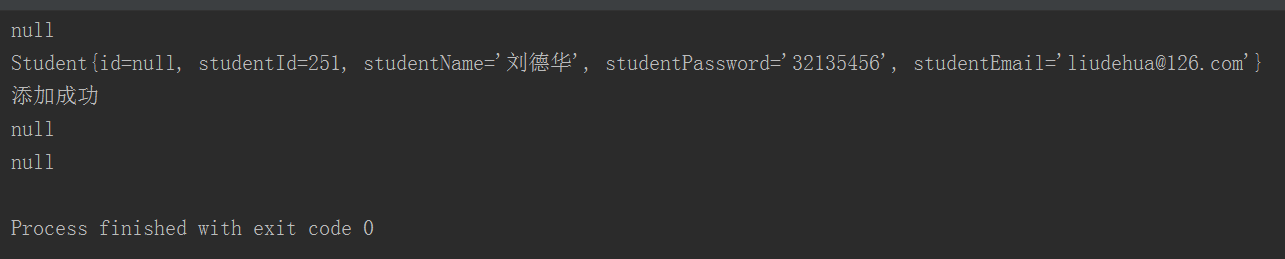
9.试运行
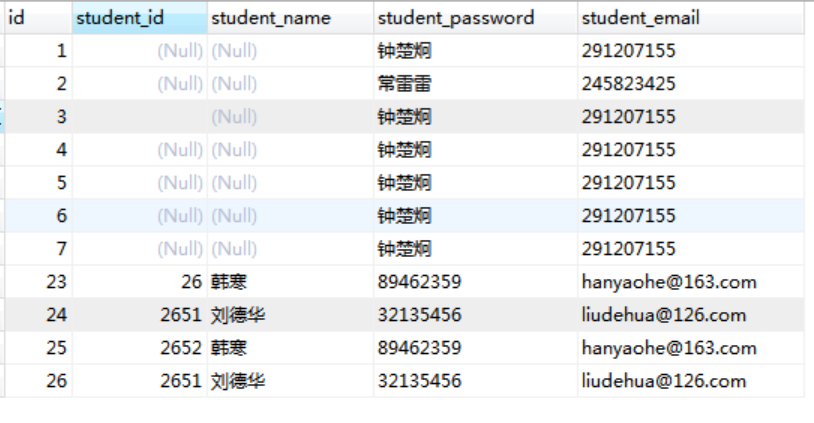
10,最后表的形状是:
明天的计划:再做一遍,再熟悉熟悉。买阿里云服务器
遇到的问题:大部分解决了,还有的程序语言要百度。
今天的收获:总算勉强把mybatis这关给过了,虽然还有不懂得地方,感谢庆东师兄,孟阳师兄,东霖,雷雷的指点。
java任务一开始时间:2017.12.05
预计demo时间:2018.01-05
可能有延期风险,原因是:基础太差,很多任务的教程都卡壳,进行不下去。
禅道链接地址:http://task.ptteng.com/zentao/project-task-501.html


评论