发表于: 2017-11-27 22:59:34
1 603
今天做的事情:
完成短信验证接口,具体用作于注册时填上手机号完成验证码操作。一致便注册成功。
controller:
//注册用户
@RequestMapping(value = "/a/user",method = RequestMethod.POST)
public String addUser(User user,Integer status,HttpServletRequest request) {
    logger.info("注册的user" + user);
    // MD5 加密 密码
    String password = user.getPassword();
    String md5 = MD5.getMd5(password);
    user.setPassword(md5);
    //获取当前时间 存入时间
    long date = new Date().getTime();
    user.setCreate_date(date);
    //
    logger.info("加密和存入当前时间的user" + user);

    Integer msg = (Integer) request.getSession().getAttribute("msg");
    logger.info("session中的验证码为:"+msg+"还有status为:"+status);
    if (status.equals(msg)) {
        int i = serviceI.addUser(user);
        if (i != 0) {
            return "success";
        } else {
            return "err";
        }
    } else {
        return "error";
}

//检查手机号 发送验证码
@RequestMapping(value = "/checkPhone",method = RequestMethod.GET)
public void checkPhone(String phone, Model model, HttpServletResponse response, HttpServletRequest request){
    boolean flag =false;
    //转换类型
    Integer i =  (int) ((Math.random()*9+1)*100000);
    String s = i.toString();

    logger.info("phone 为 :"+phone+"\t随机数为"+i);
    sms.sendMessage(phone,s);

    HttpSession session = request.getSession();
    session.setAttribute("msg",i);
    // model.addAttribute("msg","1");
    try {
        response.getWriter().print(flag);
        logger.info("发送到页面的随机验证码"+s);
    } catch (IOException e) {
        e.printStackTrace();
    }
}
jsp页面、
 //检查两次密码是否一致
    function cheockpwd() {
        var password =  $("[name=password]").val();
        var pwd = $(".pwd").val();
//        var password = $(".password").val();
//        var pwd = $(".pwd").val();
        if(password == pwd){
            document.getElementById("tishi").innerHTML="<font color='green'>两次密码相同</font>";
            document.getElementById("submit").disabled= false;

        }else{
            document.getElementById("tishi").innerHTML="<font color='red'>两次密码不相同</font>";
            document.getElementById("submit").disabled= true;
        }
    }
    //获取t通过手机号拿到验证码
    function getStatus() {
        var phone = $("[name=phone]").val();

        if(phone.length>0 &&phone!=null &&phone!=""){
            $.ajax({

                url:"<%=request.getContextPath()%>/checkPhone",
                type:"get",
                async:false,
                data:{"phone":phone},
                success:function (msg) {
                    if(msg){
                        document.getElementById("sc").innerHTML="<font color='green'>验证码发送成功</font>";
                        document.getElementById("submit").disabled= false;

                    }else{
                        document.getElementById("sc").innerHTML="<font color='red'>验证码发送失败</font>";
                        document.getElementById("submit").disabled= true;
                    }
                }
            })
        }else {
            alert("请填写手机号");
        }
}
     $(function(){
         //页面一加載完毕即验证
         testName();
         //输入完毕即验证
         $("#username").blur(function(){
             testName();
         });
     });
    //把验证用户名的方法提取出来
     function testName() {
         //获取name的当前值
         var username = $("#username").val();
         if (username.trim().length > 0) {//trim() 过滤前后多余的空格
             $.ajax({
                 url: "<%=request.getContextPath()%>/checkName",
                 type: "post",
                 async: false,
                 data: {"username": username},
                 success: function (msg) {
                     if (msg != 1) {
                         $("#namesp").html("用户名可用!").css("color", "green");
                         document.getElementById("submit").disabled = false;
                     } else {
                         $("#namesp").html("用户名已存在!").css("color", "red");
                         document.getElementById("submit").disabled = true;
                     }
                 },
                 dataType: "text",
             });
         } else {
//             $("#namesp").html("用户名不能为空!").css("color", "red");
             document.getElementById("namesp").innerHTML = "<font color='red'>用户名不能为空</font>";
             document.getElementById("submit").disabled = true;
         }
     }


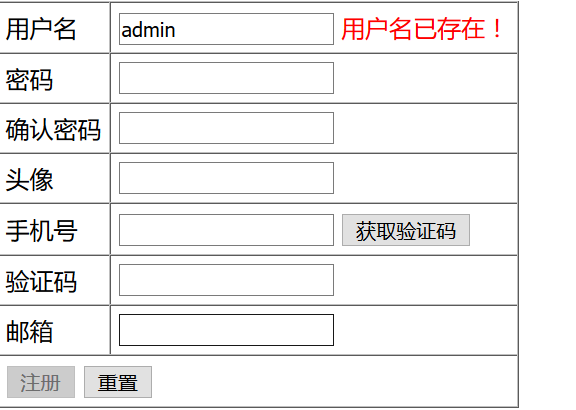
注册时,进行判断用户名是否唯一,两次输的密码是否一致,填上手机号进行获取验证码,应该加密传到方法里,再和页面输入的加密过进行判断,这个加密步骤后来才想起。如果用户名重复,密码不唯一,提交按钮是不能被点击的。
使用了这个进行设置 ,这个submit是提交的<input>的id.
document.getElementById("submit").disabled = true;

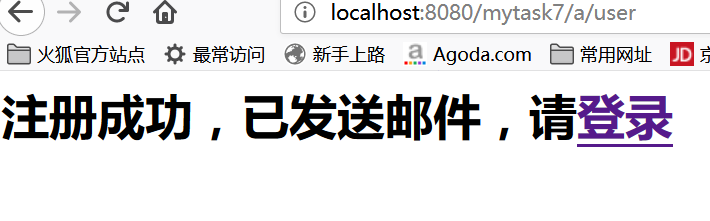
注册成功之后的数据库。
还有第三方邮件接口;
测试类,也是调用方法
public class SendEmail {

    private String email;

    public void setEmail(String email) {
        this.email = email;
    }

    public String getEmail() {
        return email;
    }

    public static void ceshi(String email) {

        try {
            HttpClient httpclient = HttpClientBuilder.create().build();
            HttpPost httpost = new HttpPost("http://api.sendcloud.net/apiv2/mail/send");

            List params = new ArrayList();
            // 您需要登录SendCloud创建API_USER,使用API_USER和API_KEY才可以进行邮件的发送。
            params.add(new BasicNameValuePair("apiUser", "A1327939512_test_h5IrOL"));
            params.add(new BasicNameValuePair("apiKey", "nirygCebrkvzDiY6"));
            params.add(new BasicNameValuePair("from", "service@sendcloud.im"));
            params.add(new BasicNameValuePair("fromName", "虎子"));
            params.add(new BasicNameValuePair("to", email));
            params.add(new BasicNameValuePair("subject", "来自SendCloud的邮件!"));
            params.add(new BasicNameValuePair("html", "你已经被发现了,限你10分钟内对我臣服!否则,哼哼哼~"));

            httpost.setEntity(new UrlEncodedFormEntity(params, "UTF-8"));
            // 请求
            HttpResponse response = httpclient.execute(httpost);
            // 处理响应
            if (response.getStatusLine().getStatusCode() == HttpStatus.SC_OK) { // 正常返回
                // 读取xml文档
                String result = EntityUtils.toString(response.getEntity());
                System.out.println(result);
            }
    } catch (Exception e) {
            e.printStackTrace();
        }
        }
}
在注册用户方法里面加入
//发邮件  第三放
SendEmail.ceshi(user.getEmail());
控制台成功的信息。
步骤1,2,3,只剩下图片上传,其余都完成。
再来了解一下图片上传
<form action="http://ipAdress:9010/api/sdingba/upload" method="post"
      enctype="multipart/form-data">
    <p>
        选择文件:<input type="file" name="imgFiles">
    <p>
        选择文件:<input type="file" name="imgFiles">
    <p>
        选择文件:<input type="file" name="imgFiles">
    <p>
        <input type="submit" value="提交"></form>
jsp下面的对应的from表单,上传文件用的那么ImgFiles的属性名称,同样你可以使用其他的,或者以数组的形式,比如imgFiles[0],…
上传图片需要对大小进行设置,还有格式进行判断。
遇到的问题:
很多,也很零碎,都已经解决,再次感谢笑然师兄给的改的错,还有博韬师兄的邮件工具类。、
收获:
完成短信和邮件的调用,对第三方接口,可以简单的使用,对真实的功能有了解。


评论