发表于: 2017-10-30 22:42:30
1 779
今天完成的任务
深入学习了aop(http://www.cnblogs.com/flowwind/p/4782606.html)
看着很复杂
实际上还是很好理解并掌握的
因为是自己的项目,在这里主要说一下使用注解方式进行aop
1.一开始我就已经把乱七八糟的命名空间部署到xml上了,现取现用即可
<?xml version="1.0" encoding="UTF-8"?>
<beans xmlns="http://www.springframework.org/schema/beans"
       xmlns:xsi="http://www.w3.org/2001/XMLSchema-instance" xmlns:aop="http://www.springframework.org/schema/aop"
       xmlns:tx="http://www.springframework.org/schema/tx" xmlns:jdbc="http://www.springframework.org/schema/jdbc"
       xmlns:context="http://www.springframework.org/schema/context"
       xmlns:mvc="http://www.springframework.org/schema/mvc"
       xsi:schemaLocation="
     http://www.springframework.org/schema/context http://www.springframework.org/schema/context/spring-context-3.0.xsd
     http://www.springframework.org/schema/beans http://www.springframework.org/schema/beans/spring-beans-3.0.xsd
     http://www.springframework.org/schema/jdbc http://www.springframework.org/schema/jdbc/spring-jdbc-3.0.xsd
     http://www.springframework.org/schema/tx http://www.springframework.org/schema/tx/spring-tx-3.0.xsd
     http://www.springframework.org/schema/aop http://www.springframework.org/schema/aop/spring-aop-3.0.xsd
     http://www.springframework.org/schema/mvc http://www.springframework.org/schema/mvc/spring-mvc.xsd">
2.声明需要自动扫描的类
<context:component-scan base-package="com.task.units"/>
<context:component-scan base-package="com.task.service.impl"/>
<aop:aspectj-autoproxy/>
但除了这句话其它都不是必须的
<aop:aspectj-autoproxy/>
3.写aop的切片类
我是放在units文件夹里写的,不太清楚是不是该写着里
@Aspect //注解表示这是一个切面
@Component //表示这是一个bean,由Spring进行管理
public class TimeLogger {

  static Logger logger=Logger.getLogger(TimeLogger.class);

    @Around(value = "execution(* com.task.service.impl.CategoryServiceImpl.list(..))")
    public Object listLog(ProceedingJoinPoint joinpoint) {
        Object result = null;
        try {
            long start = System.currentTimeMillis();
            result =  joinpoint.proceed();
            long end = System.currentTimeMillis();
            logger.fatal("调用了list方法" + "   共耗时"+(end - start) + " 毫秒");
        } catch (Throwable t) {
            logger.error("出错");
        }
        return result;
    }

    @Before(value = "execution(* com.task.service.impl.CategoryServiceImpl.add(..))")
    public void aaLog() {
        System.out.println("调用添加了");
    }
        }
也很简单 标签的具体作用在上面通过注释已经声明了
不过需要注意的是
1.aop的切片标签共有以下五种
@Before//方法开始执行时 @After//方法结束时@AfterReturning//方法结束执行成功时@AfterThrowing//抛出异常时@Around//环绕型2.
value = "execution(* com.task.service.impl.CategoryServiceImpl.list(..))
目前只理解为定义到需要切片的方法,可以从上面看出,在这一个类里,分别定义了listLog和addLog两个方法,分别对controller的俩个接口进行定义
3.环绕切片
@Around(value = "execution(* com.task.service.impl.CategoryServiceImpl.list(..))")
public Object listLog(ProceedingJoinPoint joinpoint) {
    Object result = null;
    try {
        long start = System.currentTimeMillis();
        result =  joinpoint.proceed();
        long end = System.currentTimeMillis();
        logger.debug("调用了list方法" + "   共耗时"+(end - start) + " 毫秒");
    } catch (Throwable t) {
        logger.error("出错");
    }
    return result;
}
@Around可以在方法启动前启动后分别定义
具体操作从方法上可以看出,在此说几个注意的地方
被aroind的方法,需要一个
ProceedingJoinPoint参数
方法有返回值并声明为Object,返回joinpoint.proceed();
此方法即为被切片方法的替代
-----------------------------------------------------------------------------------------------------------------------------------------------------
<bean id="xmlAopDemoUserLog" class="com.ganji.demo.service.aspect.XmlAopDemoUserLog"></bean>
<aop:config>
<aop:aspect ref="xmlAopDemoUserLog"> <!--指定切面-->
    <!--定义切点-->
    <aop:pointcut id="logpoint" expression="execution(* com.ganji.demo.service.user.UserService.GetDemoUser(..))"></aop:pointcut>
    <!--定义连接点-->
    <aop:before pointcut-ref="logpoint" method="beforeLog"></aop:before>
    <aop:after pointcut-ref="logpoint" method="afterLog"></aop:after>
    <aop:after-returning pointcut-ref="logpoint" method="afterReturningLog"></aop:after-returning>
    <aop:after-throwing pointcut-ref="logpoint" method="afterThrowingLog"></aop:after-throwing>
</aop:aspect>
</aop:config>
xml配置aop的话,多添加一个bean就好,也不是很复杂
--------------------------------------------------------------------------------------------------------------------------------------------
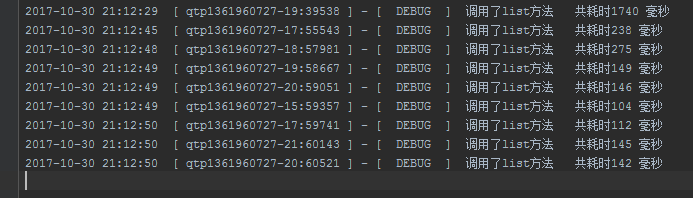
关注返回调用controller的时间,也是参考了师兄的日报,在返回前返回后分别计算时间并相减返回,这里使用的log级别是随便找的
在log4j.properties
添加将此信息输出于文件
log4j.appender.A = org.apache.log4j.DailyRollingFileAppender
log4j.appender.A.File = ./src/main/resources/log/VisitTime/Time.log
log4j.appender.A.Append = true
log4j.appender.A.Threshold = DEBUG
log4j.appender.A.layout = org.apache.log4j.PatternLayout
log4j.appender.A.layout.ConversionPattern = %-d{yyyy-MM-dd HH:mm:ss}  [ %t:%r ] - [ %p ]  %m%n
获得的效果
脚本与前面大同小异就不再复述了
-----------------------------------------------------------------------------------
遇到的问题
1.部署到服务器时文字发生乱码未解决
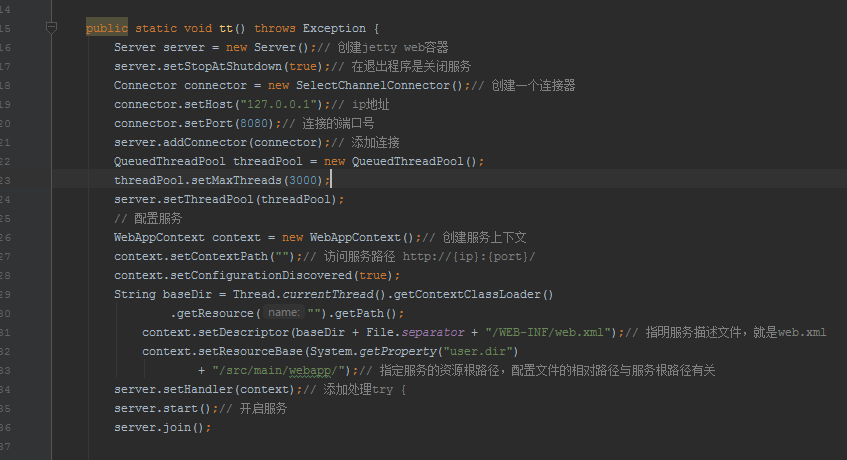
2.使用jetty部署项目发生
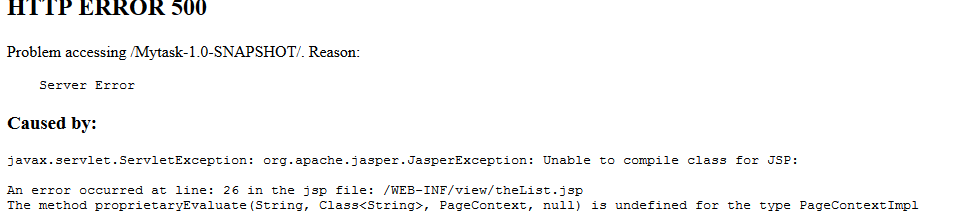
错误
部署方法为idea部署war
原因:通过内置部署jetty的jar和外部jetty有冲突
明天要做的事
任务三以师兄的日报为参考已经做的七七八八了,不知道审核任务三的话,我还需要准备和提供哪些内容
收获


评论