发表于: 2017-10-13 23:14:39
3 746
今日完成:
ssm框架整合!
首先采用maven框架创建web项目,对pom.xml导入所有所需的jar包,因为这里采用了mybatis,索引首先创建了entity实体类,和映射xml配置文件
如下
public class Emp {
private int id;
private String name;
public Emp() {
}
public Emp(int id, String name) {
this.id = id;
this.name = name;
}
public int getId() {
return id;
}
public void setId(int id) {
this.id = id;
}
public String getName() {
return name;
}
public void setName(String name) {
this.name = name;
}}
<?xml version="1.0" encoding="UTF-8" ?>
<!DOCTYPE mapper PUBLIC "-//mybatis.org//DTD Mapper 3.0//EN"
        "http://mybatis.org/dtd/mybatis-3-mapper.dtd">
<mapper namespace="test.emp">


    <resultMap type="cn.ssm.entity.Emp" id="myemp">
        <id property="id" column="id"/>
        <result property="name" column="name"/>
    </resultMap>

    <insert id="add"  parameterType="cn.ssm.entity.Emp">
        insert into emp(id,name) values (#{id},#{name});
    </insert>


    <delete id="delete" parameterType="cn.ssm.entity.Emp">
        delete from  emp where id = #{id};
    </delete>


    <update id="update" parameterType="cn.ssm.entity.Emp">
         update emp set name = #{name} where id = #{id}
    </update>

    <select id="findAll"  resultType="cn.ssm.entity.Emp">
          select id,name from emp ;
    </select>

    <select id="findById" parameterType="int" resultType="cn.ssm.entity.Emp">
        select id,name from emp where id=#{id};
    </select>

    <select id="findByName" parameterType="String" resultType="cn.ssm.entity.Emp">
        select id,name from emp where name=#{name} ;
    </select>
</mapper>
这里为了方便 dao 和service直接写的实现类
@Component
public class MybatisDao {

    @Autowired
    private SqlSessionFactory sqlSessionFactory;


    public void add(Emp emp){
        SqlSession sqlSession = sqlSessionFactory.openSession();
        sqlSession.update("test.emp.add", emp);
        sqlSession.commit();
    }
    public void delete(Emp emp){
        SqlSession sqlSession = sqlSessionFactory.openSession();
        sqlSession.update("test.emp.delete", emp);
        sqlSession.commit();
    }
    public void update(Emp emp){
        SqlSession sqlSession = sqlSessionFactory.openSession();
        sqlSession.update("test.emp.update", emp);
        sqlSession.commit();
    }
    public List<Emp> findAll(){
        SqlSession sqlSession = sqlSessionFactory.openSession();
        List<Emp> list = sqlSession.selectList("test.user.findAll");
        return list;
    }

    public Emp findById(int id){
        SqlSession sqlSession = sqlSessionFactory.openSession();
        Emp emp = sqlSession.selectOne("test.emp.findById", id);
        return emp;
    }

    public Emp findByName(String name){
        SqlSession sqlSession = sqlSessionFactory.openSession();
        Emp emp = sqlSession.selectOne("test.emp.findByName",name);
        return emp;
    }
}
@Service
public class MybatisService {
    @Autowired
    private MybatisDao mybatisDao;

    public void add(Emp emp){
        mybatisDao.add(emp);
    }
    public void delete(Emp emp){
        mybatisDao.delete(emp);
    }
    public void update(Emp emp){
        mybatisDao.update(emp);
    }
    public List<Emp> findAll(){
        return mybatisDao.findAll();
    }
    public Emp findById(int id){ return mybatisDao.findById(id);};
    public Emp findByName(String name){ return mybatisDao.findByName(name);};

}
下面是最重要的spring 和 mybaits进行整合
首先是进行数据源对象的创建,这里使用了c3p0连接池,配置文件写了jdbc.properties
<bean id="propertyConfigurer" class="org.springframework.beans.factory.config.PropertyPlaceholderConfigurer">
    <property name="location" value="classpath:jdbc.properties" />
</bean>
<bean id="dataSource" class="com.mchange.v2.c3p0.ComboPooledDataSource">
    <property name="driverClass" value="${driver}"></property>
    <property name="jdbcUrl" value="${url}"></property>
    <property name="user" value="${emp}"></property>
    <property name="password" value="${password}"></property>
    <property name="initialPoolSize" value="${initialPoolSize}"></property>
    <property name="maxPoolSize" value="${maxPoolSize}"></property>
    <property name="maxIdleTime" value="${maxIdleTime}"></property>
</bean>
创建完后,使用SqlSessionFactoryBean 对其进行整合将数据源注入SqlSessionFactoryBean
<bean id="sqlSessionFactory" class="org.mybatis.spring.SqlSessionFactoryBean">
    <property name="dataSource" ref="dataSource"></property>
    <property name="configLocation" value="classpath:mybatis.xml"></property>
</bean>
红字部分指定了我的Mybatis的总配置文件,mybatis.xml内容如下
<?xml version="1.0" encoding="UTF-8"?>
<!DOCTYPE configuration PUBLIC "-//mybatis.org//DTD Config 3.0//EN"
        "http://mybatis.org/dtd/mybatis-3-config.dtd">
<configuration>

    <mappers>
        <mapper resource="mapper/emp-mybatis.xml"/>
    </mappers>

</configuration>
里面内容很简单,将我之前的emp映射配置文件添加到总配置文件中
整合完成之后,使用getBean测试service方法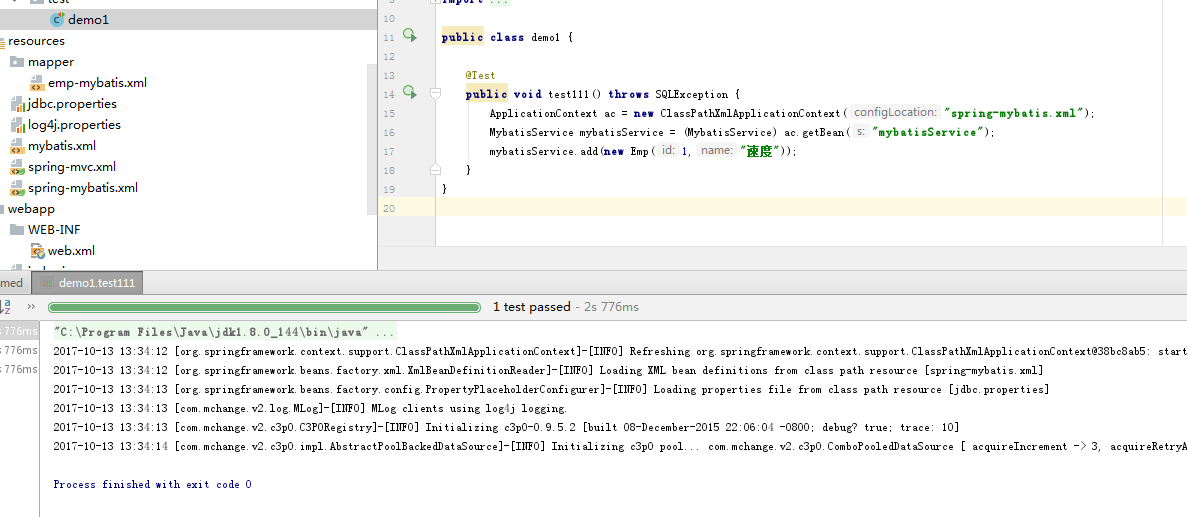
查看数据库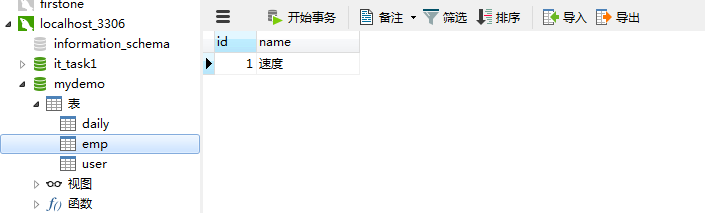 测试成功.
测试成功.
接下来开始配置spring mvc.
首先创建Controller
@Controller
public class FirstDemo {

    @Autowired
    public MybatisService mybatisService;

    @RequestMapping(value = "/Hi")
    public String useradd(Emp emp){
        mybatisService.add(emp);
        return "/index.jsp";
    }
}
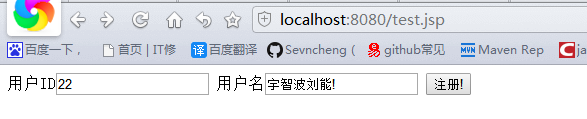
增加前台接受页面
<%@ page contentType="text/html;charset=UTF-8" language="java" %>
<html>
<head>
    <title>Title</title>
</head>
<body>
    <
    <form action="/Hi" method="post">
        <tr>用户ID<<input type="text" name="id"></tr>
        <tr>用户名<input type="text" name="name"></tr>
        <tr><td colspan="2" align="center"><input type="submit" value="注册!"></td></tr>
    </form>

</body>
</html>
重中之重,配置mvc.xml文件
<?xml version="1.0" encoding="UTF-8"?>
<beans
        xmlns="http://www.springframework.org/schema/beans"
        xmlns:xsi="http://www.w3.org/2001/XMLSchema-instance"
        xmlns:context="http://www.springframework.org/schema/context"
        xmlns:aop="http://www.springframework.org/schema/aop"
        xmlns:tx="http://www.springframework.org/schema/tx"
        xmlns:mvc="http://www.springframework.org/schema/mvc"

        xsi:schemaLocation="

     http://www.springframework.org/schema/beans
     http://www.springframework.org/schema/beans/spring-beans-3.0.xsd

     http://www.springframework.org/schema/context
      http://www.springframework.org/schema/context/spring-context-3.0.xsd

     http://www.springframework.org/schema/aop
     http://www.springframework.org/schema/aop/spring-aop-3.0.xsd

     http://www.springframework.org/schema/tx
      http://www.springframework.org/schema/tx/spring-tx-3.0.xsd

      http://www.springframework.org/schema/mvc
      http://www.springframework.org/schema/mvc/spring-mvc-3.0.xsd

      ">


    <mvc:annotation-driven />
    <context:component-scan base-package="cn.ssm"/>

</beans>
红字代码,是扫描该包下所含有的Controller类,并将其自动注入到spring容器中
这里我原来使用了
<bean class="cn.ssm.controller.FirstDemo"></bean>
这样导致的后果就是,controller只会注册到spring mvc的容器中,从而不能去掉用sping容器中的对象,导致空指针异常!
最后配置web.xml
<?xml version="1.0" encoding="utf-8" ?>
<web-app xmlns="http://java.sun.com/xml/ns/javaee"
         xmlns:xsi="http://www.w3.org/2001/XMLSchema-instance"
         xsi:schemaLocation="http://java.sun.com/xml/ns/javaee http://java.sun.com/xml/ns/javaee/web-app_2_5.xsd"
         version="2.5">


  <!--将spring总配置文件加载-->
  <context-param>
    <param-name>contextConfigLocation</param-name>
    <param-value>classpath:spring-mybatis.xml</param-value>
  </context-param>
  <!--启动spring监听器-->
  <listener>
    <listener-class>org.springframework.web.context.ContextLoaderListener</listener-class>
  </listener>
  <!-- 解决工程编码过滤器 -->
  <filter>
    <filter-name>characterEncodingFilter</filter-name>
    <filter-class>org.springframework.web.filter.CharacterEncodingFilter</filter-class>
    <init-param>
      <param-name>encoding</param-name>
      <param-value>UTF-8</param-value>
    </init-param>
    <init-param>
      <param-name>forceEncoding</param-name>
      <param-value>true</param-value>
    </init-param>
  </filter>
  <filter-mapping>
    <filter-name>characterEncodingFilter</filter-name>
    <url-pattern>/*</url-pattern>
  </filter-mapping>
  <!--注册核心控制器!-->
  <servlet>
    <servlet-name>firstSpring</servlet-name>
    <servlet-class>org.springframework.web.servlet.DispatcherServlet</servlet-class>
    <!--手动定义sprngmvc配置文件路径-->
    <init-param>
            <param-name>contextConfigLocation</param-name>
            <param-value>classpath:spring-mvc.xml</param-value>
    </init-param>
  </servlet>
  <servlet-mapping>
    <servlet-name>firstSpring</servlet-name>
    <!--拦截路径这里设置了拦截全部-->
    <url-pattern>/</url-pattern>
  </servlet-mapping>


</web-app>
正式测试!
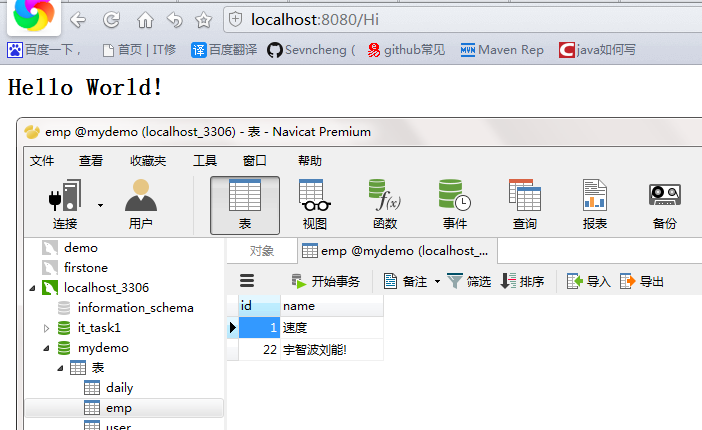
基本框架搭建完成后,使用sping mvc 完成rest接口,具体增删改查已经完成,但是出现了多次操作数据库后出现卡死情况.暂时未解决
明日计划:先解决问题,开始步骤5,争取早日提交task2
问题:造成上述的原因猜测是连接池连接数已经满了,解决原因未知
收获:ssm框架整合过程中几处要点已经领会!


评论