发表于: 2017-10-11 22:57:03
1 728
今天完成的事情:初步了解了rmi
跑了网上的简单demo
首先是java rmi 我们新建一个服务端
创建一个接口,继承Remote
package com.jnshu.javaRmi;

import java.rmi.Remote;
import java.rmi.RemoteException;
/**
 * 定义远程接口,必须继承Remote接口,
 * 其中所有需要远程调用的方法都必须抛出RemoteException异常
 */
public interface IHello extends Remote {

    public String sayHello(String name) throws RemoteException;

    public int sum(int a, int b) throws RemoteException;


}
创建接口的实现类
public class HelloImpl extends UnicastRemoteObject implements IHello{

    private static final long serialVersionUID = 1961558474342609777L;

    public HelloImpl()throws RemoteException {
        super();
    }


    @Override
    public String sayHello(String name) {
        return "Hello, " + name;
    }


    @Override
    public int sum(int a, int b) {

        return a+b;
    }

}
接口的实现类同时要实现Serializable接口,这里继承UnicastRemoteObject也是间接实现Serializable接口,同时,因为构造方法需要抛出RemoteException,所以不能缺省使用隐含的无参构造方法,而应该自己显式定义构造方法。
然后最重要的最核心的 创建应用类,注册和启动服务端RMI,以被客户端调用
public class HelloServer {
    public static void main(String args[]) {
        try {
            //创建一个远程对象
            IHello rhello = new HelloImpl();
            //生成远程对象注册表Registry的实例,并指定端口为8888(默认端口是1099)
            LocateRegistry.createRegistry(8888);

            //把远程对象注册到RMI注册服务器上,并命名为RHello
            //绑定的URL标准格式为:rmi://host:port/name(协议名可以省略,下面两种写法都可以)
            Naming.bind("rmi://127.0.0.1:8888/RHello", rhello);

            System.out.println(">>INFO:远程IHello对象绑定成功!");
        } catch (RemoteException e) {
            System.out.println("创建远程对象发生异常!");
            e.printStackTrace();
        } catch (AlreadyBoundException e) {
            System.out.println("发生重复绑定对象异常!");
            e.printStackTrace();
        } catch (MalformedURLException e) {
            System.out.println("发生URL畸形异常!");
            e.printStackTrace();
        }
    }
}
运行HelloServer.java看到,:

然后在新建一个客户端的项目
因为客户端需要有服务端那边提供的接口,才可以访问,所以要将服务端的接口完全拷贝(连同包)到客户端,当然为了方便,你在客户端工程中新建一个完全一样的接口也可以,我就是直接复制粘贴客户端的接口。实际运用中通常是要服务端接口打成jar包来提供的。
创建客户端调用类
public class HelloClient {
public static void main(String args[]) {
try {
// 在RMI服务注册表中查找名称为RHello的对象,并调用其上的方法
IHello rhello = (IHello) Naming.lookup("rmi://127.0.0.1:8888/RHello");
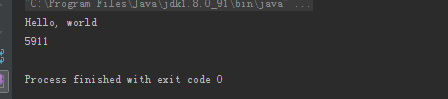
System.out.println(rhello.sayHello("world"));
System.out.println(rhello.sum(454, 5457));
} catch (Exception e) {
e.printStackTrace();
}
}
}
运行 成功
再来看Spring rmi 整体思路一样 不过因为是使用Spring 你懂得 封装
在Web工程中添加接口,普通接口,这里无需继承其他public interface HelloRMIService {
    public int  getAdd(int a, int b);
}
接口的实现类
public class HelloRMIServiceImpl implements HelloRMIService {

    @Override
    public int getAdd(int a, int b) {

        return a+b;
    }
在该服务端Web工程中添加Spring的bean配置文件,比如命名为rmiServer.xml,内容如下:
<?xml version="1.0" encoding="UTF-8" standalone="no"?>
<beans xmlns="http://www.springframework.org/schema/beans"
       xmlns:aop="http://www.springframework.org/schema/aop"
       xmlns:context="http://www.springframework.org/schema/context"
       xmlns:jee="http://www.springframework.org/schema/jee"
       xmlns:tx="http://www.springframework.org/schema/tx"
       xmlns:xsi="http://www.w3.org/2001/XMLSchema-instance"
       xsi:schemaLocation="http://www.springframework.org/schema/aop http://www.springframework.org/schema/aop/spring-aop-3.0.xsd
       http://www.springframework.org/schema/beans http://www.springframework.org/schema/beans/spring-beans-3.0.xsd
       http://www.springframework.org/schema/context http://www.springframework.org/schema/context/spring-context-3.0.xsd
       http://www.springframework.org/schema/jee http://www.springframework.org/schema/jee/spring-jee-3.0.xsd
       http://www.springframework.org/schema/tx http://www.springframework.org/schema/tx/spring-tx-3.0.xsd">

    <bean id="helloRMIServiceImpl" class="com.jnshu.SpringRmi.HelloRMIServiceImpl"> </bean>
    <!-- 将一个类发布为一个RMI服务 -->
    <bean id="myRMIServer"  class="org.springframework.remoting.rmi.RmiServiceExporter">
        <property name="serviceName" value="helloRMI"></property>
        <property name="service" ref="helloRMIServiceImpl"></property>
        <property name="serviceInterface" value="com.jnshu.SpringRmi.HelloRMIService"></property>
        <property name="registryPort" value="9999"></property>
    </bean>


</beans>
主要配置了真实实现类,用RmiServiceExporter暴露时,配置property要注意的有service,serviceName,serviceInterface,端口registryPort。一般需要启动Web工程的服务器,该配置文件应该被Spring的监听器监听,并加载,启动成功后,服务端就算建好了。如果服务器是在localhost启动的,那么暴露的RMI的IP也是localhost,如果需要使用其他IP,需要让服务器在其他的IP启动。 这里没有web服务器,使用main模拟启动,如下:
package com.jnshu;

import org.springframework.context.support.ClassPathXmlApplicationContext;

/**
 * Created by BSR on 2017/10/11.
 */
public class RMIServiceTest {

    public static void main(String[] args) {

        new ClassPathXmlApplicationContext("rmiServer.xml");

    }
}
客户端调用:为了方便也只新建一个简单的Java Project,使用静态的java代码来调用了。
首先 在源文件src下建立一个rmiClient.xml
<?xml version="1.0" encoding="UTF-8" standalone="no"?>
<beans xmlns="http://www.springframework.org/schema/beans"
       xmlns:aop="http://www.springframework.org/schema/aop"
       xmlns:context="http://www.springframework.org/schema/context"
       xmlns:jee="http://www.springframework.org/schema/jee"
       xmlns:tx="http://www.springframework.org/schema/tx"
       xmlns:xsi="http://www.w3.org/2001/XMLSchema-instance"
       xsi:schemaLocation="http://www.springframework.org/schema/aop http://www.springframework.org/schema/aop/spring-aop-3.0.xsd
       http://www.springframework.org/schema/beans http://www.springframework.org/schema/beans/spring-beans-3.0.xsd
       http://www.springframework.org/schema/context http://www.springframework.org/schema/context/spring-context-3.0.xsd
       http://www.springframework.org/schema/jee http://www.springframework.org/schema/jee/spring-jee-3.0.xsd
       http://www.springframework.org/schema/tx http://www.springframework.org/schema/tx/spring-tx-3.0.xsd">

    <!-- 客户端 -->
    <bean id="myRMIClient"  class="org.springframework.remoting.rmi.RmiProxyFactoryBean">
        <property name="serviceInterface" value="com.jnshu.SpringRmi.HelloRMIService"></property>
        <property name="serviceUrl" value="rmi://127.0.0.1:9999/helloRMI"></property>
    </bean>


</beans>
然后客户端程序
public class RMIClient {
    public static void main(String[] args) {
        ApplicationContext applicationContext = new ClassPathXmlApplicationContext("rmiClient.xml");
        HelloRMIService helloRMIService =  applicationContext.getBean("myRMIClient",HelloRMIService.class);
        System.out.println(helloRMIService.getAdd(3, 4));
    }
}
这里注意到RmiProxyFactoryBean的两个重要的property:serviceUrl和serviceInterface,HelloRMIService接口可以从服务端的接口打成jar包来提供。
所以这里是需要提供服务端的jar包的
在maven clean install 把客户端打成jar 然后在服务端引入
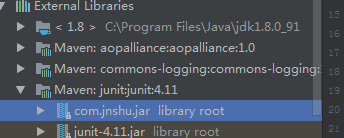
随便放在了这里 然后自动补全引入 ok
明天计划的事情:拆分自己的程序
遇到的问题:对rmi的客户端 服务端理解的还是很浅显
收获:学习了java rmi是去创建一个远程对象 然后生产远程注册表Registry的实例 指定端口
把远程对象注册到rmi 的注册服务器上
Spring rmi 是对java rmi 的封装和扩展
预计完成时间:10.23
是否有延期风险:暂无
禅道链接:http://task.ptteng.com/zentao/my-task.htm


评论