发表于: 2017-08-15 22:04:42
3 1063
今天完成的事情:看了一下rest的介绍,创建配置了maven web项目
REST:全称Resource Representational State Transfer:资源在网络中以某种表现形式进行状态转移
REST风格接口:RESTful API
常用HTTP动词:
GET(SELECT):从服务器取出资源(一项或多项)。
POST(CREATE):在服务器新建一个资源。
PUT(UPDATE):在服务器更新资源(提供全部信息)。
PATCH(UPDATE):在服务器更新资源(提供部分信息)。
DELETE(DELETE):从服务器删除资源。
不常用HTTP动词:
HEAD:获取资源的元数据。
OPTIONS:获取信息,关于资源的哪些属性是客户端可以改变的。
过滤信息(Filtering):
?limit=10:指定返回记录的数量
?offset=10:指定返回记录的开始位置。
?page=2&per_page=100:指定第几页,以及每页的记录数。
?sortby=name&order=asc:指定返回结果按照哪个属性排序,以及排序顺序。
?animal_type_id=1:指定筛选条件
步骤2,创建Maven WEB 工程:
配置pom:
百度springmvc需要的包,到链接,http://mvnrepository.com/,查找,选择使用人数较多(相关使用同一版本)的包点开复制粘贴其中maven的配置写法,
spring:
spring-test/spring-beans/spring-core/spring-context/spring-web/spring-webmvc
json支持(json-lib配置需要多加一行
<classifier>jdk15</classifier>
我的测试程序报错这样解决的):
json/json-lib/commons-lang/commons-beanutils/commons-collections/commons-logging/ezmorph
json serialize and deserialization:
fastjson/gson/jstl
配置web.xml文档没有介绍,就直接复制粘贴了:
<?xml version="1.0" encoding="UTF-8"?>
<web-app xmlns:xsi="http://www.w3.org/2001/XMLSchema-instance"
         xmlns="http://java.sun.com/xml/ns/javaee"
         xsi:schemaLocation="http://java.sun.com/xml/ns/javaee http://java.sun.com/xml/ns/javaee/web-app_3_0.xsd"
         version="3.0">

  <welcome-file-list>
    <welcome-file>/index.jsp</welcome-file>
  </welcome-file-list>
  <!-- Spring MVC配置 -->
  <servlet>
    <servlet-name>spring</servlet-name>
    <servlet-class>org.springframework.web.servlet.DispatcherServlet</servlet-class>

    <!-- 可以自定义servlet.xml配置文件的位置和名称,默认为WEB-INF目录下,名称为[<servlet-name>]-servlet.xml,如spring-servlet.xml
    <init-param>
    <param-name>contextConfigLocation</param-name>
    <param-value>/WEB-INF/spring-servlet.xml</param-value>
    </init-param>-->

    <!-- load-on-startup元素标记容器是否在启动的时候就加载这个servlet(实例化并调用其init()方法) -->
    <load-on-startup>1</load-on-startup>
  </servlet>

  <servlet-mapping>
    <servlet-name>spring</servlet-name>
    <url-pattern>/</url-pattern>
    <!--<url-pattern>*.do</url-pattern>-->
  </servlet-mapping>

  <!-- Spring配置 -->
  <listener>
    <listener-class>org.springframework.web.context.ContextLoaderListener</listener-class>
  </listener>

  <!-- 指定Spring Bean的配置文件所在目录。默认配置在WEB-INF目录下 -->
  <context-param>
    <param-name>contextConfigLocation</param-name>
    <param-value>classpath:applicationContext.xml</param-value>
  </context-param>
</web-app>
在WEB-INF文件夹下新建 spring-servlet.xml,这里采用注解的方式
<?xml version="1.0" encoding="UTF-8"?>
<beans xmlns="http://www.springframework.org/schema/beans"
       xmlns:xsi="http://www.w3.org/2001/XMLSchema-instance"
       xmlns:context="http://www.springframework.org/schema/context"
       xmlns:mvc="http://www.springframework.org/schema/mvc"
       xsi:schemaLocation="http://www.springframework.org/schema/beans
 http://www.springframework.org/schema/beans/spring-beans-3.1.xsd
 http://www.springframework.org/schema/context
 http://www.springframework.org/schema/context/spring-context-3.1.xsd
 http://www.springframework.org/schema/mvc
 http://www.springframework.org/schema/mvc/spring-mvc-3.1.xsd">

    <!-- 启动注解驱动的Spring MVC功能,注册请求url和注解POJO类方法的映射-->
    <mvc:annotation-driven >

    </mvc:annotation-driven>

    <!-- 启动包扫描功能,以便注册带有@Controller、@service、@repository、@Component等注解的类成为spring的bean -->
    <context:component-scan base-package="HelloSpringMvc.controller" />
    <!-- 对模型视图名称的解析,在请求时模型视图名称添加前后缀 -->
    <bean class="org.springframework.web.servlet.view.InternalResourceViewResolver">
        <property name="viewClass" value="org.springframework.web.servlet.view.JstlView"/>
        <property name="prefix" value="/"/>    <!-- 前缀 -->
        <property name="suffix" value=".jsp"/>    <!-- 后缀 -->
    </bean>
    <!-- 访问静态文件(jpg,js,css)的方法 -->
    <mvc:resources location="/files/" mapping="/files/**" />
    <mvc:resources location="/scripts/" mapping="/scripts/**" />
    <mvc:resources location="/styles/" mapping="/styles/**" />
    <mvc:resources location="/Views/" mapping="/Views/**" />
</beans>
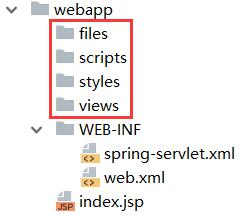
配置了静态文件路径,因此在目录结构新建几个文件夹用以放静态文件例如脚本,图片文件,视图之类的。
在Resources资源文件夹下新建applicationContext.xml
<?xml version="1.0" encoding="UTF-8"?>
<beans
        xmlns="http://www.springframework.org/schema/beans"
        xmlns:xsi="http://www.w3.org/2001/XMLSchema-instance"
        xsi:schemaLocation="http://www.springframework.org/schema/beans http://www.springframework.org/schema/beans/spring-beans-3.1.xsd">
    <!-- 我们可以在其中添加我们所需要配置的bean,也可以添加相应的数据库连接和事务处理等等,方便后续拓展
           -->
</beans>
使用的社区版idea,找不到tomcat插件,就用pom配置的
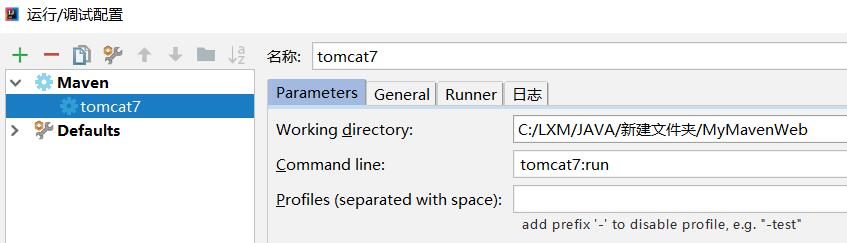
<build>
  <finalName>MyMavenWeb</finalName>
  <!---->
  <plugins>
    <plugin>
      <groupId>org.apache.tomcat.maven</groupId>
      <artifactId>tomcat7-maven-plugin</artifactId>
      <version>2.2</version>
      <configuration>
        <port>8080</port>
        <path>/</path>
        <uriEncoding>UTF-8</uriEncoding>
        <server>tomcat7</server>
      </configuration>
    </plugin>
  </plugins>
</build>
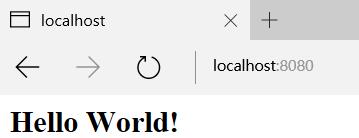
拷贝了教程的测试代码,tomcat7运行,只搞定了helloworld,另外几个链接打不开,明天再继续
明天计划的事情:先拷贝测试代码成功打开定义的链接,然后进行步骤3
遇到的问题:步骤1,定义Rest接口格式,这一步是自己写接口吗
昨天的,百度,不用select *的八个原因,你更早以前说过,我也百度了,没有这个内容啊
收获:了解了rest(一点基础),学会了maven web项目的配置


评论