发表于: 2017-08-07 22:00:46
2 1043
今天完成的事情:
1、学习Spring的基本框架,一些概念,IoC,依赖注入,AOP等
基本结构分为四层,如图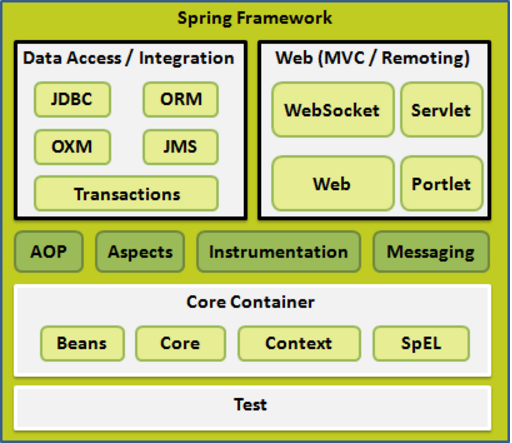
核心容器、数据访问/集成、Web和其他,包括一些AOP和测试模块等
Spring容器使用依赖注入(DI)来管理对象,Spring Beans
Bean的作用域
singleton 将bean的定义限制在每一个IoC容器中的一个单一实例
prototype 将单一bean的定义限制在任意数量的对象实例
@Autowired
注释,用在构造函数中,表示创建bean时,即使在xml中没有使用元素配置bean,构造函数也会被自动连接
修改了一下之前写的spring配置文件,分成了两个,sping.xml和spring-mybatis.xml
<bean name="dataSource" class="com.alibaba.druid.pool.DruidDataSource" init-method="init" destroy-method="close">
        <property name="driver" value="${driver}"/>
        <property name="url" value="${url}" />
        <property name="username" value="${username}" />
        <property name="password" value="${password}" />
        <!-- 初始化连接大小 -->
        <property name="initialSize" value="3" />
        <!-- 连接池最大使用连接数量 -->
        <property name="maxActive" value="20" />
        <!-- 连接池最大空闲 -->
        <property name="maxIdle" value="20" />
        <!-- 连接池最小空闲 -->
        <property name="minIdle" value="2" />
        <!-- 获取连接最大等待时间 -->
        <property name="maxWait" value="10000" />
        <!--
        <property name="poolPreparedStatements" value="true" />
        <property name="maxPoolPreparedStatementPerConnectionSize" value="33" />
        -->
        <property name="validationQuery" value="${validationQuery}" />
        <property name="testOnBorrow" value="false" />
        <property name="testOnReturn" value="false" />
        <property name="testWhileIdle" value="true" />
        <!-- 配置间隔多久才进行一次检测,检测需要关闭的空闲连接,单位是毫秒 -->
        <property name="timeBetweenEvictionRunsMillis" value="60000" />
        <!-- 配置一个连接在池中最小生存的时间,单位是毫秒 -->
        <property name="minEvictableIdleTimeMillis" value="25200000" />
        <!-- 打开removeAbandoned功能 -->
        <property name="removeAbandoned" value="true" />
        <!-- 1800秒,也就是30分钟 -->
        <property name="removeAbandonedTimeout" value="1800" />
        <!-- 关闭abanded连接时输出错误日志 -->
        <property name="logAbandoned" value="true" />
        <!-- 监控数据库 -->
        <!-- <property name="filters" value="stat" /> -->
        <property name="filters" value="mergeStat" />
    </bean>

    <!-- ========================================分隔线========================================= -->

    <!-- ========================================针对myBatis的配置项============================== -->
    <!-- 配置sqlSessionFactory -->
    <bean id="sqlSessionFactory" class="org.mybatis.spring.SqlSessionFactoryBean">
        <!-- 实例化sqlSessionFactory时需要使用上述配置好的数据源以及SQL映射文件 -->
        <property name="dataSource" ref="dataSource" />
        <!-- 自动扫描me/gacl/mapping/目录下的所有SQL映射的xml文件, 省掉Configuration.xml里的手工配置
        value="classpath:me/gacl/mapping/*.xml"指的是classpath(类路径)下me.gacl.mapping包中的所有xml文件
        UserMapper.xml位于me.gacl.mapping包下,这样UserMapper.xml就可以被自动扫描
         -->
        <property name="mapperLocations" value="classpath:Student.xml" />
    </bean>
    <!-- 配置扫描器 -->
    <bean id="studentMapper" class="org.mybatis.spring.mapper.MapperFactoryBean">
        <property name="mapperInterface" value="dao.StudentDao"/>
        <property name="sqlSessionFactory" ref="sqlSessionFactory"/>
    </bean>
</beans>
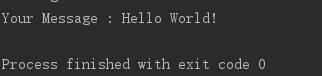
然后写了一个HelloWorld
public class HelloWorld {
    private String message;
    public void setMessage(String message){
        this.message  = message;
    }
    public void getMessage(){
        System.out.println("Your Message : " + message);
    }
}
public class MainApp {
    public static void main(String[] args) {
        /**
         * 使用框架API ClassPathXmlApplicationContext()来创建应用程序的上下文,这个API
         * 加载beans的配置文件并最终基于所提供的API,它处理创建并初始化所有的对象
         */
        ApplicationContext context =
                new ClassPathXmlApplicationContext("beans.xml");
        /**
         * 使创建的上下文getBean()方法来获得所需的bean,使用bean的ID返回一个最终可以装换
         * 为实体对象的通用对象,一旦有了对象,你就可以使用这个对象调用任何类的方法
         */
        HelloWorld obj = (HelloWorld) context.getBean("helloWorld");
        obj.getMessage();
    }
}
spring-mybatis的增删改查
public interface StudentDao {
    Student studentSelect(int id);
    int studentInsert(Student student);
    int studentUpdate(Student student);
    int studentDelete(int id);
    List<Student> studentName();
}
public interface StudentService1 {
    /**
     * 添加用户
     * @param student
     */
    void addStudent(Student student);
@Service("studentService")
public class StudentServiceImpl implements StudentService1{

    /**
     * 使用@Autowired注解标注studentDao变量,
     * 当需要使用StudentDao时,Spring就会自动注入StudentDao
     */
    @Autowired
    private StudentDao studentDao;//注入dao

    @Override
    public void addStudent(Student student){
        studentDao.studentInsert(student);
    }
@RunWith(SpringJUnit4ClassRunner.class)
@ContextConfiguration(locations = {"classpath:spring.xml","classpath:spring-mybatis.xml"})
public class MybatisTest{
    @Autowired
    private StudentService1 studentService;
    @Test
    public void testAddStudent(){
        Student student = new Student();
        student.setName("yao");
        student.setQq(123);
        student.setType("java");
        student.setTime(20170805L);
        student.setSchool("123");
        student.setNumber(4645);
        student.setLink("sdfsd");
        student.setHope("sdfsdf");
        student.setReferrer("zhou");
        student.setFromWhere("beijing");
        student.setCreateAt(20170805L);
        student.setUpdateAt(20170807L);
        studentService.addStudent(student);
    }
}
报错了,可能是哪里写错了
Could not resolve placeholder 'validationQuery' in value "${validationQuery}"
应该是多配置了一个PropertyPlaceholderConfigurer,原因找到了,改了一下配置文件的引用
Error creating bean with name 'dataSource' defined in class path resource [spring-mybatis.xml]: Initialization of bean failed; nested exception is org.springframework.beans.
问题在找_(:з」∠)_
明天的计划:
继续学Spring,服务器已经买了有机会就安装一下
遇到的问题:
用Spring整合Mybatis很多地方不是很理解,然后配置文件看来也出现问题了,再好好改一下吧
收获:
spring整体上看懂了一些,怎么整合mybatis也看了,尝试了一个Hello World。
进度:
任务一步骤19
任务开始时间:2017.8.3
预计demo时间:2017.8.13
是否有延期风险:无
http://task.ptteng.com/zentao/task-view-9054.html


评论