发表于: 2017-04-09 15:02:16
3 1496
今天完成的事情:
在Eclipse中安装配置好Tomcat;
学习mysql中模糊查询的四种方法;
学习mybatis的Annotation注解方法;
安装终端模拟器Xshell,并服务器取得连接。
明天计划的事情:
1.使用xshell连接服务器,给云服务器安装必要的软件以及配置环境
2.将项目部署到云服务器,并运行
3.连接云服务器数据库,进行操作
遇到的问题:
针对下面提出的问题,我认为情况是这样的,还请各位大佬发表自己观点:

收获:
1. 关于Tomcat的学习:
- 官网下载安装
- 配置环境变量
Tomcat启动分析(我们为什么要配置CATALINA_HOME环境变量)
来自 <http://www.mamicode.com/info-detail-575803.html>
- 在Eclipse中配置Tomcat,可参考
http://blog.csdn.net/ascarybird/article/details/53120132
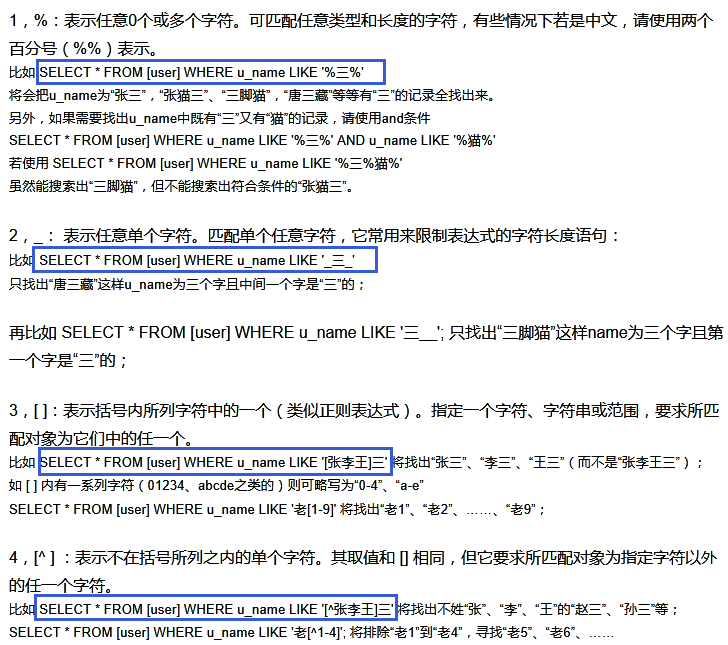
2. 模糊查询在以后的项目中会经常使用到,所以应该把它学好,下面是网上总结的四种常用方法:
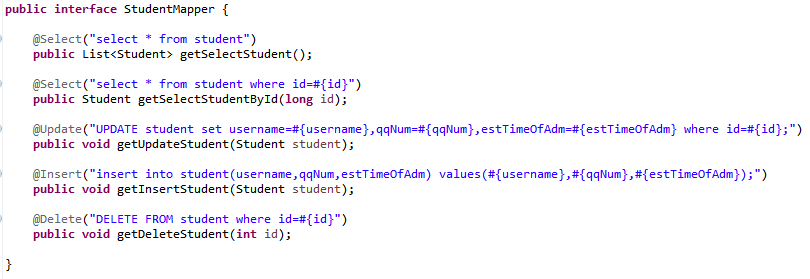
3) 关于Mybatisd的annotation注解方法:
通过Mybatis的注解方法,实现了对于mysql数据库的增删改查,包括
首先,先定义SQL映射的接口:
然后在Mybatis的configuration.xml文件中

这个也是基于注解方法和配置方法的不同之处,在基于配置方法的configuration.xml文件中是不一样的:

最后,编写测试代码,使用Junit进行测试
public class TestStudentAnnotation {
@Test
public void testStudent() throws IOException {
SqlSessionFactory sqlSessionFactory;
Reader reader;
String resource = "configuration.xml";
// 加载一个流
reader = Resources.getResourceAsReader(resource);
// 生成sqlSessionFactory工厂
sqlSessionFactory = new SqlSessionFactoryBuilder().build(reader);
SqlSession session = sqlSessionFactory.openSession();
StudentMapper studentMapper = session.getMapper(StudentMapper.class);
// 插入一条记录
Student student1 = new Student();
student1.setUsername("陈海十四");
student1.setQqNum(2032849279);
student1.setEstTimeOfAdm("2017年4月10日");
studentMapper.getInsertStudent(student1);
session.commit();
System.out.println(student1.getId());
System.out.println(studentMapper.getSelectStudentById(13).getId());
// 删除
studentMapper.getDeleteStudent(11);
session.commit();
// 更新将id为10的username改为"鲁智深"
Student student2 = new Student();
student2.setId(10);
student2.setUsername("鲁智深");
student2.setQqNum(139947239);
studentMapper.getUpdateStudent(student2);
session.commit();
// 查询
List<Student> students = studentMapper.getSelectStudent();
for (Student student3 : students) {
System.out.println(student3.toString());
}
session.close();
}
}
其中session.commit();是非常重要的语句,如果没有它,Mybatis就不能提交对于mysql数据库的操作
控制台的输出结果:
发现成功插入了第13条记录,而且将第11条记录删除成功,查询全部如下:
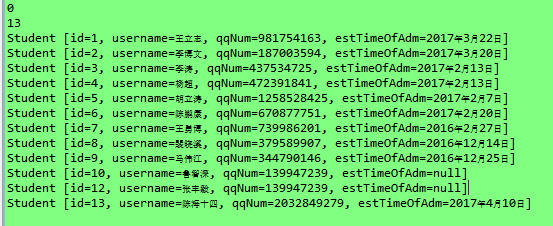
但是,为什么会出现打印输出是0和13的情况呢?(请参照上面遇到的问题)
——————————————————————————————————————————————
4) 下载安装了终端模拟器 Xshell
Xshell是Windows下一款功能非常强大的安全终端模拟软件,支持Telnet、Rlogin、SSH、SFTP、Serial 等协议,可以非常方便的对linux主机进行远程管理。
入门使用教程,可以参考这个网址: http://jingyan.baidu.com/article/295430f13fb4db0c7f005065.html
成功登陆服务器。


评论