发表于: 2020-07-22 23:30:47
1 2668
今天完成的事情:
学习SpringBoot国际化。
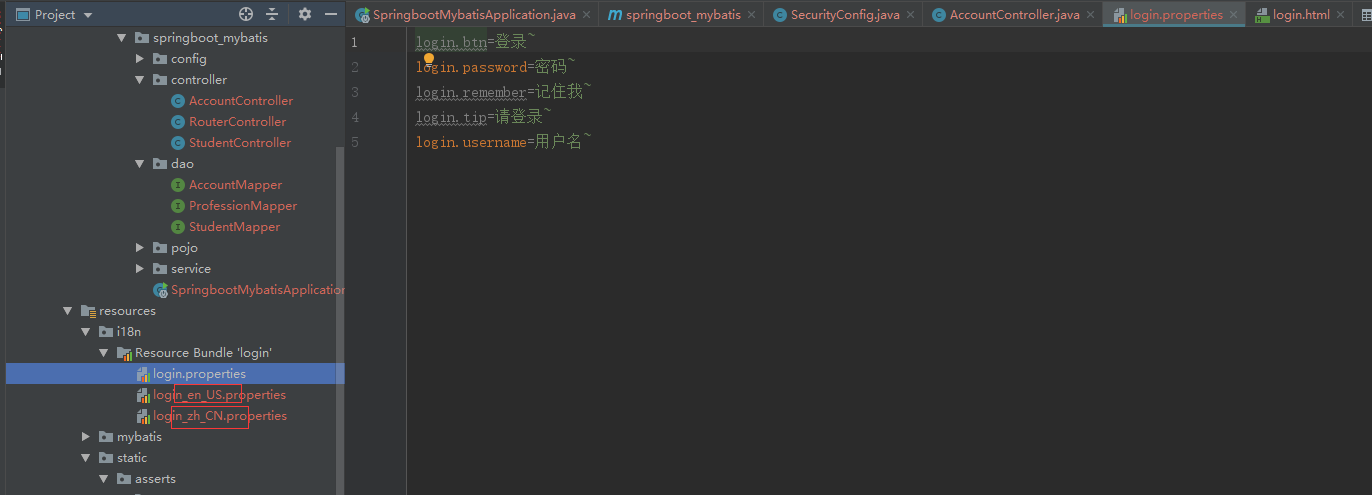
首先编写国际化配置文件,抽取页面需要显示的国际化信息:

SpringBoot自动配置好了管理国际化资源文件的组件;
//
// Source code recreated from a .class file by IntelliJ IDEA
// (powered by Fernflower decompiler)
//
@Configuration(
proxyBeanMethods = false
)
@ConditionalOnMissingBean(
name = {"messageSource"},
search = SearchStrategy.CURRENT
)
@AutoConfigureOrder(-2147483648)
@Conditional({MessageSourceAutoConfiguration.ResourceBundleCondition.class})
@EnableConfigurationProperties
public class MessageSourceAutoConfiguration {
private static final Resource[] NO_RESOURCES = new Resource[0];
public MessageSourceAutoConfiguration() {
}
@Bean
@ConfigurationProperties(
prefix = "spring.messages"
)
public MessageSourceProperties messageSourceProperties() {
return new MessageSourceProperties();
}
@Bean
public MessageSource messageSource(MessageSourceProperties properties) {
ResourceBundleMessageSource messageSource = new ResourceBundleMessageSource();if (StringUtils.hasText(properties.getBasename())) {
//设置国际化资源文件的基础名(去掉语言国家代码的),默认为messages
messageSource.setBasenames(StringUtils.commaDelimitedListToStringArray(StringUtils.trimAllWhitespace(properties.getBasename())));
}
if (properties.getEncoding() != null) {
messageSource.setDefaultEncoding(properties.getEncoding().name());
}
messageSource.setFallbackToSystemLocale(properties.isFallbackToSystemLocale());
Duration cacheDuration = properties.getCacheDuration();
if (cacheDuration != null) {
messageSource.setCacheMillis(cacheDuration.toMillis());
}
messageSource.setAlwaysUseMessageFormat(properties.isAlwaysUseMessageFormat());
messageSource.setUseCodeAsDefaultMessage(properties.isUseCodeAsDefaultMessage());
return messageSource;
}
可以直接默认创建messages.properties为国际化资源文件,这里我自定义了,所以要在application.yml文件中指定:

去页面获取国际化的值:
刷新页面:

将浏览器设为英文:

可以根据浏览器自动切换显示的语言,这里是根据请求头中的语言来对应切换的,想要实现手动点击切换中英文的话,需要做个判断,将中文和英文分别做成一个指向本页面的链接,并在请求参数中加上语言,然后再加入一个判断如果请求参数中有语言,则使用参数中的语言,如果没有就使用默认的请求头中的语言。具体的我就没试了。
完成springboot登录验证功能:
首先编写AccountController类:
package com.jnshu.springboot_mybatis.controller;

import com.jnshu.springboot_mybatis.service.AccountService;
import com.jnshu.springboot_mybatis.utils.MD5Util;
import org.slf4j.Logger;
import org.slf4j.LoggerFactory;
import org.springframework.beans.factory.annotation.Autowired;
import org.springframework.stereotype.Controller;
import org.springframework.web.bind.annotation.RequestMapping;

import java.util.Map;

@Controller
public class AccountController {

    private final static Logger logger = LoggerFactory.getLogger(AccountController.class);

    @Autowired
    private AccountService accountService;

    @RequestMapping("/tologin")
    public String tologin(){
        return "login";
    }

    @RequestMapping("/login")
    public String login(String username, String password, Map<String,Object> map){
        logger.info("用户名:" + username + " 密码:" + password);
        String password1 = accountService.selectAccount(username).getPassword();
        if(MD5Util.verify(password,password1)){
            logger.info("验证成功");
            return "redirect:/main";
        }else {
            logger.info("验证失败");
            map.put("msg","用户名或密码错误");
            return "login";
        }
    }
}
登录成功之后其实是跳转到dashboard.html页面,但是为了防止重复提交表单,采用了重定向到/main,同时在SpringMVC中配置路径映射,使/main映射到dashboard.html页面:
package com.jnshu.springboot_mybatis.config;

import org.springframework.context.annotation.Bean;
import org.springframework.context.annotation.Configuration;
import org.springframework.web.servlet.config.annotation.ViewControllerRegistry;
import org.springframework.web.servlet.config.annotation.WebMvcConfigurer;

@Configuration
public class MyMvcConfig implements WebMvcConfigurer {

    @Bean
    public WebMvcConfigurer webMvcConfigurer (){
        WebMvcConfigurer webMvcConfigurer = new WebMvcConfigurer() {
            @Override
            public void addViewControllers(ViewControllerRegistry registry) {
                registry.addViewController("/").setViewName("index");
                registry.addViewController("/index.html").setViewName("index");
                registry.addViewController("/main").setViewName("dashboard");
            }
        };
        return webMvcConfigurer;
    }


}
测试:
登录失败:

登录成功跳转到dashboard页面:

这边由于springboot不支持jsp,所以只能使用框架,我这里使用的是thymeleaf,需要导入两个依赖:
<dependency>
    <groupId>org.thymeleaf</groupId>
    <artifactId>thymeleaf-spring5</artifactId>
</dependency>
<dependency>
    <groupId>org.thymeleaf.extras</groupId>
    <artifactId>thymeleaf-extras-java8time</artifactId>
</dependency>
thymeleaf也有自己的语法,主要常用的有以下几种:
1.th:text:文本替换;
2.th:utext:支持html的文本替换。
3.th:value:属性赋值
4.th:each:遍历循环元素
5.th:if:判断条件,类似的还有th:unless,th:switch,th:case
6.th:insert:代码块引入,类似的还有th:replace,th:include,常用于公共代码块提取的场景
7.th:fragment:定义代码块,方便被th:insert引用
8.th:object:声明变量,一般和*{}一起配合使用,达到偷懒的效果。
9.th:attr:设置标签属性,多个属性可以用逗号分隔
静态资源直接在bootstrap上找的模板,主要是拿来练习的。
学习SpringBoot中拦截器的使用:
要判断是否登录需要用到拦截器,首先在controller中加入,登录成功之后,在session中加入username:
@RequestMapping("/login")
public String login(String username, String password, Map<String,Object> map, HttpSession session){
    logger.info("用户名:" + username + " 密码:" + password);
    String password1 = accountService.selectAccount(username).getPassword();
    if(MD5Util.verify(password,password1)){
        logger.info("验证成功");
        session.setAttribute("loginUser",username);
        return "redirect:/main";
    }else {
        logger.info("验证失败");
        map.put("msg","用户名或密码错误");
        return "login";
    }
}
接着编写拦截器,springboot中和之前SSM框架一样拦截器也要实现HandlerInterceptor接口:
package com.jnshu.springboot_mybatis.config;

import org.springframework.web.servlet.HandlerInterceptor;
import org.springframework.web.servlet.ModelAndView;

import javax.servlet.http.HttpServletRequest;
import javax.servlet.http.HttpServletResponse;

public class LoginInterceptor implements HandlerInterceptor {
    @Override
    public boolean preHandle(HttpServletRequest request, HttpServletResponse response, Object handler) throws Exception {
        Object user = request.getSession().getAttribute("loginUser");
        if(user == null){
            //未登录,返回登录页面
            request.setAttribute("msg","没有权限,请先登录!");
            request.getRequestDispatcher("/tologin").forward(request,response);
            return false;
        }else {
            //已登录
            return true;
        }
    }

    @Override
    public void postHandle(HttpServletRequest request, HttpServletResponse response, Object handler, ModelAndView modelAndView) throws Exception {

    }

    @Override
    public void afterCompletion(HttpServletRequest request, HttpServletResponse response, Object handler, Exception ex) throws Exception {

    }
}
与之前不同的是springboot不需要在配置文件中配置拦截器了,只需要在MVC配置类中加入即可使用:
@Override
public void addInterceptors(InterceptorRegistry registry) {
    registry.addInterceptor(new LoginInterceptor()).addPathPatterns("/**")
            .excludePathPatterns("/","/index.html","/login","/tologin");
}
测试效果:
若未登录直接访问:

这个功能好像也可以通过SpringSecurity来实现。
学习SpringSecurity。
SpringSecurity是针对Spring项目的安全框架,也是SpringBoot底层安全模块默认的技术选型,它可以实现强大的Web安全控制,对于安全控制,我们仅需要引入spring-boot-starter-security模块,进行少量的配置,即可实现强大的安全管理。
SpringSecurity的两个主要目标是:“认证”和“授权”(访问控制)。
收获:
学会了springboot的国际化,springboot中拦截器的使用,使用springboot实现登录注册功能。
明天计划完成的事情:
学习SpringSecurity


评论