发表于: 2020-07-16 23:10:05
1 2342
今天完成的事情:
学习SpringRMI:
SpringRMI和昨天的RMI大致类似,不过简化了许多:
服务端需要接口和实现类,使用SpringRMI不需要实现Remote接口,该接口的方法也不用抛出异常,基本就是个普通的接口。
首先写一个接口:
package SpringRmi;

public interface Hello {
    void sayHello();
}
然后是接口实现类:
package SpringRmi;

public class HelloImpl implements Hello {

    public void sayHello() {
        System.out.println("Hello SpringRmi!");
    }
}
服务器启动程序
package SpringRmi;

import org.springframework.context.support.ClassPathXmlApplicationContext;

public class HelloServer {
    public static void main(String[] args) {
        new ClassPathXmlApplicationContext("classpath:applicationContext.xml");
        System.out.println("SpringRmi Server is ready.....");
    }
}
配置spring的xml文件:
<?xml version="1.0" encoding="UTF-8"?>
<beans xmlns="http://www.springframework.org/schema/beans"
       xmlns:xsi="http://www.w3.org/2001/XMLSchema-instance"
       xsi:schemaLocation="http://www.springframework.org/schema/beans http://www.springframework.org/schema/beans/spring-beans.xsd">

    <!-- RMI服务端 -->
    <!-- RMI服务端远程接口实现类 -->
    <bean id="helloImpl" class="SpringRmi.HelloImpl" scope="prototype"/>
    <bean class="org.springframework.remoting.rmi.RmiServiceExporter">
        <!-- 将远程接口实现类对象设置到RMI服务中 -->
        <property name="service" ref="helloImpl"/>
        <!-- 设置RMI服务名,为RMI客户端依据此服务名获取远程接口实现类对象引用奠定基础 -->
        <property name="serviceName" value="Hello"/>
        <!-- 将远程接口设置为RMI服务接口 -->
        <property name="serviceInterface" value="SpringRmi.Hello"/>
        <!-- 为RMI服务端远程对象注册表设置端口号-->
        <property name="registryPort" value="1099"/>
    </bean>


</beans>
客户端:
客户端也需要一个对应的接口:
public interface Hello {
    void sayHello();
}
客户端启动程序:
import org.springframework.context.ApplicationContext;
import org.springframework.context.support.ClassPathXmlApplicationContext;

public class RMIClient {
    public static void main(String[] args) {
        ApplicationContext context = new ClassPathXmlApplicationContext("classpath:applicationContext.xml");
        Hello hello = (Hello)context.getBean("rmiProxyFactory");
        hello.sayHello();
    }
}
客户端也要配置xml文件:
<?xml version="1.0" encoding="UTF-8"?>
<beans xmlns="http://www.springframework.org/schema/beans"
       xmlns:xsi="http://www.w3.org/2001/XMLSchema-instance"
       xsi:schemaLocation="http://www.springframework.org/schema/beans http://www.springframework.org/schema/beans/spring-beans.xsd">

    <!--RMI客户端-->
    <bean id="rmiProxyFactory" class="org.springframework.remoting.rmi.RmiProxyFactoryBean">
        <property name="serviceUrl" value="rmi://localhost:1099/Hello"/>
        <property name="serviceInterface" value="Hello"/>
        <!--当连接失败时是否刷新远程调用stub-->
        <property name="refreshStubOnConnectFailure" value="true"/>
    </bean>
</beans>
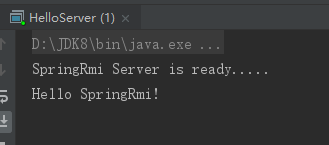
先启动服务器文件:

再启动客户端程序之后:

接下来将之前项目的报名系统拆分。
直接在服务端xml配置文件中添加:
<!-- RMI服务端 -->
<!-- RMI服务端远程接口实现类 -->
<bean id="accountServiceImpl" class="com.jnshu.service.AccountServiceImpl" scope="prototype"/>
<bean class="org.springframework.remoting.rmi.RmiServiceExporter">
    <!-- 将远程接口实现类对象设置到RMI服务中 -->
    <property name="service" ref="accountServiceImpl"/>
    <!-- 设置RMI服务名,为RMI客户端依据此服务名获取远程接口实现类对象引用奠定基础 -->
    <property name="serviceName" value="AccountServiceImpl"/>
    <!-- 将远程接口设置为RMI服务接口 -->
    <property name="serviceInterface" value="com.jnshu.service.AccountService"/>
    <!-- 为RMI服务端远程对象注册表设置端口号-->
    <property name="registryPort" value="1099"/>
</bean>
然后启动程序:
package com.jnshu.Rmi;

import org.springframework.context.support.ClassPathXmlApplicationContext;

public class Server {
    public static void main(String[] args) {
        new ClassPathXmlApplicationContext("classpath:applicationContext.xml");
        System.out.println("Rmi Server is ready.....");
    }
}
然后新建了个项目来模拟客户端:
<?xml version="1.0" encoding="UTF-8"?>
<beans xmlns="http://www.springframework.org/schema/beans"
       xmlns:xsi="http://www.w3.org/2001/XMLSchema-instance"
       xsi:schemaLocation="http://www.springframework.org/schema/beans http://www.springframework.org/schema/beans/spring-beans.xsd">

    <!--RMI客户端-->
    <bean id="rmiProxyFactory" class="org.springframework.remoting.rmi.RmiProxyFactoryBean">
        <property name="serviceUrl" value="rmi://localhost:1099/AccountServiceImpl"/>
        <property name="serviceInterface" value="Test.AccountService"/>
        <!--当连接失败时是否刷新远程调用stub-->
        <property name="refreshStubOnConnectFailure" value="true"/>
    </bean>
</beans>
启动程序:
package Test;

import org.springframework.context.ApplicationContext;
import org.springframework.context.support.ClassPathXmlApplicationContext;

public class TestClient {

    public static void main(String[] args) {
        ApplicationContext context = new ClassPathXmlApplicationContext("classpath:test.xml");
        AccountService accountService =(AccountService)context.getBean("rmiProxyFactory");
        System.out.println(accountService.selectAccount("root"));
    }
}
这里有几个点要注意:
首先是接口返回的是Account类,这个类在客户端也需要有,而且要序列化(实现Serializable接口)。
分别启动测试一下:


可以看到成功调用了。
接下来要做的就简单了,只需要像这样把其他所有接口都加进去就可以了。
收获:初步学会SpringRmi的使用方法。
明天计划完成的事情:
将学员系统的service拆分出来。


评论