发表于: 2020-05-26 21:30:04
1 1396
今天完成的事情:
之前那个账号注册的时候没有填写邀请码,所以重新注册了一个新的账号,现在要重新提交一次任务一,刚好我也觉得之前做的时候太仓促了有些不扎实,趁此机会将任务一整体重新过一遍,好好梳理一下,加深印象,夯实基础。
今天开始在武汉分院进行为期7天的线下试学,由于之前在家里使用的台式电脑,现在换笔记本之后所以之前搭建的环境全部要重新弄。电脑配置有些老了,于是先花了一早上的时间重装电脑+安装JDK,Navicat,IDEA,mysql等。
上次安装mysql使用的是直接安装方式,这一次尝试了解压的免安装方式,确实比较麻烦。
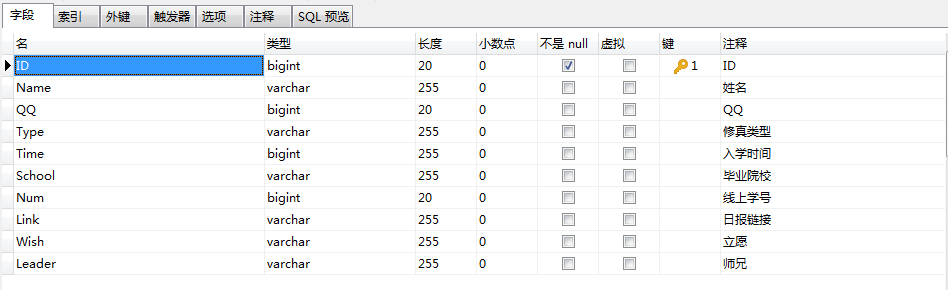
1,创建报名帖的业务表,并用mysql插入一条最近报名的师弟,使用Navicat将立愿改为老大最帅:
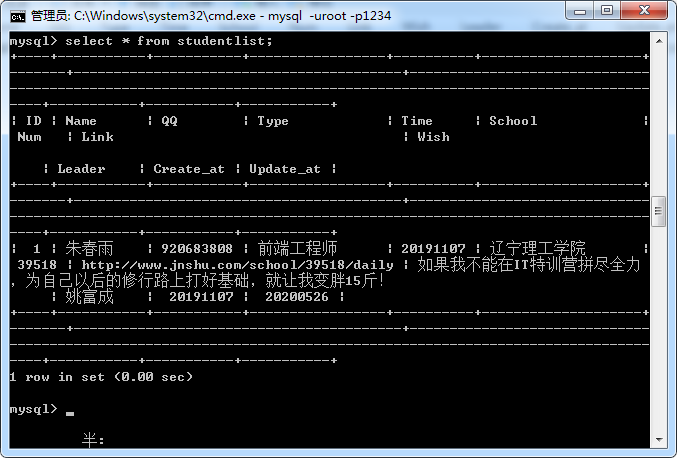

之前做过一遍,这次很快。
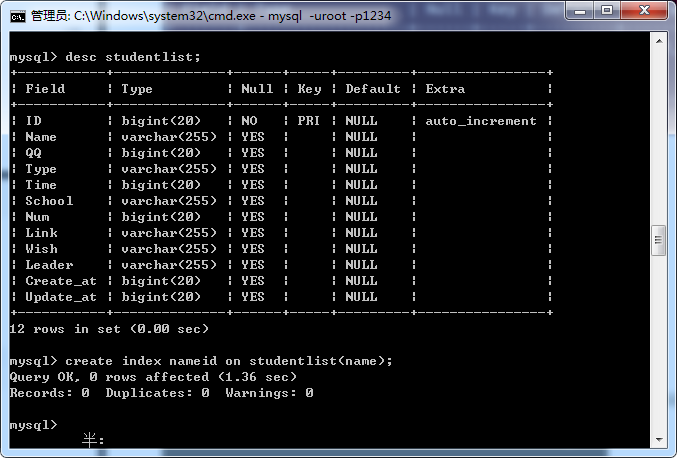
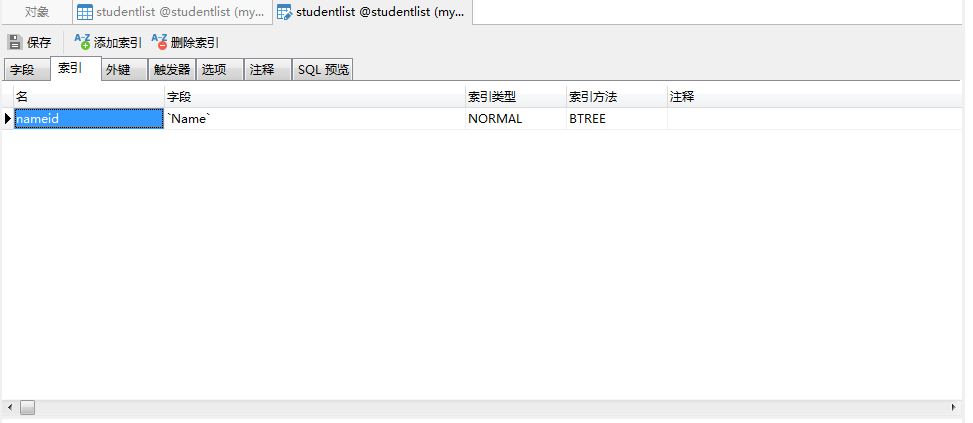
给姓名建索引:
也可以直接用Navicat建:
使用JDBCTemplate连接数据库,并对其进行增删改查:
首先导入依赖:
<?xml version="1.0" encoding="UTF-8"?>
<project xmlns="http://maven.apache.org/POM/4.0.0"
         xmlns:xsi="http://www.w3.org/2001/XMLSchema-instance"
         xsi:schemaLocation="http://maven.apache.org/POM/4.0.0 http://maven.apache.org/xsd/maven-4.0.0.xsd">
    <modelVersion>4.0.0</modelVersion>

    <groupId>jnshu</groupId>
    <artifactId>JDBCTemplate</artifactId>
    <version>1.0</version>

    <dependencies>
        <!-- https://mvnrepository.com/artifact/org.springframework/spring-context -->
        <dependency>
            <groupId>org.springframework</groupId>
            <artifactId>spring-context</artifactId>
            <version>5.2.5.RELEASE</version>
        </dependency>

        <!-- https://mvnrepository.com/artifact/mysql/mysql-connector-java -->
        <dependency>
            <groupId>mysql</groupId>
            <artifactId>mysql-connector-java</artifactId>
            <version>5.1.21</version>
        </dependency>

        <!-- https://mvnrepository.com/artifact/org.springframework/spring-jdbc -->
        <dependency>
            <groupId>org.springframework</groupId>
            <artifactId>spring-jdbc</artifactId>
            <version>5.2.1.RELEASE</version>
        </dependency>

        <!-- https://mvnrepository.com/artifact/commons-dbcp/commons-dbcp -->
        <dependency>
            <groupId>commons-dbcp</groupId>
            <artifactId>commons-dbcp</artifactId>
            <version>1.4</version>
        </dependency>

        <!-- https://mvnrepository.com/artifact/org.springframework/spring-beans -->
        <dependency>
            <groupId>org.springframework</groupId>
            <artifactId>spring-beans</artifactId>
            <version>5.2.1.RELEASE</version>
        </dependency>

        <!-- https://mvnrepository.com/artifact/org.springframework/spring-core -->
        <dependency>
            <groupId>org.springframework</groupId>
            <artifactId>spring-core</artifactId>
            <version>5.2.5.RELEASE</version>
        </dependency>

        <!-- https://mvnrepository.com/artifact/com.mchange/c3p0 -->
        <dependency>
            <groupId>com.mchange</groupId>
            <artifactId>c3p0</artifactId>
            <version>0.9.5.2</version>
        </dependency>

        <!-- https://mvnrepository.com/artifact/org.springframework/spring-context-support -->
        <dependency>
            <groupId>org.springframework</groupId>
            <artifactId>spring-context-support</artifactId>
            <version>5.2.5.RELEASE</version>
        </dependency>

        <!-- https://mvnrepository.com/artifact/junit/junit -->
        <dependency>
            <groupId>junit</groupId>
            <artifactId>junit</artifactId>
            <version>4.12</version>
            <scope>test</scope>
        </dependency>
        <dependency>
            <groupId>org.junit.jupiter</groupId>
            <artifactId>junit-jupiter-api</artifactId>
            <version>RELEASE</version>
            <scope>compile</scope>
        </dependency>


    </dependencies>


</project>
创建Student类:
package Model;

public class Student {
    private Long ID;
    private String Name;
    private Long QQ;
    private String Type;
    private Long Time;
    private String School;
    private Long Num;
    private String Link;
    private String Wish;
    private String Leader;
    private Long Create_at;
    private Long Update_at;

    public Student() {
    }

    public Student(Long ID, String name) {
        this.ID = ID;
        Name = name;
    }

    public Student(Long ID, String Name, Long QQ, String type, Long time, String school, Long num, String link, String wish, String leader, Long create_at, Long update_at) {
        this.ID = ID;
        this.Name = Name;
        this.QQ = QQ;
        Type = type;
        Time = time;
        School = school;
        Num = num;
        Link = link;
        Wish = wish;
        Leader = leader;
        Create_at = create_at;
        Update_at = update_at;
    }

    public Long getID() {
        return ID;
    }

    public void setID(Long ID) {
        this.ID = ID;
    }

    public String getName() {
        return Name;
    }

    public void setName(String Name) {
        this.Name = Name;
    }

    public Long getQQ() {
        return QQ;
    }

    public void setQQ(Long QQ) {
        this.QQ = QQ;
    }

    public String getType() {
        return Type;
    }

    public void setType(String type) {
        Type = type;
    }

    public Long getTime() {
        return Time;
    }

    public void setTime(Long time) {
        Time = time;
    }

    public String getSchool() {
        return School;
    }

    public void setSchool(String school) {
        School = school;
    }

    public Long getNum() {
        return Num;
    }

    public void setNum(Long num) {
        Num = num;
    }

    public String getLink() {
        return Link;
    }

    public void setLink(String link) {
        Link = link;
    }

    public String getWish() {
        return Wish;
    }

    public void setWish(String wish) {
        Wish = wish;
    }

    public String getLeader() {
        return Leader;
    }

    public void setLeader(String leader) {
        Leader = leader;
    }

    public Long getCreate_at() {
        return Create_at;
    }

    public void setCreate_at(Long create_at) {
        Create_at = create_at;
    }

    public Long getUpdate_at() {
        return Update_at;
    }

    public void setUpdate_at(Long update_at) {
        Update_at = update_at;
    }

    public String toString(){
        return "ID:" + this.ID + "姓名:" + this.Name;
    }
}
编写StudentDao和它的实现类StudentDaoImal:
package Dao;

import Model.Student;

import java.util.List;

public interface StudentDao {
    void Insert(Student student);
    void Delete(Long ID);
    void Update(Student student);
    Student SelectById(Long ID);
    List<Student> SelectAll();
}
package DaoImapl;
import Dao.StudentDao;
import Model.Student;
import org.springframework.jdbc.core.JdbcTemplate;
import org.springframework.jdbc.datasource.DriverManagerDataSource;
import java.util.List;
public class StudentDaoImpl implements StudentDao {
DriverManagerDataSource dataSource = new DriverManagerDataSource();
JdbcTemplate jdbcTemplate;
public void Insert(Student student) {
dataSource.setDriverClassName("com.mysql.jdbc.Driver");
dataSource.setUrl("jdbc:mysql://localhost:3306/studentlist");
dataSource.setUsername("root");
dataSource.setPassword("1234");
jdbcTemplate = new JdbcTemplate(dataSource);
jdbcTemplate.update("insert into studentlist(ID,Name,QQ,Type,Time,School,Num,Link,Wish,Leader,Create_at,Update_at)values(?,?,?,?,?,?,?,?,?,?,?,?)",student.getID(),student.getName(),student.getQQ(),student.getType(),student.getTime(),student.getSchool(),student.getNum(),student.getLink(),student.getWish(),student.getLeader(),student.getCreate_at(),student.getUpdate_at());
}
public void Delete(Long ID){
dataSource.setDriverClassName("com.mysql.jdbc.Driver");
dataSource.setUrl("jdbc:mysql://localhost:3306/studentlist");
dataSource.setUsername("root");
dataSource.setPassword("1234");
jdbcTemplate = new JdbcTemplate(dataSource);
jdbcTemplate.update("delete from studentlist where ID=?",ID);
}
public void Update(Student student){
dataSource.setDriverClassName("com.mysql.jdbc.Driver");
dataSource.setUrl("jdbc:mysql://localhost:3306/studentlist");
dataSource.setUsername("root");
dataSource.setPassword("1234");
jdbcTemplate = new JdbcTemplate(dataSource);
jdbcTemplate.update("update studentlist set Name = ?,where ID =?",student.getName(),student.getID());}
对其进行测试:
import DaoImapl.StudentDaoImpl;
import Model.Student;

public class Test {

   public static void main(String[] args){
       Student s1 = new Student(2L,"张三");
       new StudentDaoImpl().Insert(s1);
       new StudentDaoImpl().Delete(2L);
   }
}
没有问题。
RowMapper可以将数据中的每一行封装成用户自定义的类。
使用JDBCTemplate首先要使用创建一个DriverManagerDataSource对象,接着使用它的setDriverClassName/Url/username/password 来连接数据库;
然后再使用JDBCTemplate类中的update,delete,queryForObject等方法来对数据库进行增删改查。
今天将JDBCTemplate回顾了一遍
明天计划的事情:继续回顾后面的Mybatis,Spring,以及他们的结合。


评论