发表于: 2020-05-14 20:55:09
1 1483
今天完成的事情:学习了Mybatis和junit
一.Mybatis详情
Mybatis是ORM(对象关系映射Object Relation Mapping)框架,支持定制化SQL,存储过程,高级映射。
原Ibatis在2010迁移到google code,并改名MyBtis,2013年迁移到GItHub。
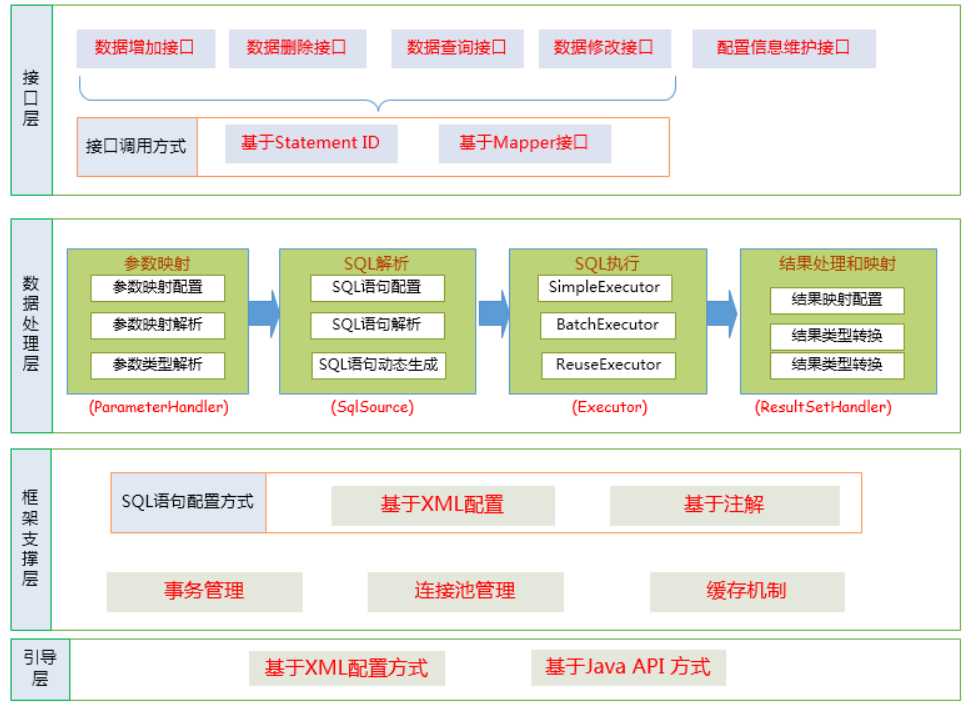
核心API解析
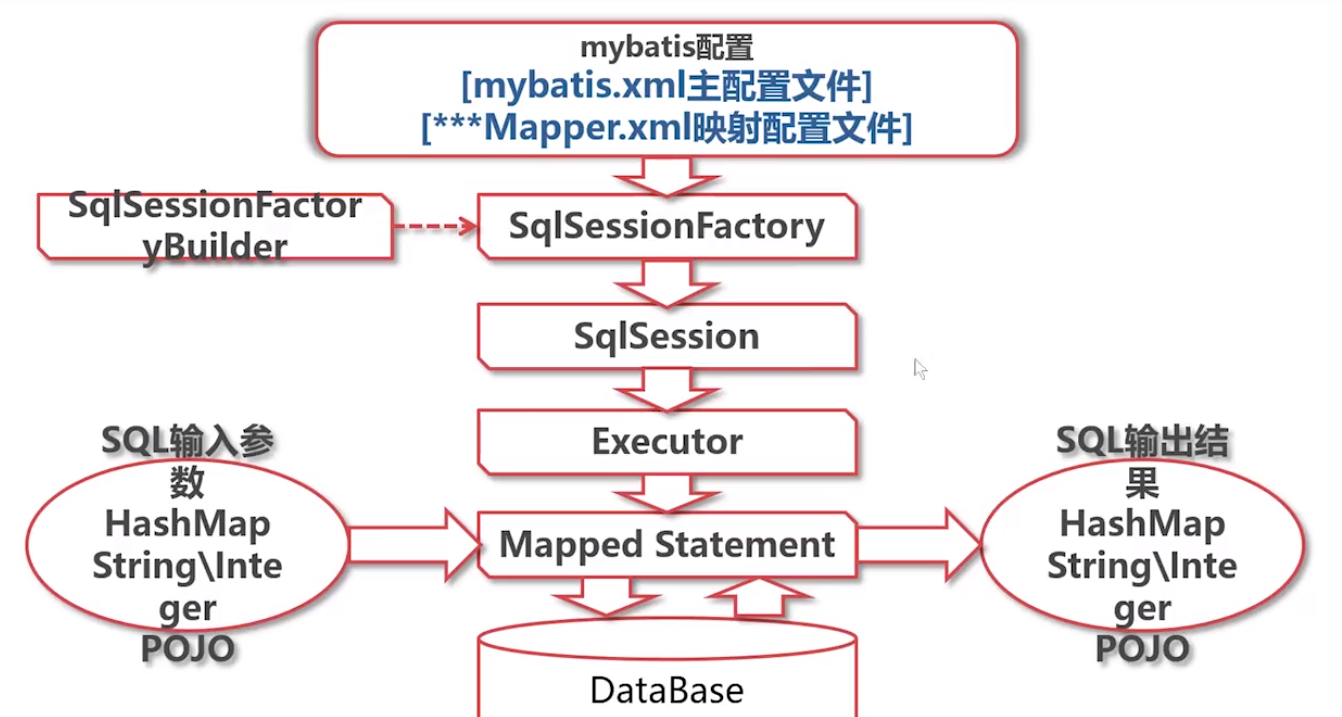
MyBtis框架设计
二.MyBatis连接查询数据库
(第一种传统Mybatis API方式)
1.运行idea搭建maven项目,在pom.xml中配置mybatis mysql-connector-java junit 的依赖包
2.配置数据源myBatis.xml,并写好db.properties都放在resources下
driver=com.mysql.jdbc.Driver
url=jdbc:mysql://localhost:3306/test
username=root
password=root
<?xml version="1.0" encoding="UTF-8" ?>
<!DOCTYPE configuration
        PUBLIC "-//mybatis.org//DTD Config 3.0//EN"
        "http://mybatis.org/dtd/mybatis-3-config.dtd">
<configuration>
    <!--
    properties配置用于加载外部的properties文件
    -->
    <properties resource="db.properties"></properties>
    <!--
   environments 主要用于数据源的配置
   可以配置多个数据源,通过default属性进行指定当前项目运用的是哪个数据源
   -->
 <environments default="development">
    <environment id="development">
        <!--
   transactionManager 主要用于事务管理,默认使用JDBC事务
   -->
        <transactionManager type="JDBC"/>
        <!--
dataSource 具体数据源的链接,type属性用于指定是否使用连接池
-->
        <dataSource type="POOLED">
            <property name="driver" value="${driver}"/>
            <property name="url" value="${url}"/>
            <property name="username" value="${username}"/>
            <property name="password" value="${password}"/>
        </dataSource>
    </environment>
</environments>
    <!--
   mappers 主要用于配置我们外部的映射配置文件
   在主配置文件中需要引入加载的配置文件
   -->
    <mappers>
        <!--
        mapper 主要配置引入某一个具体的映射文件,resource属性进行路径的引入-->
        <mapper resource="org/mybatis/example/BlogMapper.xml"/>
    </mappers>
</configuration>
3.编写实体类并重写toString方法,才能在输出对象时候有明显的内容
4.编写mapper,新建一个mapper包在resources下,并在mapper包中新建一个studentMapper.xml
<?xml version="1.0" encoding="UTF-8" ?>
<!DOCTYPE mapper
        PUBLIC "-//mybatis.org//DTD Mapper 3.0//EN"
        "http://mybatis.org/dtd/mybatis-3-mapper.dtd">
<!--
mapper 用于定义一个映射配置文件的根节点
namespace属性用来配置命名空间,主要进行session级别的缓存管理
命名空间默认情况下,使用我们当前操作的实体类的全路径
parameterType 值表示Mapper对应方法的传参类型,
resultMap 值则对应了Mapper表示的返回值类型或者返回结果集的元素类型。
-->
<mapper namespace="com.hyx.entity.Student">
    <select id="studentList" resultType="com.hyx.entity.Student">
    select * from mytable
    </select>
</mapper>
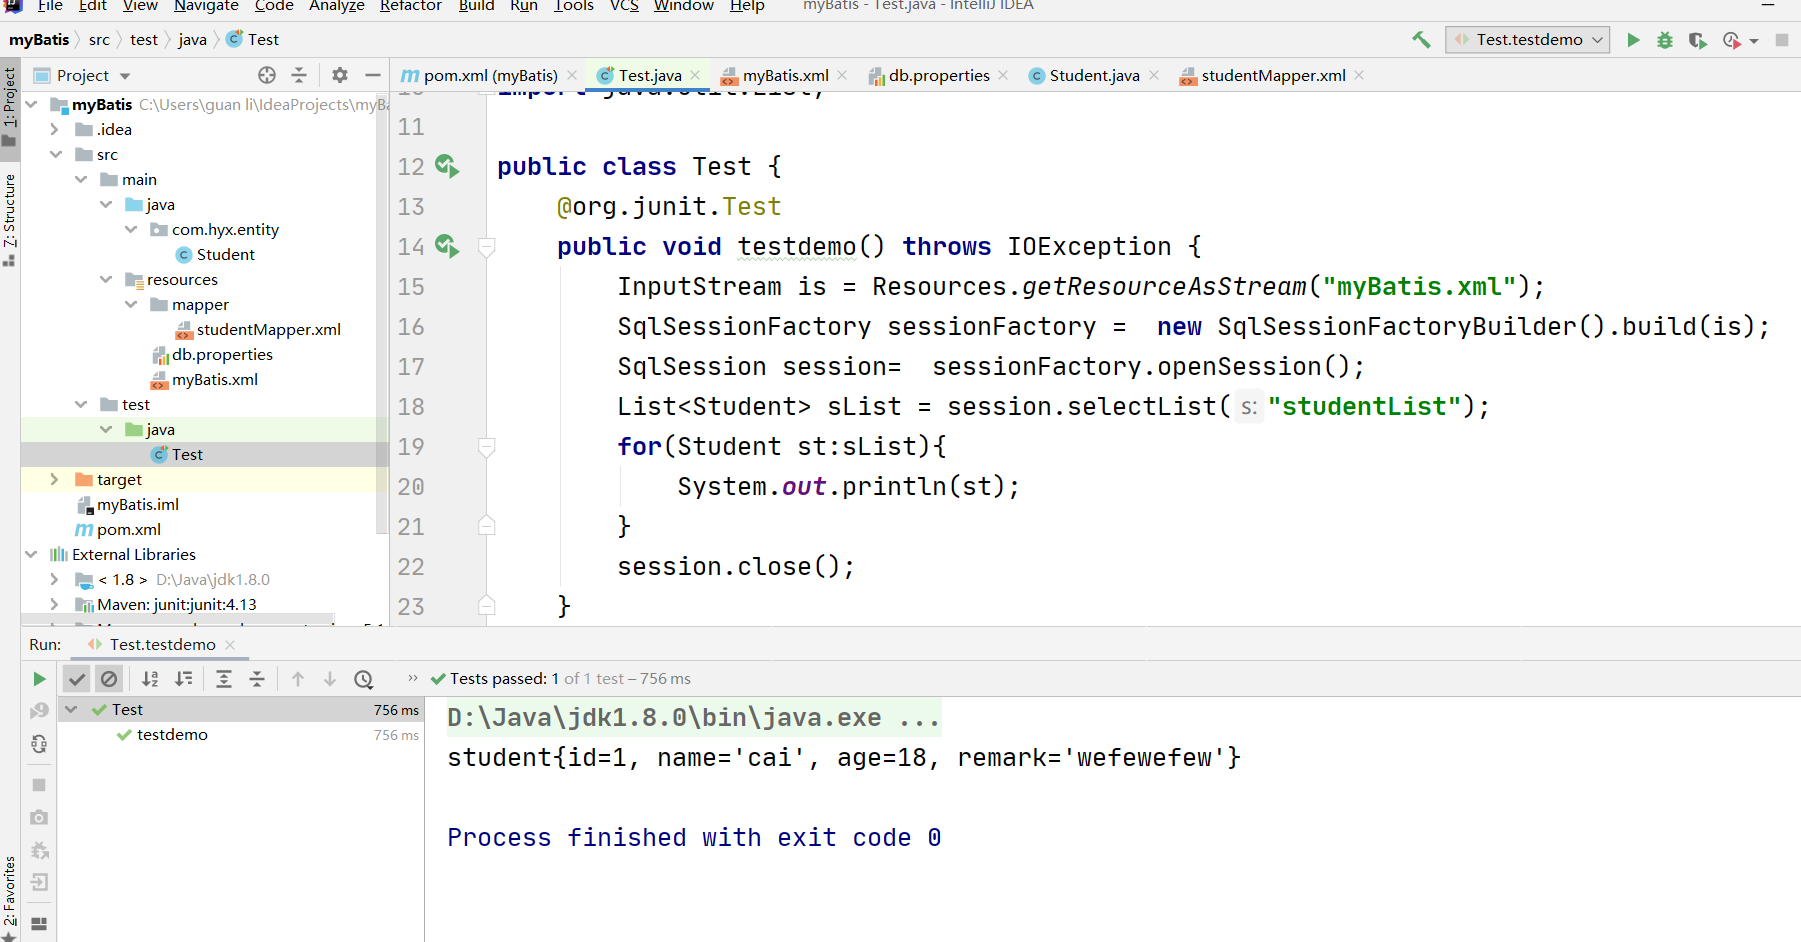
5.编写测试类
public class Test {
    @org.junit.Test
    public void testdemo() throws IOException {
        InputStream is = Resources.getResourceAsStream("myBatis.xml");
        SqlSessionFactory sessionFactory =  new SqlSessionFactoryBuilder().build(is);
        SqlSession session=  sessionFactory.openSession();
        List<Student> sList = session.selectList("studentList");
        for(Student st:sList){
            System.out.println(st);
        }
        session.close();
    }
}
三.第二种运用Mapper接口方式
MyBatis 将配置文件中的每一个<mapper> 节点抽象为一个 Mapper 接口,而这个接口中声明的方法和跟<mapper> 节点中的<select|update|delete|insert> 节点项对应,即<select|update|delete|insert> 节点的id值为Mapper 接口中的方法名称,parameterType 值表示Mapper 对应方法的入参类型,而resultMap 值则对应了Mapper 接口表示的返回值类型或者返回结果集的元素类型。
根据MyBatis 的配置规范配置好后,通过SqlSession.getMapper(XXXMapper.class) 方法,MyBatis 会根据相应的接口声明的方法信息,通过动态代理机制生成一个Mapper 实例,我们使用Mapper 接口的某一个方法时,MyBatis 会根据这个方法的方法名和参数类型,确定Statement Id,底层还是通过SqlSession.select("statementId",parameterObject);或者SqlSession.update("statementId",parameterObject); 等等来实现对数据库的操作,
public class Test {
    @org.junit.Test
    public void testdemo() throws IOException {
        InputStream is = Resources.getResourceAsStream("myBatis.xml");
        SqlSessionFactory sessionFactory =  new SqlSessionFactoryBuilder().build(is);
        SqlSession session=  sessionFactory.openSession();
        //第一种方式最初的API
        List<Student> sList = session.selectList("studentAll");
        for(Student st:sList){
            System.out.println(st);
        }
        //第二种方式 Mapper接口
        StudentMapper studentMapper = session.getMapper(StudentMapper.class);
        List<Student> list = studentMapper.studentAll();
        for(Student s:list){
            System.out.println(s);
        }
        session.close();
    }
}
注意啊:namespase要写成dao下面的Mapper接口才能运行成功
<mapper namespace="com.hyx.dao.StudentMapper">
    <select id="studentAll" resultType="com.hyx.entity.Student">
    select * from mytable
    </select>

</mapper>

.思考为什么mybatis没有编写impl
因为编写的xxxMpper.xml的映射文件就相当于实现类
四.junit的学习
1.Junit简介
开发模型:基于瀑布式开发模型和基于敏捷式的开发
瀑布式开发模型中对软件测试分三个测试:单元测试(最重要),集成测试,系统测试。
运用在分布式进行扩展:-压力测试:验证系统的稳定性和承受能力 -用户测试
junit就是进行单元测试的重要工具
Junit.jar下载地址
https://github.com/junit-team/junit4/wiki/Download-and-Install
2.具体内容
@Test表示这是一个测试方法
@Ignore忽略测试注解的方法
@Before表示在所有方法运行前运行的方法;
@After表示在所有的方法运行之后执行的方法;
断言方法的执行结果是否与期望值相等
assertEquals(期望值,方法());
期待抛出一个异常@Test(expected=Exception.class) <传入的参数有错,返回提示>
过了1秒程序还没有结束,就认为程序运行失败 @Test(timeout=1000)
使用timeout的场景: 当被测试的程序,逻辑非常复杂,不清楚是否存在问题,然后也要考虑这个程序的效率,在一定的时间内要执行完,这种情况要加一个timeout进行限制,当程序超过一定的时间没有执行完,就认为它是错误的。
测试方法的执行顺序不一定按照编写的代码的顺序,而是按照JVM的执行顺序,可以通过@FixMethodOrder(MethodSorts.JVM)来指定执行顺序打包测试多个类的步骤: 1. 创建测试类
2. 在类声明前添加如下注解 @RunWith(Suite.class) @Suite.SuiteClasses({ NeedTestClass1.class, NeedTestClass2.class })
明天计划的事情:学习Spring
遇到的问题:今天没弄清楚mybatis的运行过程,太多搞混了,看了一些资料和视频清晰些了
收获:学到mybatis和junit


评论