发表于: 2019-12-24 20:48:06
0 1253
今天完成的事:
1、访问微服务,使用Ribbon。
springcloud提供了两种方式,一种就是Ribbon,是使用restTemplate进行调用,并进行客户端负载均衡。也就是在注册微服务时,注册了两个微服务,Ribbon会从注册中心得到消息,由Ribbon这个客户端来决定调用哪个。
而另一个方式就是 Feign,是对 Ribbon 的封装,调用起来更加方便、简单。
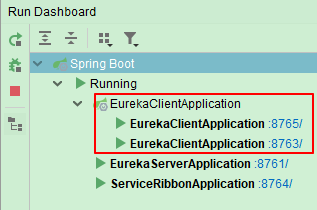
(1)运行两个客户端实例,修改idea的单例模式。
首先需要运行两个客户端,先运行一次客户端,将yml中的端口号修改,再运行一次,这样就运行了两个客户端,在服务中心注册两个实例,才能使用ribbon进行客户端的负载均衡。
先运行客户端启动类,端口号8763,将端口号修改为8762,再次运行启动类。
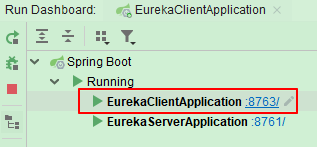
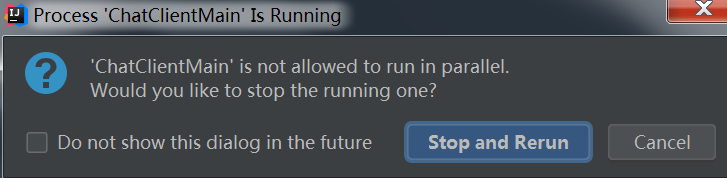
会报出如下图的警告,这个图是摘得网上的,停止并重新运行,这是因为idea默认是单例运行,无法运行多个实例。
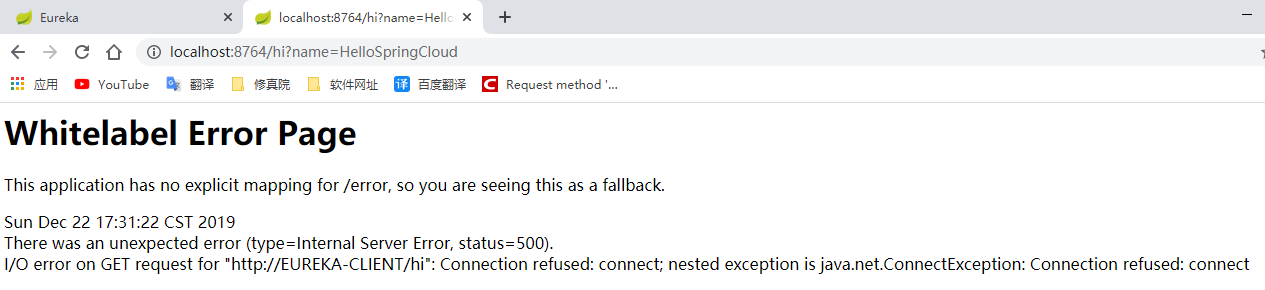
虽然在注册中心能看到有两个实例,但是实际这里只会运行最后一次的端口号客户端。

这里如果使用ribbon进行负载均衡,刷新到没有运行的客户端端口号就会报错,没有连接。
所以需要修改idea的配置,如下图。
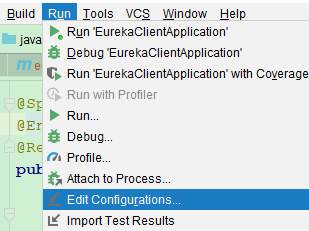
在客户端服务处,勾选框选位置,allow parallel run,就可以运行多个实例,不再是单例运行。

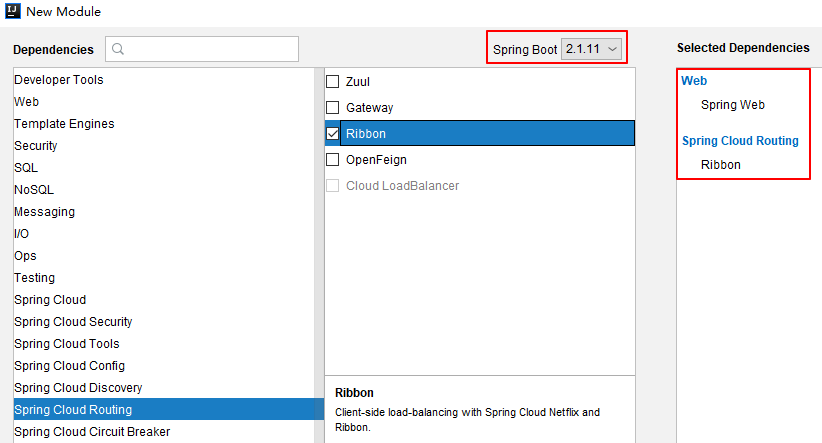
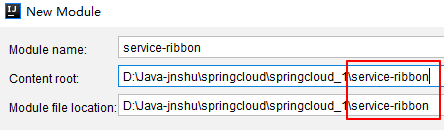
(2)创建子模块,服务消费者 service-ribbon。
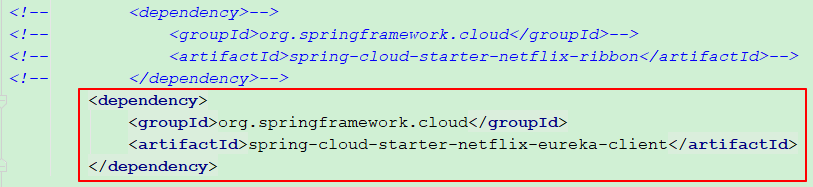
这里注意版本号对应,选择了web、ribbon依赖,但是后面无法运行,不知道为什么,搜索得知这里不需要添加ribbon依赖,只需要添加client依赖即可,其内包含ribbon依赖,修改后就可以正常运行了。
选择新建的文件夹。
集成ribbon只需要添加client依赖即可。
修改pom文件中的依赖。
pom文件:
<?xml version="1.0" encoding="UTF-8"?>
<project xmlns="http://maven.apache.org/POM/4.0.0" xmlns:xsi="http://www.w3.org/2001/XMLSchema-instance"
xsi:schemaLocation="http://maven.apache.org/POM/4.0.0 https://maven.apache.org/xsd/maven-4.0.0.xsd">
<modelVersion>4.0.0</modelVersion>
<groupId>com.springcloud</groupId>
<artifactId>service-ribbon</artifactId>
<version>0.0.1-SNAPSHOT</version>
<!-- 后添加 -->
<packaging>jar</packaging>
<name>service-ribbon</name>
<description>Demo project for Spring Boot</description>
<!-- 后添加,父模块 -->
<parent>
<groupId>com.springcloud</groupId>
<artifactId>parent</artifactId>
<version>0.0.1-SNAPSHOT</version>
</parent>
<dependencies>
<dependency>
<groupId>org.springframework.boot</groupId>
<artifactId>spring-boot-starter-web</artifactId>
</dependency>
<dependency>
<groupId>org.springframework.cloud</groupId>
<artifactId>spring-cloud-starter-netflix-eureka-client</artifactId>
</dependency>
</dependencies>
</project>
application.yml文件
server:
port: 8764
spring:
application:
name: service-ribbon
eureka:
client:
serviceUrl:
defaultZone: http://localhost:8761/eureka/
启动类:
package com.springcloud.serviceribbon;
import org.springframework.boot.SpringApplication;
import org.springframework.boot.autoconfigure.SpringBootApplication;
import org.springframework.cloud.client.discovery.EnableDiscoveryClient;
import org.springframework.cloud.client.loadbalancer.LoadBalanced;
import org.springframework.context.annotation.Bean;
import org.springframework.web.client.RestTemplate;
@SpringBootApplication
@EnableDiscoveryClient
public class ServiceRibbonApplication {
public static void main(String[] args) {
SpringApplication.run(ServiceRibbonApplication.class, args);
}
@Bean
@LoadBalanced
RestTemplate restTemplate() {
return new RestTemplate();
}
}
创建两个类,代表service与controller层。
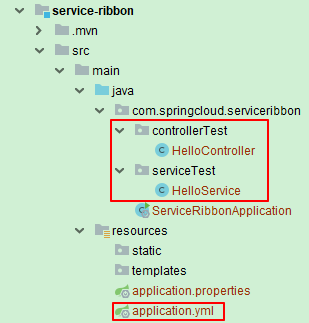
service:
package com.springcloud.serviceribbon.serviceTest;
import org.springframework.beans.factory.annotation.Autowired;
import org.springframework.stereotype.Service;
import org.springframework.web.client.RestTemplate;
@Service
public class HelloService {
@Autowired
RestTemplate restTemplate;
// 根据返回值类型,确定 “.class” 前的数据类型
// 访问网址用 服务名称 EUREKA-CLIENT 代替
public String hiService(String name) {
return restTemplate.getForObject("http://EUREKA-CLIENT/hi?name="+name,String.class);
}
}
controller:
package com.springcloud.serviceribbon.controllerTest;
import com.springcloud.serviceribbon.serviceTest.HelloService;
import org.springframework.beans.factory.annotation.Autowired;
import org.springframework.web.bind.annotation.RequestMapping;
import org.springframework.web.bind.annotation.RequestParam;
import org.springframework.web.bind.annotation.RestController;
@RestController
public class HelloController {
@Autowired
HelloService helloService;
@RequestMapping(value = "/hi")
public String hi(@RequestParam String name){
return helloService.hiService(name);
}
}
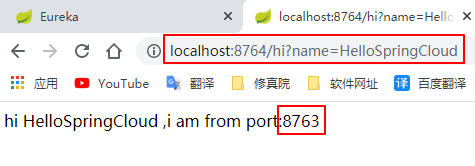
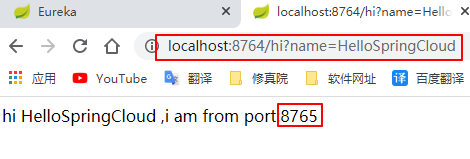
按照之前步骤运行两个客户端实例,端口号分别是8763、8765。
这里需要注意,访问的url端口号为ribbon的端口号,这里也就是8764。浏览器会交替显示访问了两个客户端的端口号。说明通过调用restTemplate.getForObject("http://EUREKA-CLIENT/hi?name="+name,String.class) 方法时,做到了负载均衡,访问不同端口的服务实例。
浏览器交替显示访问了两个客户端的端口号。
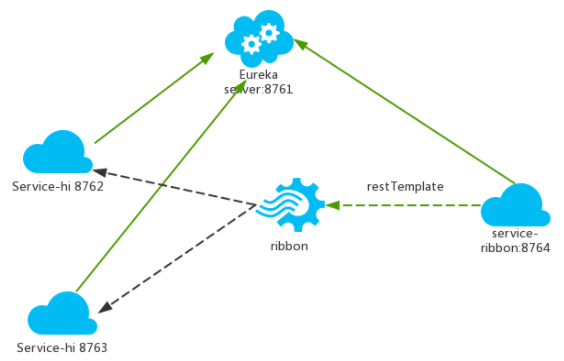
下图为ribbon的运行流程,以及步骤的解释,服务名称和端口号略有差异。
ribbon是从注册中心服务器端获取服务注册信息列表,从而在调用restTemplate的方法时,指定调用服务的名称,来进行客户端的负载均衡。
2、访问微服务,使用Feign,运行效果和ribbon一样。
feign的好处:
① feign采用基于接口的注解;
② feign自身是个声明式的伪Http客户端,写起来思路更加清晰、方便;
③ feign整合了ribbon;
④ feign整合了Hystrix断路器,有熔断作用。
ribbon:
@Service
public class HelloService {
@Autowired
RestTemplate restTemplate;
// 根据返回值类型,确定 “.class” 前的数据类型
// 访问网址用 服务名称 EUREKA-CLIENT 代替
public String hiService(String name) {
return restTemplate.getForObject("http://EUREKA-CLIENT/hi?name="+name,String.class);
}
}
feign:
@FeignClient(value = "eureka-client")
public interface HiService {
@RequestMapping(value = "/hi",method = RequestMethod.GET)
String sayHiFromClientOne(@RequestParam(value = "name") String name);
}
新建子模块feign服务,选择web、client、feign依赖。
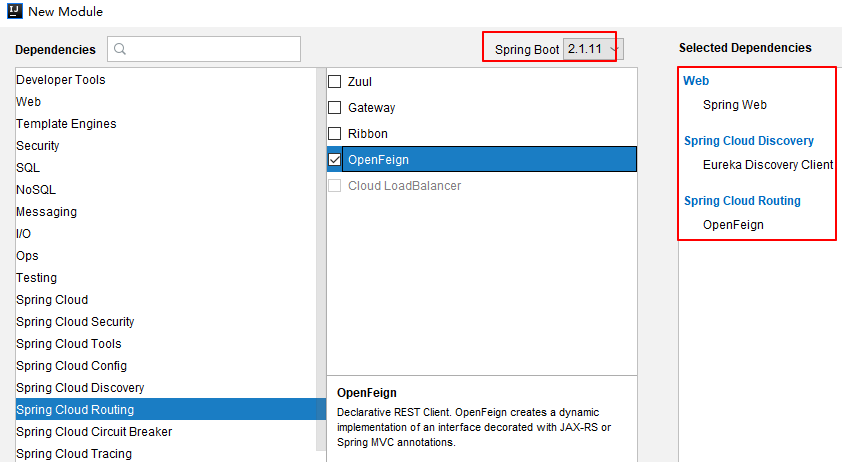
pom文件:
<?xml version="1.0" encoding="UTF-8"?>
<project xmlns="http://maven.apache.org/POM/4.0.0" xmlns:xsi="http://www.w3.org/2001/XMLSchema-instance"
xsi:schemaLocation="http://maven.apache.org/POM/4.0.0 https://maven.apache.org/xsd/maven-4.0.0.xsd">
<modelVersion>4.0.0</modelVersion>
<groupId>com.springcloud</groupId>
<artifactId>service-feign</artifactId>
<version>0.0.1-SNAPSHOT</version>
<!-- 后添加 -->
<packaging>jar</packaging>
<name>service-feign</name>
<description>Demo project for Spring Boot</description>
<!-- 后添加,父模块 -->
<parent>
<groupId>com.springcloud</groupId>
<artifactId>parent</artifactId>
<version>0.0.1-SNAPSHOT</version>
</parent>
<dependencies>
<dependency>
<groupId>org.springframework.boot</groupId>
<artifactId>spring-boot-starter-web</artifactId>
</dependency>
<dependency>
<groupId>org.springframework.cloud</groupId>
<artifactId>spring-cloud-starter-netflix-eureka-client</artifactId>
</dependency>
<dependency>
<groupId>org.springframework.cloud</groupId>
<artifactId>spring-cloud-starter-openfeign</artifactId>
</dependency>
</dependencies>
</project>
application.yml
server:
port: 8765
spring:
application:
name: service-feign
eureka:
client:
serviceUrl:
defaultZone: http://localhost:8761/eureka/
启动类:
package com.springcloud.servicefeign;
import org.springframework.boot.SpringApplication;
import org.springframework.boot.autoconfigure.SpringBootApplication;
import org.springframework.cloud.client.discovery.EnableDiscoveryClient;
import org.springframework.cloud.openfeign.EnableFeignClients;
@SpringBootApplication
@EnableDiscoveryClient
@EnableFeignClients
public class ServiceFeignApplication {
public static void main(String[] args) {
SpringApplication.run(ServiceFeignApplication.class, args);
}
}
创建接口、类,其中熔断方法的类是下面需要的。
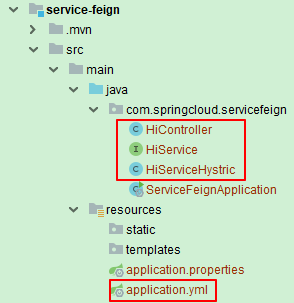
service接口:
package com.springcloud.servicefeign;
import org.springframework.cloud.openfeign.FeignClient;
import org.springframework.web.bind.annotation.RequestMapping;
import org.springframework.web.bind.annotation.RequestMethod;
import org.springframework.web.bind.annotation.RequestParam;
@FeignClient(value = "eureka-client")
public interface HiService {
@RequestMapping(value = "/hi",method = RequestMethod.GET)
String sayHiFromClientOne(@RequestParam(value = "name") String name);
}
controller类:
package com.springcloud.servicefeign;
import org.springframework.beans.factory.annotation.Autowired;
import org.springframework.web.bind.annotation.RequestMapping;
import org.springframework.web.bind.annotation.RequestMethod;
import org.springframework.web.bind.annotation.RequestParam;
import org.springframework.web.bind.annotation.RestController;
import javax.annotation.Resource;
@RestController
public class HiController {
@Resource
HiService hiService;
@RequestMapping(value = "/hi",method = RequestMethod.GET)
public String sayHi(@RequestParam String name){
return hiService.sayHiFromClientOne(name);
}
}
3、断路器Hystrix。
这里只用了feign整合的Hystrix断路器,还有其他方法的断路器设置。
断路器就相当于之前手动创建的错误信息显示的jsp错误信息页面。
当被访问的微服务无法使用时,当前服务能够感应到这个现象,并给出一个备用的方案出来,显示相关的错误信息。
在feign服务的配置文件中添加如下,开启其整合的Hystrix设置。
feign:
hystrix:
enabled: true
并新建一个Hystrix的类,实现之前创建的service接口,方法返回错误信息。
package com.springcloud.servicefeign;
import org.springframework.stereotype.Component;
@Component
public class HiServiceHystric implements HiService {
@Override
public String sayHiFromClientOne(String name) {
return "sorry~ " + name;
}
}
并且service接口需要添加如下标红代码,指定错误信息的类。
@FeignClient(value = "eureka-client",fallback = HiServiceHystric.class)
public interface HiService {
@RequestMapping(value = "/hi",method = RequestMethod.GET)
String sayHiFromClientOne(@RequestParam(value = "name") String name);
}
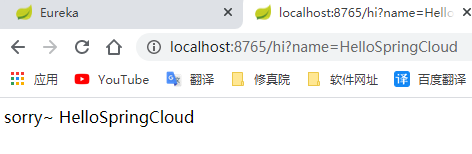
关掉client服务,则返回熔断器的方法值。
4、网关Zuul。
Zuul的主要功能是路由转发和过滤器。
其中路由的功能是因为,多个微服务可能会有不同的IP、端口,为了访问他们就需要记住这些信息,而IP和端口是可能变化的,所以为了解决这个问题,类似nginx的反向代理,使用网关Zuul来解决。只需要记住网关IP和端口号就行。
新建子模块,service-zuul。
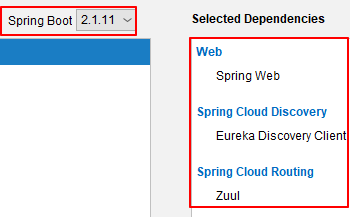
但是运行网关,报错,无法运行,百度说是版本问题。
目前使用的是springboot 2.1.11,应该对应着springcloud的Greenwich版本,但是使用的是Finchley版本。
但是尝试降低springcloud版本不管用。
只能降低springboot版本,由2.1.11改为2.0.6版本。。成功运行。
pom文件:
<?xml version="1.0" encoding="UTF-8"?>
<project xmlns="http://maven.apache.org/POM/4.0.0" xmlns:xsi="http://www.w3.org/2001/XMLSchema-instance"
xsi:schemaLocation="http://maven.apache.org/POM/4.0.0 https://maven.apache.org/xsd/maven-4.0.0.xsd">
<modelVersion>4.0.0</modelVersion>
<groupId>com.springcloud</groupId>
<artifactId>service-zuul</artifactId>
<version>0.0.1-SNAPSHOT</version>
<!-- 后添加 -->
<packaging>jar</packaging>
<name>service-zuul</name>
<description>Demo project for Spring Boot</description>
<!-- 后添加,父模块 -->
<parent>
<groupId>com.springcloud</groupId>
<artifactId>parent</artifactId>
<version>0.0.1-SNAPSHOT</version>
</parent>
<dependencies>
<dependency>
<groupId>org.springframework.boot</groupId>
<artifactId>spring-boot-starter-web</artifactId>
</dependency>
<dependency>
<groupId>org.springframework.cloud</groupId>
<artifactId>spring-cloud-starter-netflix-eureka-client</artifactId>
</dependency>
<dependency>
<groupId>org.springframework.cloud</groupId>
<artifactId>spring-cloud-starter-netflix-zuul</artifactId>
</dependency>
</dependencies>
</project>
application.yml文件:
server:
port: 8769
spring:
application:
name: service-zuul
eureka:
client:
serviceUrl:
defaultZone: http://localhost:8761/eureka/
zuul:
routes:
api-a:
path: /api-a/**
serviceId: service-ribbon
api-b:
path: /api-b/**
serviceId: service-feign
启动类:
package com.springcloud.servicezuul;
import org.springframework.boot.SpringApplication;
import org.springframework.boot.autoconfigure.SpringBootApplication;
import org.springframework.cloud.netflix.eureka.EnableEurekaClient;
import org.springframework.cloud.netflix.zuul.EnableZuulProxy;
@EnableZuulProxy
@EnableEurekaClient
@SpringBootApplication
public class ServiceZuulApplication {
public static void main(String[] args) {
SpringApplication.run(ServiceZuulApplication.class, args);
}
}
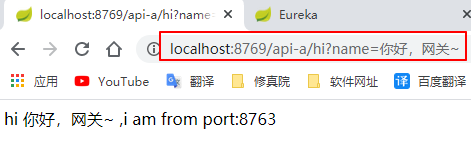
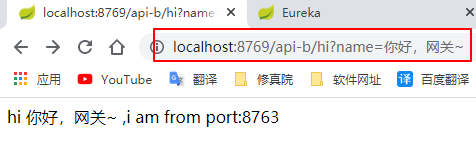
依次运行注册中心、客户端(这里只运行一个实例,两个url都能访问就表示成功)、ribbon、feign、zuul服务。
访问“api-a”、“api-b”url,对应着ribbon、feign,成功显示。
5、安装SVN客户端、服务端。
明天计划的事:
查看SVN使用,了解复盘相关规范。
遇到的问题:
版本版本版本
收获:
1、访问微服务,使用Ribbon。
(1)运行两个客户端实例,修改idea的单例模式。
(2)创建子模块,服务消费者 service-ribbon。
ribbon是从注册中心服务器端获取服务注册信息列表,从而在调用restTemplate的方法时,指定调用服务的名称,来进行客户端的负载均衡。
2、访问微服务,使用Feign,运行效果和ribbon一样。
feign的好处:
① feign采用基于接口的注解;
② feign自身是个声明式的伪Http客户端,写起来思路更加清晰、方便;
③ feign整合了ribbon;
④ feign整合了Hystrix断路器,有熔断作用。
3、断路器Hystrix。
这里只用了feign整合的Hystrix断路器,还有其他方法的断路器设置。
断路器就相当于之前手动创建的错误信息显示的jsp错误信息页面。当被访问的微服务无法使用时,当前服务能够感应到这个现象,并给出一个备用的方案出来,显示相关的错误信息。
4、网关Zuul。
Zuul的主要功能是路由转发和过滤器。
其中路由的功能是因为,多个微服务可能会有不同的IP、端口,为了访问他们就需要记住这些信息,而IP和端口是可能变化的,所以为了解决这个问题,类似nginx的反向代理,使用网关Zuul来解决。只需要记住网关IP和端口号就行。
5、安装SVN客户端、服务端。


评论