发表于: 2019-12-15 23:19:55
1 1136
今天完成的事:
1、实现spring RMI。
查看了很多实例,参考如下网址,借助第一个网址的项目框架,相关配置是第二个网址的。
spring RMI简化了RMI的实现,服务接口不需要继承Remote(仅仅是普通接口),服务实现类不用继承UnicastRemoteObject,不用自己注册RMI远程服务实现类,
服务端要做的仅仅是写好需要提供远程服务的实现类,然后将其交给RmiServiceExporter类,RmiServiceExporter类会将实现类发布成RMI服务。
客户端也简单,只需要使用RmiProxyFactoryBean从服务端的url中获取服务对象,然后从spring容器中获取RmiProxyFactoryBean封装的id即可。
具体代码:
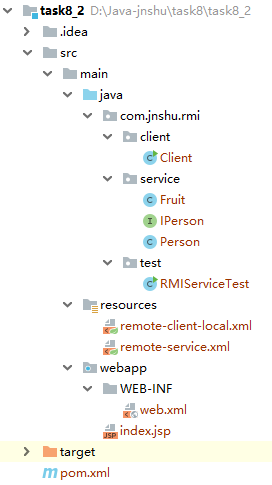
(1)为方便自测,将服务端和客户端整合到一个webapp项目中,这里不需要将接口、实体类打成jar包。
pom文件中添加spring的常用依赖。
下图左侧为实际代码结构,左侧为参考案例代码结构,标注了哪些是客户端、哪些是服务端。

实体类:
package com.jnshu.rmi.service;
import java.io.Serializable;
import java.util.Date;
//水果,需要序列化
public class Fruit implements Serializable {
// 暂时没用
// private static final long serialVersionUID = 1883838732853579826L;
Integer id;//编号
String name;//名称
Double weight;//重量
String color;//颜色
Date pickDay;//采摘日期
public Fruit() {
// 暂时没用
// super();
}
public Fruit(Integer id, String name, Double weight, String color, Date pickDay) {
super();
this.id = id;
this.name = name;
this.weight = weight;
this.color = color;
this.pickDay = pickDay;
}
// get、set省略。。
@Override
public String toString() {
return "Fruit [id=" + id + ", name=" + name + ", weight=" + weight + ", color=" + color + ", pickDay=" + pickDay + "]";
}
}
接口:
package com.jnshu.rmi.service;
// 人接口
public interface IPerson {
public String eat(String fruitName);
public String eat(Fruit fruit);
}
接口实现类:
package com.jnshu.rmi.service;
// 人实现类
public class Person implements IPerson {
@Override
public String eat(String fruitName){
System.out.println("服务开始------");
System.out.println("我要吃:"+ fruitName );
System.out.println("服务结束------");
return "请喂我吃:" + fruitName;
}
@Override
public String eat(Fruit fruit){
System.out.println("服务2开始------");
System.out.println("我想想:"+fruit);
System.out.println("服务2结束------");
return "请给我点时间:"+ fruit;
}
}
服务端配置文件:
<?xml version="1.0" encoding="UTF-8"?>
<beans xmlns="http://www.springframework.org/schema/beans"
xmlns:xsi="http://www.w3.org/2001/XMLSchema-instance"
xsi:schemaLocation="http://www.springframework.org/schema/beans
http://www.springframework.org/schema/beans/spring-beans-3.0.xsd">
<!-- 人接口 -->
<bean id="person" class="com.jnshu.rmi.service.Person"/>
<bean id="personService" class="org.springframework.remoting.rmi.RmiServiceExporter">
<property name="serviceName" value="helloRMI" />
<property name="service" ref="person" />
<property name="serviceInterface" value="com.jnshu.rmi.service.IPerson" />
<property name="registryPort" value="9999"></property>
</bean>
</beans>
web.xml:
这里是通过web.xml配置文件读取服务端配置了,需要添加tomcat运行,我在这里没有添加,使用的新建一个类,用main方法运行服务端,在下面的建立项目模块里,添加的是tomcat。
<!DOCTYPE web-app PUBLIC
"-//Sun Microsystems, Inc.//DTD Web Application 2.3//EN"
"http://java.sun.com/dtd/web-app_2_3.dtd" >
<web-app xmlns:xsi="http://www.w3.org/2001/XMLSchema-instance"
xmlns="http://java.sun.com/xml/ns/javaee"
xsi:schemaLocation="http://java.sun.com/xml/ns/javaee
http://java.sun.com/xml/ns/javaee/web-app_2_5.xsd" version="2.5">
<display-name>Archetype Created Web Application</display-name>
<!-- springmvc核心,前端控制器:分发servlet -->
<servlet>
<servlet-name>mvc-dispatcher</servlet-name>
<servlet-class>org.springframework.web.servlet.DispatcherServlet</servlet-class>
<!-- 指定spring mvc的配置文件位置 -->
<init-param>
<param-name>contextConfigLocation</param-name>
<param-value>classpath:remote-service.xml</param-value>
</init-param>
<load-on-startup>1</load-on-startup>
</servlet>
<!--静态资源访问配置-->
<servlet-mapping>
<servlet-name>mvc-dispatcher</servlet-name>
<url-pattern>/</url-pattern>
</servlet-mapping>
</web-app>
新建测试类,运行服务端:
package com.jnshu.rmi.test;
import org.springframework.context.support.ClassPathXmlApplicationContext;
public class RMIServiceTest {
public static void main(String[] args) {
new ClassPathXmlApplicationContext("remote-service.xml");
}
}
客户端测试:
读取客户端配置文件,获取其bean,调用服务端方法。
package com.jnshu.rmi.client;
import java.util.Date;
import com.jnshu.rmi.service.Fruit;
import com.jnshu.rmi.service.IPerson;
import org.springframework.context.ApplicationContext;
import org.springframework.context.support.ClassPathXmlApplicationContext;
// 客户端调用类
public class Client {
//读取配置文件
static ApplicationContext context = new ClassPathXmlApplicationContext("remote-client-local.xml");
public static void main(String[] args) {
eatFruit1();
eatFruit2();
}
public static void eatFruit1() {
// 获取bean
IPerson service = (IPerson) context.getBean("person");
String ii = service.eat("苹果");
System.out.println(ii);
}
public static void eatFruit2() {
IPerson service = (IPerson) context.getBean("person");
Fruit fruit = new Fruit(1,"西瓜",2.2d,"green",new Date());
String i = service.eat(fruit);
System.out.println(i);
}
}
客户端配置文件:
<?xml version="1.0" encoding="UTF-8"?>
<beans xmlns="http://www.springframework.org/schema/beans"
xmlns:xsi="http://www.w3.org/2001/XMLSchema-instance"
xsi:schemaLocation="http://www.springframework.org/schema/beans
http://www.springframework.org/schema/beans/spring-beans-3.0.xsd">
<!-- 人接口 -->
<bean id="person"
class="org.springframework.remoting.rmi.RmiProxyFactoryBean">
<property name="serviceUrl" value="rmi://127.0.0.1:9999/helloRMI" />
<property name="serviceInterface" value="com.jnshu.rmi.service.IPerson" />
</bean>
</beans>
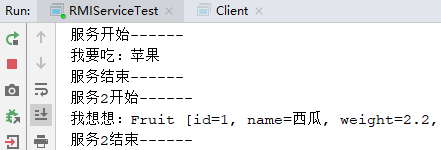
先运行服务端,成功,再运行客户端,成功输出信息。

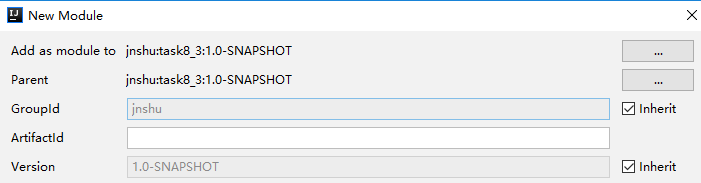
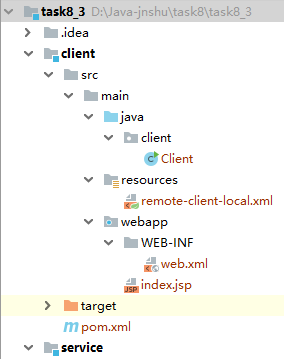
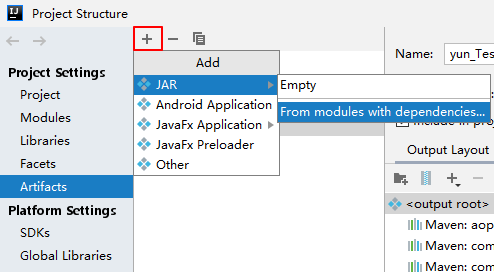
(2)创建maven quickstart,纯java项目,然后创建两个子模块webapp项目,其父工程都是纯java项目,如下图,依次创建。
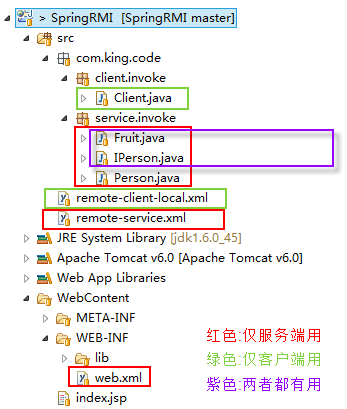
按照例子的颜色标注,将几个文件分开,红色为服务端,绿加紫为客户端。这里需要注意的是如果将服务端打成jar包,那么客户端就不需要添加紫色部分了。
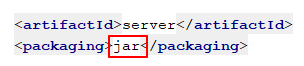
将服务端的pom中,war处修改为jar,点击maven的install插件,即可在本地仓库中查找到对应的jar包,可以直接添加依赖到客户端的pom文件中。
这里添加依赖,导入的就是实体类、服务端接口。
这里也可以不导入jar包,相应的客户端就需要添加服务端的实体类、接口,而且类路径需要保持一致。

client客户端依赖添加。

下图左侧为客户端模块目录,右侧为服务端。
两者相同的依赖可以添加到父工程的pom文件中,这里将spring的一些常用依赖添加到父工程pom文件。客户端添加服务端jar包依赖,服务端不添加依赖。
项目代码与上个例子都是一样的,只是对应的类路径修改了,服务端添加了tomcat运行,这里就不放代码了。
2、实现两个service随机访问,两个web随机访问service。
在客户端的模块中,创建一个类,用于随机选择service。
package client;
import org.apache.log4j.Logger;
import org.springframework.beans.factory.annotation.Autowired;
import org.springframework.beans.factory.annotation.Qualifier;
import org.springframework.stereotype.Component;
import service.IPerson;
import java.util.Random;
/**
* 随机选择service
*/
@Component
public class RandomService {
private static final Logger logger = Logger.getLogger("RandomService");
@Qualifier("person1")
@Autowired
IPerson service1;
@Qualifier("person2")
@Autowired
IPerson service2;
public IPerson chooseService(){
IPerson service = (IPerson)choose(service1,service2);
return service;
}
private Object choose(Object m,Object n){
int choose = new Random().nextInt(2);
if(0 == choose){
try{
logger.info("服务一。。。");
return m;
}catch (Exception e1){
try{
logger.info("服务二。。。");
return n;
}catch (Exception e2){
logger.error("服务选择出现异常1。。。");
throw new RuntimeException("服务选择异常1");
}
}
}
if(1 == choose){
try{
logger.info("服务二。。。");
return n;
}catch (Exception e1){
try{
logger.info("服务一。。。");
return m;
}catch (Exception e2){
logger.error("服务选择出现异常2。。。");
throw new RuntimeException("服务选择异常2");
}
}
}
logger.error("未知异常。。。");
throw new RuntimeException("未知异常");
}
}
将客户端调用服务端方法改为控制层,用于打war包运行。
package client;
import org.apache.log4j.Logger;
import org.springframework.beans.factory.annotation.Autowired;
import org.springframework.beans.factory.annotation.Qualifier;
import org.springframework.stereotype.Controller;
import org.springframework.web.bind.annotation.RequestMapping;
import org.springframework.web.bind.annotation.RequestMethod;
import org.springframework.web.bind.annotation.ResponseBody;
import service.Fruit;
import service.IPerson;
import org.springframework.context.ApplicationContext;
import org.springframework.context.support.ClassPathXmlApplicationContext;
import java.util.Date;
import java.util.HashMap;
import java.util.Map;
/**
* 客户端调用类
*/
@Controller
public class Client {
private static final Logger logger = Logger.getLogger("Client");
@Autowired
RandomService randomService;
@RequestMapping(value = "/client",method = RequestMethod.GET )
@ResponseBody
public Map eatFruit1() {
String ii = randomService.chooseService().eat("苹果");
Map<String,String> map = new HashMap<>();
map.put("水果",ii);
logger.info("水果"+ii);
return map;
}
@RequestMapping(value = "/client2",method = RequestMethod.GET )
@ResponseBody
public Map eatFruit2() {
Fruit fruit = new Fruit(1,"西瓜",2.2d,"green",new Date());
String i = randomService.chooseService().eat(fruit);
Map<String,String> map = new HashMap<>();
map.put("水果品种",i);
logger.info("水果品种"+i);
return map;
}
}
服务端添加main方法读取配置文件,用于打jar包运行,并在客户端添加依赖,导入实体类、服务接口。
package service;
import org.apache.log4j.Logger;
import org.springframework.context.support.ClassPathXmlApplicationContext;
/**
* 测试服务端
*/
public class ServiceTest {
private static final Logger logger = Logger.getLogger("ServiceTest");
public static void main(String[] args) {
new ClassPathXmlApplicationContext("remote-service.xml");
logger.info("服务连接成功------");
}
}
配置文件的修改:
客户端:
<!--开启注解的扫描-->
<context:component-scan base-package="client" />
<context:annotation-config />
<mvc:annotation-driven />
<!-- 1-接口 -->
<bean id="person1"
class="org.springframework.remoting.rmi.RmiProxyFactoryBean">
<property name="serviceUrl" value="rmi://127.0.0.1:9999/helloRMI1" />
<property name="serviceInterface" value="service.IPerson" />
</bean>
<!-- 2-接口 -->
<bean id="person2"
class="org.springframework.remoting.rmi.RmiProxyFactoryBean">
<property name="serviceUrl" value="rmi://127.0.0.1:8888/helloRMI2" />
<property name="serviceInterface" value="service.IPerson" />
</bean>
服务端:
<!-- 人接口 -->
<bean id="person" class="service.Person"/>
<!-- 1-接口 -->
<bean id="personService1" class="org.springframework.remoting.rmi.RmiServiceExporter">
<property name="serviceName" value="helloRMI1" />
<property name="service" ref="person" />
<property name="serviceInterface" value="service.IPerson" />
<property name="registryPort" value="9999"></property>
</bean>
<!-- 2-接口 -->
<bean id="personService2" class="org.springframework.remoting.rmi.RmiServiceExporter">
<property name="serviceName" value="helloRMI2" />
<property name="service" ref="person" />
<property name="serviceInterface" value="service.IPerson" />
<property name="registryPort" value="8888"></property>
</bean>
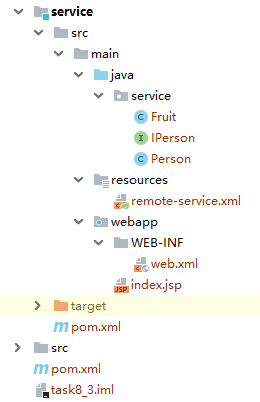
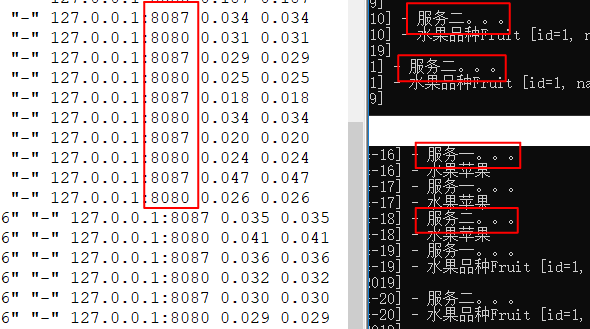
将服务端jar包运行,cmd到jar包目录,“java -jar xxx.jar”运行。将客户端war包放入两个tomcat的webapp中,启动tomcat、nginx。运行成功。
我是通过日志查看负载均衡以及service切换的。结果如下。
明天计划的事:
1、学习shiro框架。
2、尝试简单案例。
遇到的问题:
1、将服务端打jar包。
因为有相应的依赖,直接使用idea的打包命令不会添加其依赖,所以查看后,得知可以使用maven的一个插件进行打包,maven-shade-plugin。它能够将项目依赖的所有jar包都打成单一的jar包。
代码如下,在service模块pom中添加,但是插件好是很好,可以没法使用,查看别人日报代码没什么问题,百度搜索也不知道。。
<plugins>
<plugin>
<groupId>org.apache.maven.plugins</groupId>
<artifactId>maven-shade-plugin</artifactId>
<executions>
<execution>
<phase>package</phase>
<goals>
<goal>shade</goal>
</goals>
<configuration>
<transformers>
<transformer implementation="org.apache.maven.plugins.shade.resource.AppendingTransformer">
<resource>META-INF/spring.handlers</resource>
</transformer>
<transformer implementation="org.apache.maven.plugins.shade.resource.AppendingTransformer">
<resource>META-INF/spring.schemas</resource>
</transformer>
<transformer implementation = "org.apache.maven.plugins.shade.resource.MainifestResourceTransformer">
<mainClass>service.ServiceTest</mainClass>
</transformer>
</transformers>
<filters>
<filter>
<artifact>*:*</artifact>
<excludes>
<exclude>META-INF/*.SF</exclude>
<exclude>META-INF/*.DSA</exclude>
<exclude>META-INF/*.RSA</exclude>
</excludes>
</filter>
</filters>
</configuration>
</execution>
</executions>
</plugin>
</plugins>
报错信息:
Failed to execute goal org.apache.maven.plugins:maven-shade-plugin:2.4.1:shade (default) on project service: Unable to parse configuration of mojo org.apache.maven.plugins:maven-shade-plugin:2.4.1:shade for parameter transformers: Cannot load implementation hint 'org.apache.maven.plugins.shade.resource.MainifestResourceTransformer' -> [Help 1]
[ERROR]
[ERROR] To see the full stack trace of the errors, re-run Maven with the -e switch.
[ERROR] Re-run Maven using the -X switch to enable full debug logging.
[ERROR]
[ERROR] For more information about the errors and possible solutions, please read the following articles:
插件问题没有解决,询问师兄后,使用idea的打包方式将服务端以及其依赖打jar包成功,需要将所有依赖都添加到运行目录,才能运行服务端jar包。。
2、客户端打war包。
没使用插件之前是将服务端、客户端都打的war包,使用两个tomcat运行的,因为还要复制tomcat,所以将服务端用jar包运行。
但是服务端jar包用上述方法完成后,使用idea的打包插件无法打包客户端war包。。报错说是没有找到服务端的依赖,删除重新导入也不行,服务端重新打包也不行,但是仓库明明有jar包的。。
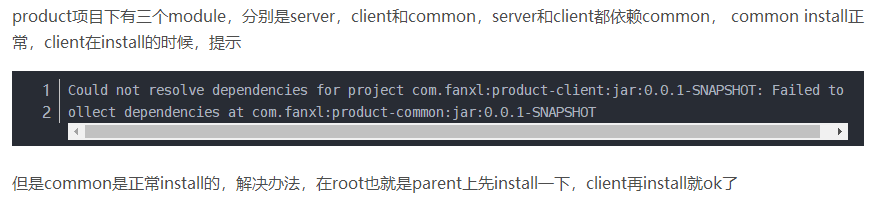
后来查看到一个说是多模块的打包问题,如下,说是模块依赖本项目模块,依赖的模块无法打包,被依赖的模块可以正常打包,解决办法是将父工程先install安装下,再打包子模块。
于是将父工程install,而后再打包客户端,结果就成功了。。。maven还是不熟练。。
收获:
1、实现spring RMI,单个项目,以及单个项目两个子模块,都成功了。
参考如下网址,借助第一个网址的项目框架,相关配置是第二个网址的。
2、实现两个service随机访问,两个web随机访问service。


评论