发表于: 2019-11-16 21:14:15
6 1286
啥也不说就是干!!!
今天完成的事情:
1、SSM 整合
整合思路
将工程的三层结构中的JavaBean分别使用Spring容器(通过XML方式)进行管理。
1)整合持久层mapper,包括数据源、会话工程及mapper代理对象的整合;
2)整合业务层Service,包括事务及service的bean的配置;
3)整合表现层Controller,直接使用springmvc的配置。
4) Web.xml加载spring容器(包含多个XML文件)
Spring核心配置文件:
applicationContext-dao.xml
applicationContext-service.xml
springmvc.xml
工程搭建:添加相关依赖
spring(包括springmvc)
mybatis
mybatis-spring整合包
数据库驱动
第三方连接池
JSTL
servlet-api
工程整合:
1)Mapper 整合:applicationContext-dao.xml
在 resources 文件夹下创建 spring 目录,并创建 applicationContext-dao.xml 文件
<?xml version="1.0" encoding="UTF-8"?>
<beans xmlns="http://www.springframework.org/schema/beans"
       xmlns:context="http://www.springframework.org/schema/context"
       xmlns:xsi="http://www.w3.org/2001/XMLSchema-instance"
       xsi:schemaLocation="http://www.springframework.org/schema/beans http://www.springframework.org/schema/beans/spring-beans.xsd
   http://www.springframework.org/schema/context http://www.springframework.org/schema/context/spring-context.xsd">

    <!-- 加载db.properties -->
    <context:property-placeholder location="classpath:db.properties" />
    <!-- 配置数据源 -->
    <bean id="dataSource" class="com.alibaba.druid.pool.DruidDataSource"
          init-method="init" destroy-method="close">
        <property name="driverClassName" value="${druid.driverClassName}" />
        <property name="url" value="${druid.url}" />
        <property name="username" value="${druid.username}" />
        <property name="password" value="${druid.password}" />
        <property name="maxActive" value="${druid.maxActive}" />
        <property name="maxWait" value="${druid.maxWait}" />
        <!-- 配置间隔多久才进行一次检测,检测需要关闭的空闲连接,单位是毫秒 -->
        <property name="timeBetweenEvictionRunsMillis" value="${druid.timeBetweenEvictionRunsMillis}" />

        <!-- 配置一个连接在池中最小生存的时间,单位是毫秒 -->
        <property name="minEvictableIdleTimeMillis" value="${druid.minEvictableIdleTimeMillis}" />
        <property name="validationQuery" value="${druid.validationQuery}" />
        <property name="testWhileIdle" value="${druid.testWhileIdle}" />
        <property name="testOnBorrow" value="${druid.testOnBorrow}" />
        <property name="testOnReturn" value="${druid.testOnReturn}" />

        <!-- 打开PSCache,并且指定每个连接上PSCache的大小 如果用Oracle,则把poolPreparedStatements配置为true,mysql可以配置为false。 -->
        <property name="poolPreparedStatements" value="${druid.poolPreparedStatements}" />
        <property name="maxPoolPreparedStatementPerConnectionSize"
                  value="${druid.maxPoolPreparedStatementPerConnectionSize}" />

        <!-- 配置监控统计拦截的filters -->
        <property name="filters" value="${druid.filters}" />
    </bean>

    <!-- 配置SqlSessionFacotory -->
    <bean id="sqlSessionFactory" class="org.mybatis.spring.SqlSessionFactoryBean">
        <!-- 加载mybatis的配置文件(如果配置文件中没有配置项,可以忽略该文件) -->
        <property name="configLocation" value="classpath:mybatis/SqlMapConfig.xml" />
        <!-- 配置数据源 -->
        <property name="dataSource" ref="dataSource" />
        <property name="mapperLocations" value="classpath:mappers/*.xml"/>
    </bean>

    <!-- 配置mapper扫描器,SqlSessionConfig.xml中的mapper配置去掉 -->
    <bean class="org.mybatis.spring.mapper.MapperScannerConfigurer">
        <!-- 指定扫描的包 -->
        <property name="basePackage" value="com.gerry.jnshu.mapper" />
        <property name="sqlSessionFactoryBeanName" value="sqlSessionFactory"/>
    </bean>
</beans>
在 classpath 路径下,创建 db.properties
druid.driverClassName=com.mysql.cj.jdbc.Driver
druid.url=jdbc:mysql://localhost:3306/jnshu?useUnicode=true&characterEncoding=UTF-8&serverTimezone=GMT
druid.username=root
druid.password=123456
druid.initialSize=10
druid.minIdle=6
druid.maxActive=50
druid.maxWait=60000
druid.timeBetweenEvictionRunsMillis=60000
druid.minEvictableIdleTimeMillis=300000
druid.validationQuery=SELECT 'x'
druid.testWhileIdle=true
druid.testOnBorrow=false
druid.testOnReturn=false
druid.poolPreparedStatements=false
druid.maxPoolPreparedStatementPerConnectionSize=20
druid.filters=wall,stat
然后 在 resource 文件下创建 SqlMapConfig.xml 文件
<?xml version="1.0" encoding="UTF-8" ?>
<!DOCTYPE configuration
        PUBLIC "-//mybatis.org//DTD Config 3.0//EN"
        "http://mybatis.org/dtd/mybatis-3-config.dtd">
<configuration>
    <!-- 开启驼峰映射 ,为自定义的SQL语句服务-->
    <!--设置启用数据库字段下划线映射到java对象的驼峰式命名属性,默认为false-->
    <settings>
        <setting name="mapUnderscoreToCamelCase" value="true"/>
        <setting name="logImpl" value="LOG4J2" />
    </settings>
</configuration>
2)整合 Service:applicationContext-service.xml
在 resource/spring 路径下创建 applicationContext-service.xml 文件,其中配置了 Service,把 service 组件交给 Spring 容器进行管理
<?xml version="1.0" encoding="UTF-8"?>
<beans xmlns="http://www.springframework.org/schema/beans"
       xmlns:context="http://www.springframework.org/schema/context"                  xmlns:p="http://www.springframework.org/schema/p"
       xmlns:xsi="http://www.w3.org/2001/XMLSchema-instance"
       xsi:schemaLocation="http://www.springframework.org/schema/beans http://www.springframework.org/schema/beans/spring-beans.xsd
   http://www.springframework.org/schema/context http://www.springframework.org/schema/context/spring-context.xsd">
    <!-- 扫描Service -->
    <context:component-scan base-package="com.gerry.jnshu.service" />

</beans>
3)整合 Controller:springmvc.xml
在 resource/spring 路径下创建 springmvc.xml,这个文件配置了 Controller 相关组件。
<beans xmlns="http://www.springframework.org/schema/beans"
       xmlns:xsi="http://www.w3.org/2001/XMLSchema-instance"
       xmlns:context="http://www.springframework.org/schema/context"
       xmlns:mvc="http://www.springframework.org/schema/mvc" xmlns:aop="http://www.springframework.org/schema/aop"
       xsi:schemaLocation="http://www.springframework.org/schema/beans http://www.springframework.org/schema/beans/spring-beans.xsd http://www.springframework.org/schema/context http://www.springframework.org/schema/context/spring-context.xsd http://www.springframework.org/schema/mvc http://www.springframework.org/schema/mvc/spring-mvc.xsd http://www.springframework.org/schema/aop http://www.springframework.org/schema/aop/spring-aop.xsd">
    <context:component-scan base-package="com.gerry.jnshu.controller"/>

    <bean class="org.springframework.web.servlet.view.InternalResourceViewResolver">
        <property name="prefix" value="/WEB-INF/views/"/>
        <property name="suffix" value=".jsp"/>
    </bean>
    <mvc:annotation-driven conversion-service="conversionService"/>
    <bean id="conversionService"
          class="org.springframework.format.support.FormattingConversionServiceFactoryBean">
        <property name="converters">
            <set>
                <bean class="com.gerry.jnshu.converter.DateConverter"/>
            </set>
        </property>
    </bean>

</beans>
4)配置 web.xml
在 web.xml 文件中,加载 spring 与 springmvc 的配置,让项目启动时对 spring 容器进行初始化
<!DOCTYPE web-app PUBLIC
        "-//Sun Microsystems, Inc.//DTD Web Application 2.3//EN"
        "http://java.sun.com/dtd/web-app_2_3.dtd" >
<web-app
        version="2.5" xmlns="http://java.sun.com/xml/ns/javaee"
        xmlns:xsi="http://www.w3.org/2001/XMLSchema-instance"
        xsi:schemaLocation="http://java.sun.com/xml/ns/javaee
   http://java.sun.com/xml/ns/javaee/web-app_2_5.xsd">
    <display-name>Archetype Created Web Application</display-name>
    <servlet>
        <servlet-name>springmvc</servlet-name>
        <servlet-class>org.springframework.web.servlet.DispatcherServlet</servlet-class>
        <!-- 设置spring配置文件路径 -->
        <!-- 如果不设置初始化参数,那么DispatcherServlet会读取默认路径下的配置文件 -->
        <!-- 默认配置文件路径:/WEB-INF/springmvc-servlet.xml -->
        <init-param>
            <param-name>contextConfigLocation</param-name>
            <param-value>classpath:spring/springmvc.xml</param-value>
        </init-param>
        <load-on-startup>2</load-on-startup>
    </servlet>
    <servlet-mapping>
        <servlet-name>springmvc</servlet-name>

        <!-- URL-PATTERN的设置 -->
        <!-- 不要配置为/*,否则报错 -->
        <!-- 通俗解释:/*,会拦截整个项目中的资源访问,包含JSP和静态资源的访问,对于静态资源的访问springMVC提供了默认的Handler处理器 -->
        <!-- 但是对于JSP来讲,springmvc没有提供默认的处理器,我们也没有手动编写对于的处理器,此时按照springmvc的处理流程分析得知,它短路了 -->
        <url-pattern>/</url-pattern>
    </servlet-mapping>
    <context-param>
        <param-name>contextConfigLocation</param-name>
        <param-value>classpath:spring/applicationContext-*.xml</param-value>
    </context-param>
    <listener>
        <listener-class>org.springframework.web.context.ContextLoaderListener</listener-class>
    </listener>
</web-app>
2、对 api 接口进行实现
查询学生信息接口:GET /JnshuTask2/student/
SutdentService 定义查询方法:
public interface StudentService {
    List<Student> getStudentList();

}
StudentMapper 及 StudentMapper.xml
@Repository
public interface StudentMapper {
    List<Student> getStudentList();

}
<sql id="base_column">
    name,qq,jnshu_type,join_time,school,online_num,daily_url,slogan,counsellor,known_path
</sql>

<select id="getStudentList" resultType="com.gerry.jnshu.bean.Student">
    SELECT
       <include refid="base_column"/>
    FROM student;
</select>
StudentServiceImpl 实现类
@Service
public class StudentServiceImpl implements StudentService {
    @Resource
    private StudentMapper studentMapper;

    @Override
    public List<Student> getStudentList() {
              return studentMapper.getStudentList();
    }

}
表现层 StudentController:
@RequestMapping(value = "/",method = RequestMethod.GET)
@ResponseBody
public Result<List<Student>> getStudentList(){
    List<Student> studentList = studentService.getStudentList();
    Result<List<Student>> result = new Result<>();
    result.data=studentList;
    result.message="查询成功";
    result.code=200;
    return result;
}
用 Postman 对该接口进行测试,(Postman 用法参照:https://www.jianshu.com/p/549ff9f922d6)
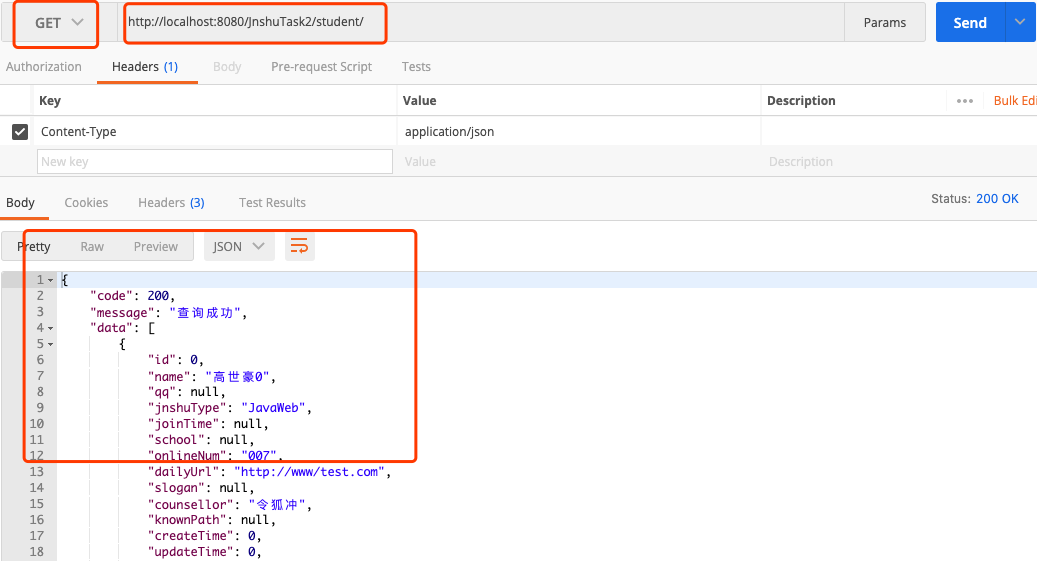
可以看到接口正常返回 json 数据
新增学生信息接口:POST /JnshuTask2/student/
SutdentMapper 及 StudentMapper.xml
@Repository
public interface StudentMapper {
    List<Student> getStudentList();
    int addStudent(Student student);

}
<insert id="addStudent" useGeneratedKeys="true" keyProperty="id" parameterType="com.gerry.jnshu.bean.Student">
  INSERT INTO student(name,qq,jnshu_type,join_time,school,online_num,daily_url,slogan,counsellor,known_path)
            VALUES (#{name},#{qq},#{jnshuType},#{joinTime},#{school},#{onlineNum},#{dailyUrl},#{slogan},#{counsellor},#{knownPath})
</insert>
SutdentService 及 StudentServiceImpl
public interface StudentService {
    List<Student> getStudentList();
    int addStudent(Student student);
}
@Service
public class StudentServiceImpl implements StudentService {
    @Resource
    private StudentMapper studentMapper;
    @Override
    public List<Student> getStudentList() {
        return studentMapper.getStudentList();
    }

    @Override
    public int addStudent(Student student) {
        return studentMapper.addStudent(student);
    }
}
表现层 StudentController
@RequestMapping(value = "/",method = RequestMethod.POST)
@ResponseBody
public Result<Integer> addStudentInfo(Student student){
    int id = studentService.addStudent(student);
    Result<Integer> result = new Result<>();
    result.code=200;
    if(id>0){
        result.message="插入成功";
        result.data=id;
    }
    else{
        result.message="插入失败";
    }
    return result;
}
Postman 对该接口进行测试:
看到该接口正常返回数据:
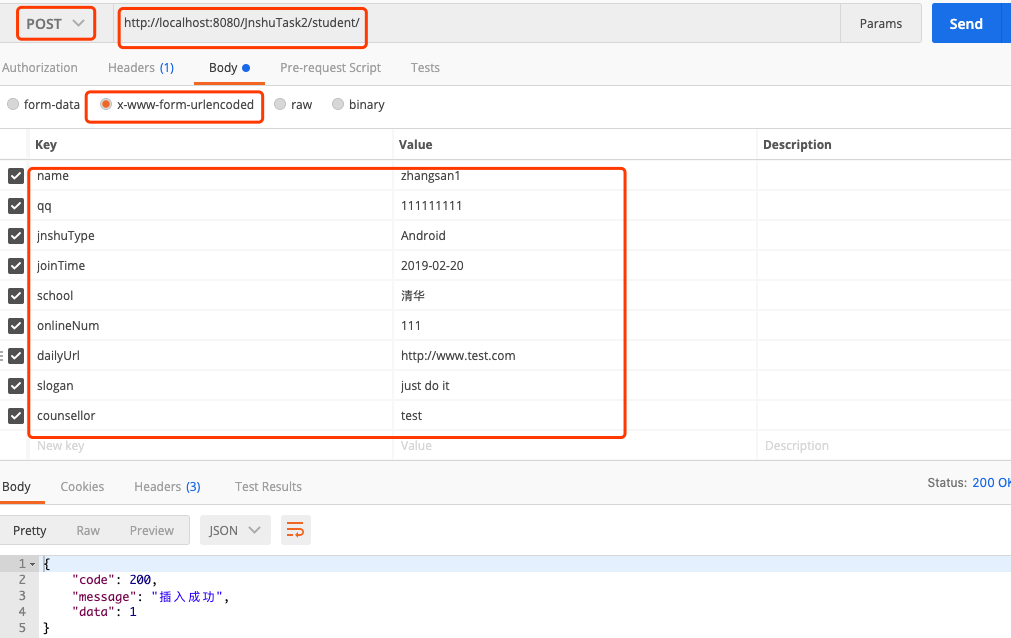
注意,这里的数据格式要选择 x-www-form-urlencoded ,正常的表单提交(form-data)
控制台也打印了 Mybatis 正常执行 sql 的 log:
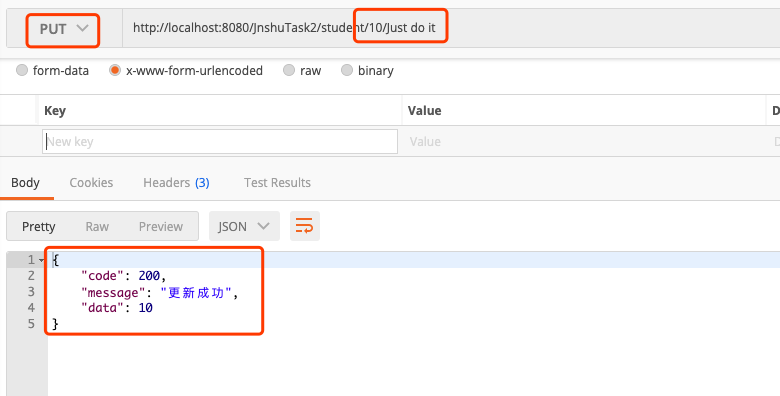
 修改学生信息接口:PUT /JnshuTask2/sutdent/{id}/{slogan}
StudentMapper 与 StudentMapper.xml
@Repository
public interface StudentMapper {
    List<Student> getStudentList();
    int addStudent(Student student);
    int updateSloganById(Integer id,String slogan);
}
 <update id="updateSloganById">
    UPDATE student SET slogan = #{param2} WHERE ID = #{param1}
</update>
SutdentService 与 StudentServiceImpl
public interface StudentService {
   List<Student> getStudentList();
    int addStudent(Student student);
    int updateSloganById(Integer id,String slogan);
}
@Service
public class StudentServiceImpl implements StudentService {
       @Resource
    private StudentMapper studentMapper;
    @Override
    public List<Student> getStudentList() {
              return studentMapper.getStudentList();
    }

       @Override
    public int addStudent(Student student) {
              return studentMapper.addStudent(student);
    }

       @Override
    public int updateSloganById(Integer id, String slogan) {
              return studentMapper.updateSloganById(id,slogan);
    }
}
StudentController:
@ResponseBody
@RequestMapping(value = "/{id}/{slogan}",method = RequestMethod.PUT)
public Result<Integer> updateSlogan(@PathVariable Integer id,@PathVariable String slogan){
    int row = studentService.updateSloganById(id,slogan);
    Result<Integer> result = new Result<>();
    result.code=200;
    if(row>0){
       result.message="更新成功";
        result.data=id;
    }
       else{
       result.message="更新失败";
    }
       return result;

}
发起请求,接口返回数据正常:
后台打印执行的 sql 语句

删除学生信息接口:DELETE /JnshuTask2/student/{id}
StudentMapper 与 StudentMapper.xml
@Repository
public interface StudentMapper {
    List<Student> getStudentList();
    int addStudent(Student student);
    int updateSloganById(Integer id,String slogan);
    int deleteStudentById(Integer id);
}
<delete id="deleteStudentById" parameterType="long">
    DELETE FROM student WHERE  id = #{id}
</delete>
SutdentService 与 StudentServiceImpl
public interface StudentService {
    List<Student> getStudentList();
    int addStudent(Student student);
    int updateSloganById(Integer id,String slogan);
    int deleteStudentById(Integer id);
}
@Service
public class StudentServiceImpl implements StudentService {
    @Resource
    private StudentMapper studentMapper;
    @Override
    public List<Student> getStudentList() {
              return studentMapper.getStudentList();
    }

       @Override
    public int addStudent(Student student) {
              return studentMapper.addStudent(student);
    }

       @Override
    public int updateSloganById(Integer id, String slogan) {
              return studentMapper.updateSloganById(id,slogan);
    }

       @Override
    public int deleteStudentById(Integer id) {
              return studentMapper.deleteStudentById(id);
    }
}
StudentController:
@ResponseBody
@RequestMapping(value = "/{id}",method = RequestMethod.DELETE)
public Result<Integer> deleteStudentInfo(@PathVariable Integer id){
       int row = studentService.deleteStudentById(id);
    Result<Integer> result = new Result<>();
    result.code=200;
    if(row>0){
       result.message="删除成功";
        result.data=id;
    }
       else{
       result.message="删除失败";
    }
       return result;

}
Postman 对该接口进行测试:

控制台打印执行的 sql 语句:

明天计划的事情:
1、接口参数校验
2、SpringMVC 对异常的处理
遇到的问题:
暂无
收获:
SSM 整合流程及RESTful 风格接口的具体实现


评论